![]()
CGM Direct Scanning provides the ability to scan documents and images directly within CGM webPRACTICE, when using Google Chrome or Microsoft Edge (not Edge in IE Mode). This functionality has been incorporated into the already existing Attach Image Action Column button throughout the system. If you would like more information, contact CGM Sales.
Installation Process
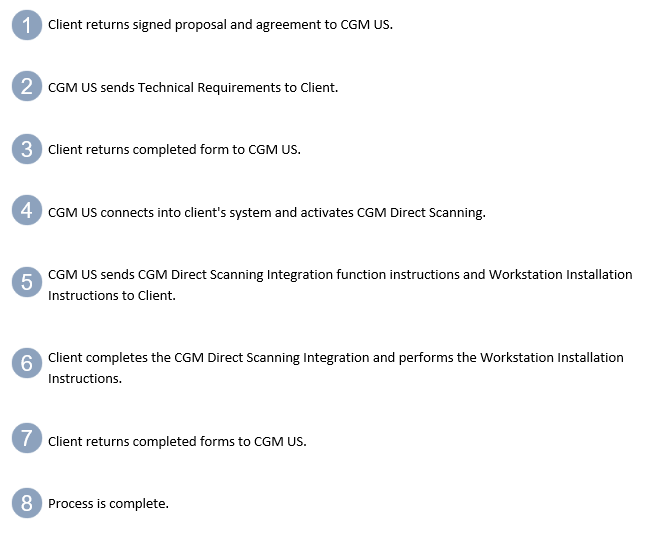
After CGM Direct Scanning has been activated in your system, the CGM Direct Scanning Integration and Workstation Installation Instructions have been completed, a new Attach Image window will display that includes a Scan button in addition to the standard Attach button. The file types that can be attached within this function are the same types that can be attached with the regular Attach function - png, gif, bmp, and jpeg. After you scan an image, there are multiple options available to edit the image if needed, such as rotate, crop, cut, etc.
For detailed instructions, see Scan and Attach Instructions.
Functions in the system with the Attach Image Action Column button:
Patient > Change Patient Data
Patient > Registration
Reports > Data Management System > DMS Letter Processor > Maintain Letters (Insert Image)
System > Form Wizards > Superbill Wizard > Insert Image
Transactions > Transaction Batch Control > Create a Batch
Transactions > Transaction Batch Control > Edit a Batch
Transactions > Payment Entry Function
Copyright and Trademark Notice. Copyright © 2019 CompuGroup Medical, Inc. CGM®, CompuGroup Medical® and the CGM logo are registered trademarks and CGM webPRACTICE™ and CGM webTOOLS™ are trademarks of CompuGroup Medical AG in the United States and/or other countries. Any rights not expressly granted herein are reserved.
