| Prompt | Response | Req | Len |
|---|---|---|---|
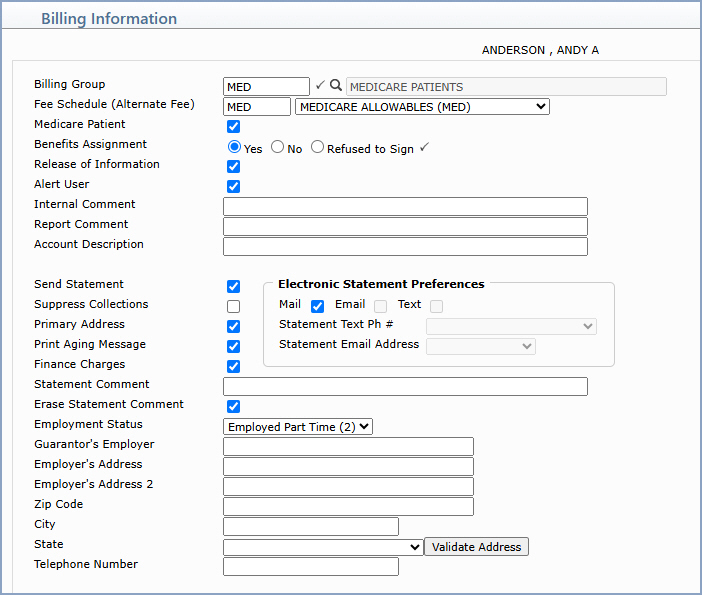
| Billing Group | Type the code you want or click the magnifying glass to search the table. If the Billing Type for your database is set up as 'Family' or 'Linking' and you change the Billing Group for any of the family members, you will be given the option to update the Billing Group on any or all of the other family members. |
 |
3 |
| Fee Schedule (Alternate Fee) | Type the fee schedule code you want or select from the Fee Schedule list. This is required if you store any Alternate Fees in this Fee Schedule. The only way the Alternate Fees will default in the Chg Amt field in the Procedure Entry Function is if the Fee Schedule is entered here. |
5 | |
| Medicare Patient | If this patient has Medicare, select this check box. This field is used to determine the proper 'accept assignment' setting when posting procedures. For more information, see the Accept Assignment Protocol help section under Introduction, System Processes. | 1 | |
| Benefits Assignment | If you have the patient's signature on file, select this radio button. If this radio button is selected, 'Signature on File' prints in Box 12 and 13 of the CMS-1500 form (and its electronic equivalent). | |
1 |
| Release of Information | If you have the patient's signature on file to authorize the release of medical information to other organizations, select this check box. | 1 | |
| Alert User | If you want the Internal Comment to appear every time this patient's account is accessed, select this check box. If a DMS Alert, HIPAA, or Family Income record containing a Review Date exists on the patient account, the Alert User field will be overridden and the Alerts window will automatically appear each time the patient's account is accessed. |
1 | |
| Internal Comment | Type any comment text you want to display whenever this patient's account is accessed using Patient Look-up. | 45 | |
| Report Comment | Type any comment text you want to print whenever this patient's account is printed on a report. | 45 | |
| Account Description | Type an additional account description, if applicable. | 45 | |
| Send Statement | If you want this patient to receive a statement, select this check box. | 1 | |
| Electronic Statement Preferences | Save the patient's preferences for receiving electronic statements. Mail, Email, Text - Select the patient's preferred method or methods of receiving statements. Statement Text Ph # - The phone number to be used when statements are sent via text message. Statement Email Address - The e-mail address to be used when statements are sent via email. Only the options enabled in the Electronic Pt Stmts Integration are available to be selected on this screen. Contact your account representative to sign up for the Email and Text options. |
||
| Suppress Collections | If you want to suppress this patient account from entering the collection process, select this check box. | 1 | |
| Primary Address | If you want to use the guarantor's primary address for all correspondence, select this check box. | 1 | |
| Print Aging Message | If you want to print aging messages on this patient's statement, select this check box. | 1 | |
| Finance Charges | If you want finance charges to generate for this account, select this check box. If you select this check box, it can still be overridden by selecting the Suppress Finance Charges check box in the Billing Group Code Table for the patient's Billing Group. The Service Charge Control File (System, Database Maintenance Menu) must also be completed for finance charges to be added to the account. |
1 | |
| Statement Comment | Type any comment text you want to appear on this patient's statement. | 45 | |
| Erase Statement Comment | If you want to erase the statement comment after it has printed, select this check box. | 1 | |
| Employment Status | Select the patient's employment status from the Employment Status List. | 1 | |
| Guarantor's Employer | Type the guarantor's employer. | 30 | |
| Employer's Address | Type the guarantor's employer's address. | 30 | |
| Employer's Address 2 | Type the guarantor's employer's address 2. | 30 | |
| Zip Code | Type the zip for the guarantor's employer's address. | 30 | |
| City | The guarantor's employer's city automatically populates based on the Zip Code entered, or you can type the name of the city. | 20 | |
| State | The guarantor's employer's state automatically populates based on the Zip Code entered, or you can type the state code or select from the drop-down list. Click Validate Address to convert the address entered into the standard United States Postal Service format. The Address Line One will be converted; the information in Address Line Two (if standard) moves up to the end of Address Line One; the Zip Code is converted to Zip+4 and the City and State are converted based on the Zip Code. If a standard match cannot be found, messages display to explain. You can still choose to override what is converted by Validate Address by typing in any address information you choose. |
3 | |
| Telephone Number | Type the telephone number of the guarantor's employer. | 20 |
Copyright and Trademark Notice. Copyright © 2019 CompuGroup Medical, Inc. CGM®, CompuGroup Medical® and the CGM logo are registered trademarks and CGM webPRACTICE™ and CGM webTOOLS™ are trademarks of CompuGroup Medical AG in the United States and/or other countries. Any rights not expressly granted herein are reserved.