7.2.0 Update Release Notes 08-25-06
Steps to be Performed Prior to Installing the Update
- You will be required to install the .NET Framework 2.0 Windows Update on the NetPracticePM Server and every workstation. This is required to activate every 'Acquire Image' function and to 'Print' from within NetPracticePM. After you have installed the .NET Framework 2.0 Windows Update, you will also need to configure Internet Information Services on the NetPracticePM server to use ASP.NET version 2.0. If you require assistance, you will need to contact your IT Department/Hardware Vendor.
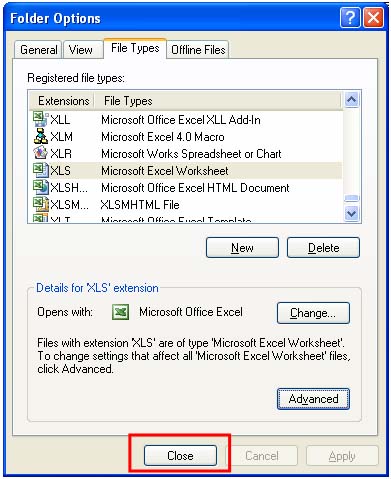
- You will need to modify the Windows Explorer Settings on the server and every workstation that has Microsoft Word and Excel loaded. These setting changes are required so that any reports or documents you want to print to Microsoft Word or Excel via MyReports will be able to open directly into the specified application. Detailed instructions are provided at the end of these release notes.
- You will need to confirm your NetPracticePM server has the latest Service Pack - Version 7.1.18 installed.
- If you plan on using the enhanced printing functionality in NetPracticePM (see the entry for Enhanced Printing Functionality under the System Conventions section), you will need to install a Printing Services program on your NetPracticePM server. This program is not required to be performed prior to installing the 7.2 Update but we have included a notification in this section since you may require the assistance of your IT Department/Hardware Vendor.
List of Updates and Enhancements
NetPracticePM and Text Systems
System Conventions
- New 7.2 Launch Page - Contains information relating to the various NetPracticePM products and also icons for launching NetPracticePM, CompuGroup Medical Web site, and Configuring Internet Explorer.
- The programs for scanning images in NetPracticePM have been enhanced and converted to a .NET Framework application. This change will require you to install the Windows update for Microsoft's .NET 2.0 Framework on every workstation and the NetPracticePM server. With this enhancement, you can now Attach additional types of images when using any 'Acquire and Attach' function throughout NetPracticePM. Instead of being restricted to only .jpg images, you can now attach bitmap (.bmp) and Gif images (.gif).
- Enhanced Printing Functionality - **NetPracticePM Self Hosted Systems only** - Every printer installed in Windows on the NetPracticePM server will be automatically defined and setup in NetPracticePM. When you print reports and select a NetPracticePM defined printer, if the printer driver offers them, additional settings will be available in the 'Printers Selection' dialog box. For example, Printer Tray selection, Duplex printing options, Number of Copies, Page Orientation, and a Collate option (orientation and collate are available only on 'Active' reports). With this new functionality you can also print documents created with the DMS Rich Text Editor (RTE) or Superbills created in the Superbill Wizard directly to a NetPracticePM defined printer and have access to the additional settings and no longer be limited to only using Print Here. NOTE: Prior to using this enhanced functionality, you will be required to install a Printing Services program on your NetPracticePM server. Complete instructions for downloading and installing the printing services program can be accessed from within the KnowledgeTree located on our Online Support Center (OSC). To access the document, click Support in the NetPracticePM Desktop Tools column on the NetPracticePM Desktop. When the OSC Welcome page is displayed, click KnowledgeTree and then click View KnowledgeTree. After the KnowledgeTree folders are displayed, click Implementation, NetPracticePM, Self Hosting and then click Installing Enhanced Printer Support for NetPracticePM 7.2. If you require assistance installing the program, you will need to contact your IT Department/Hardware Vendor. NOTE: this functionality is not available for ASP Subscription systems at this time. For information about activating the Windows printers in NetPracticePM and inactivating the printers that were previously defined in Cache manually (Legacy printers), see the entry for Printer Maintenance under the
System section.
- Printing - **NetPracticePM only** - A new printer called MyReports has been added to NetPracticePM. You can select the MyReports printer from any Printers selection window when you print various reports. The MyReports printer supports; standard reports, Active reports, and reports printed to Word or Excel. For additional information on MyReports, see the entry for MyReports under the Reports section.
- Printing Reports - Every DMS Print from List field in the various report printing functions will now provide a drop-down list box to display the DMS Lists available in your NetPracticePM system, rather than requiring you to type in the actual name of the list.
- QuikLinks - QuikLinks are available throughout NetPracticePM after selecting a patient account within a function. The QuikLinks icon will always appear in the lower-left section of each screen providing access to the following functions for the selected patient; Change/Review Patient Information, Transaction History, Appointment Inquiry, Schedule Appointment, Account DMS Notes, and DMS Records. Each QuikLink will open up a single function session of NetPracticePM to perform the selected function. These new QuikLink sessions were designed to only work for the patient account currently 'selected' but if you click on any of the QuikLink functions that first display Patient Lookup, you can select another patient. We DO NOT recommend you access multiple patient accounts within one QuikLink session.
- NetPracticePM Login Window - The Login window has been changed to automatically close after five minutes of inactivity. This will prevent sessions from being used unnecessarily when they are inactive. The 'Improper Logout' warning will also display if you click the 'X' in the upper-right corner instead of Logout.
- Patient Lookup - This function has been enhanced when you search for a patient by a phone number. When you type in a phone number, NetPracticePM will check the patient's Home Phone, Cell Phone, Work Phone, and the Guarantor's Phone number fields for any matches. Another change was made to the Last Name field that let's you type a comma after the patient's last name, instead of pressing TAB, to immediately make the First Name field active.
- Entering Dates for Date Boxes - The date entry utility has been modified to behave differently if there is no default date displayed. Up until now you had to enter the entire six or eight digit date if no default date was displayed. Now you may enter only one or two digits for the day or three or four digits for the month and day. The digits that default for the remaining un-typed digits will be pulled from today's date.
User Desktop
- Practice Vitals Dashboard - The Days in A/R field has been activated. This figure represents the average number of days it takes from the service date of the charge, to the date the charge is paid in full and is no longer part of the outstanding A/R. The calculation is based on a quarterly basis using a fixed '90' days. The calculation takes the Total Gross Accounts Receivable divided by the result of the (total charges for the quarter divided by total number of days in the quarter). This figure is calculated based on the total for the practice, not individual doctors or locations.
- Support - The Online Support Center (OSC) Web site has been re-designed to provide easier navigation and enhanced functionality. The new and enhanced functions include:
- Support Home Page - Now contains a 'What's New' section, access to the Message Center, and highlights for the various NetPracticePM products available.
- Administration - Any NetPracticePM user code that has been selected as a Support Site Administrator will have access to the Administration function. Using this function, Administrators can maintain each user's access to the various functions on the OSC and view a User Activity log.
- Downloads - This various files available for downloading have been consolidated into this function. You can download: confirmation reports, remits, RVU files, ICD9 codes, CPT codes, Fee Schedules, and the Adobe Acrobat Reader.
- Call Center - You can Open a call, Review open calls and Contact your Customer Service Team.
- KnowledgeTree - Provides easy access to share numerous documents and records with clients. The information relates to products, implementation, setup processes, training, and troubleshooting for NetPracticePM.
- Updates - Provides a complete listing of the Service Pack and Updates release dates along with the corresponding release notes.
- Help - You can use the new 'Add Notes' function to enter practice specific notes for each NetPracticePM function and store them directly in Help. Access to this function is controlled within each user code through the User code table. For additional information, see the Maintain Users entry under the System section.
- E-Mail Copy function - An Outbox has been added, which you can use to access all outstanding e-mails that contain a future 'send date' for a user. This function was designed for situations when an employee is terminated or has resigned and they have e-mails pended for future dates. The Administrator can reset the user's password, logon and process all the e-mails in that user's Outbox.
- Rollodex - The Specialty for Referring Doctors and the E-mail address, Auth Required, Electronic ID, and Comments for Insurance Carriers will now display. The Pharmacy and Employer Table entries have been added to the Rollodex too.
- Rollodex - Desktop Configuration - If the Rollodex is selected to display on the desktop, the 'Search' label has been changed to 'Look-up' to make it consistent with the regular Rollodex functionality, since this function only looks at the actual Rollodex card name.
- Tasks - Patient accounts can be selected when adding Tasks.
Billing
- Move/Re-Build Transmission File (Billing, Insurance Billing Functions, Electronic Claims) - Some insurance carriers are requiring a full middle name instead of just the middle initial. To accomplish this, you can enter both the first and middle name in the First Name field and leave the Middle Initial field blank.
- Send Statements to CGM - When you discard a patient statement from the electronic statement file, the last statement date on the patient's account will be changed back to reflect the last date a statement was generated.
- Electronic DMERC Claims (Billing, Insurance Billing Functions, Electronic Claims) - DMERC Region C claims can now be sent electronically. For information on the enrollment and setup process, contact the EDI Department at CGM.
- Transfer Journal to Current File (Billing, Insurance Billing Functions, Electronic Claims, File Maintenance) - This function has been enhanced so you can now select to move a transmission file for all doctors or only one Doctor. Also, when you move an electronic file from the journal to the current transmission file or from journal to paper, an entry will be made to the insurance ledger for each patient account in the file. The new insurance ledger entries will display 'Moved from ECS Journal' or 'Moved from ECS Journal to Paper'.
- Move/Re-Build Transmission File (Billing, Insurance Billing Functions, Electronic Claims) - A problem relating to the Date of Last Service information missing was corrected. This problem occurred when certain electronic claims were split based on the date of service.
- Move/Re-Build Transmission File (Billing, Insurance Billing Functions, Electronic Claims) - In certain situations when a Case was tied to an electronic claim the date of illness information was missing for the claim. This has been corrected.
- Print Transferred Balances (Billing, Insurance Billing Functions, Delinquent Insurance Menu) - A new Billing Group field has been added to this report. An error was also corrected that was preventing this report from printing.
Collections
- Turn Over History Report (Collections, Turn Over Functions) - This report has been updated and you can now generate Manual DMS Lists based on the patients contained in the report by adding the report to the DMS Report Integration function located on the System, Database Maintenance Menu.
- Review for Turn Over Report and Third Party Turn Over Report (Collections, Turn Over Functions) - You can print these reports by Responsible Doctor now and they have both been enhanced to print to Excel.
- Review for Turn Over Report (Collections, Turn Over Functions) - When you print this report and select 'Print Detail of Patients', the patient's Last Statement Date has been added to the report.
- Non-Delinquent Payment Plan - This is a new function that you can use to set up a payment plan for a patient account that does not have a delinquent balance. This function was designed to operate in the same manner as the payment plans used for delinquent accounts during the Collection process and has been integrated to work within the Collection module. Prior to using this function, you must create two new Collection Status codes for Non-Delinquent Payment Plan and Non-Delinquent Payment Plan Failed and add them to the Collection Integration Options. This function will not allow you to select any patient account that is already delinquent and is currently in the collection processing cycle or a patient account that is in a billing group that has collections suppressed. To process the patient accounts after you have added payment plans, you should follow the 'Standard Steps for the Collections Processing Cycle'. These steps are located in NetPracticePM Help on the main page for Collections.
- Print Payment Plan Report - This report provides a listing of the patient accounts that are currently in a collection payment plan and currently tied to the Collection Payment Plan status code. It provides a detailed listing reflecting patient account number, patient name, the plan start date, the next payment due date, the next payment amount due, the last payment date, the last payment amount, the number of days to pay before the patient fails the payment plan, and the default collection status the patient will migrate to if they fail to make the specified payment for the payment plan. You have the option to sort the report alphabetically by patient name or numerically by patient account number. You can also indicate the range of patient accounts to be printed.
Managed Care
- Print Outstanding Referrals by Referral Source (Managed Care, Referral Tracking Menu) - This report name was changed from Print Outstanding Referrals to Print Outstanding Referrals by Referral Source, since a new function has been added so this function can also be run by Requesting Dr.
- Print Outstanding Referrals by Requesting Dr (Managed Care, Referral Tracking Menu) - This report has been added so you can print outstanding referrals sorted by the requesting doctor.
- Expected Co-pay Report (Managed Care, Management Reports) - This new report allows you to compare, on a patient-by-patient basis, the amount of the expected co-pay, the actual co-pay amount collected, and the percentage of the co-pay collected. This report will only list line items when a co-payment was collected and it will not include co-payments that were left unapplied. You can print this report for a range of dates - the date refers to the accounting date the co-payment was posted.
Patient
- Patient Name and Address (Patient Registration) - The Patient and Guarantor Last Name fields were extended to allow twenty-five characters.
- Insurance Policy Information (Patient Registration) - When a Secondary policy is added to a patient account the Bill this Carrier option will automatically be set to E (for electronic crossover), if the Secondary Insurance Carrier code has a Medigap number entered in the Insurance Carrier table and ONLY if the Primary carrier on the patient's account is Medicare. NetPracticePM checks to see if the primary carrier is a Medicare carrier by checking the insurance carrier codes entered for the Medicare carrier in the NetPracticePM Integration Options. Note: the default for the Primary Carrier field must be set to Yes, (meaning the check box must be selected) otherwise this functionality will not work.
- Insurance Policy Information (Patient Registration) - A new Comment field has been added to the insurance policy information screen. This field accepts free text and is strictly informational. It does not populate into any other function or print anywhere.
- Insurance Policy Information (Change Patient Data) - If your practice has subscribed to NetVerify, the Verify Eligibility and Eligibility History buttons in the Action Column have been moved below the Acquire Back Img button.
- Case Management Information (Change Patient Data and Review Patient Information)- The Date of First PCP Visit and Comment fields have been added to the case information. The comment field accepts free text and is strictly informational. It does not populate into any other function or print anywhere.
- Patient Summary Screen (Change Patient Data and Review Patient Information) - The following have been added or modified:
- The individual balances for Patient, Insurance, and Total Balance now display in the Guarantor quadrant.
- The Primary Care Physician has also been added to the Patient information quadrant.
- Up to seven cases will display in the Case Management quadrant.
- When you hover the pointer over the Primary or Secondary Insurance carrier quadrants, detailed insurance carrier information will display in a pop-up window.
- Account Summary Screen (Patient, Review Patient Information, Summary) - The account summary screen now displays the Last Co-pay Date, and the Last Co-pay Amount.
- Transaction History (Patient, Review Patient Information) - A Billing Group column (BG) has been added for the following views: A - All Transactions, I - Insurance Format, C - Charges only, and P - Payments only. The purpose of this column is to display the billing group code stored for the transaction when it was originally posted. The code is based on the billing group the patient was assigned to at the time the transaction was posted.
- Transaction History (Patient, Review Patient Information) - An EOB image icon has been added to the transaction history screen that you can use to view an auto-generated copy of the EOB from the primary carrier. This EOB is generated at the time you click on the image icon. The information used to generate this EOB is based solely on how the payment from the primary carrier was posted and the values that were entered for the allowed amount and the adjustment amount. Note: if a payment already has a EOB image that was scanned and attached to it, the scanned image will override the auto-generated version.
- Transaction History (Patient, Review Patient Information) - If you select a specific date of service date range and then select Print in the Action Column, a statement will print only the dates of services you selected. If no dates of service are selected, then you will be required to select the beginning and ending accounting dates to print.
- Transaction History Detail (Patient, Review Patient Information)- The Department Code has been added to the screen when you click on a charge to review the Transaction History Detail. When a Take Home Supply is filed or refiled to the DMERC insurance carrier, the insurance ledger will now reflect DMERC has been filed/refiled.
- Transaction History (Patient, Review Patient Information) - A new Actions column and list box has been added to the Transaction History screen. You can select one or more transactions and then select the appropriate action from the list. A warning will be displayed if you attempt to invoke one of these actions without the required security level. Currently the available actions are:
- Refile - when refiling a charge, the effective and termination dates of the insurance policy will be checked prior to refiling the charge. The charge will automatically be put into the electronic file if it is an electronic carrier.
- Edit a Charge - you are only allowed to edit charge transactions. Whatever change is made will be applied to all the transactions you have selected.
- Billing Group - you can use this function to correct the billing group that transactions are stored under in the statistical files. The billing group is stored through Procedure Entry when the transactions are originally posted. This function can be performed for one or more transactions at a time and the internal audit trails will automatically be updated. To update your statistical files, you must reset your statistical files. An example when you could use this function: if you printed a payment analysis report sorted by billing group and discovered some of the payments were listed in the incorrect billing group; you could edit the billing group for those transactions, reset the statistical files, and re-print the reports.
- Reverse - You may only select a single transaction when using the reverse action.
- Alerts (Patient, Change Patient Data, DMS) - You can select one or more of the following check boxes to limit the Alert message to display in a particular function(s) when a patient is selected: Patient, Schedule, Transactions, Billing, Collections, Managed Care, Rx Management, System and All Functions. You can select more than one check box or you can select the 'All Functions' check box to display the Alert in all functions.
- Notes (Patient, Review Patient Information, DMS)- A column has been added to the DMS Notes summary screen showing the last activity for each note, whether it was 'added' or 'changed', the user name of the person that performed the action and the date it was performed.
- Family Income (INC) (Patient, Change Patient Data, DMS) - The Family Income Percentage will display the appropriate percentage amount when there are different entries for different dates.
- All DMS Records (Patient, Review Patient Information, DMS) - A new journal has been created to record every change made to the various DMS records. Currently, this journal can only be accessed by the programming staff at CGM but is anticipated to be released to clients in the next update. This journal will store all the user names that Add, Change, or Delete DMS records within NetPracticePM. It will also show a 'before' and 'after' view of the changes made, as well as a date and time of the change.
- CPTDX DMS Record (Patient, Change Patient Data, DMS) - This new DMS Record is used in conjunction with the new Quick-Post function. It contains fields for you to type in the codes you want to automatically default for the Procedure, Procedure Group, and Diagnosis codes.
- Radiology, XRAY, and RX Notes Records (Patient, Change Patient Data, DMS) - New DMS records are available to enter free text notes specifically for Radiology, XRAY, or RX Notes. If you want to have access to these new record types, you will need to contact your Customer Service team to have them installed.
- NetReminder (Patient, Change Patient Data, DMS) - If your practice has subscribed to use NetReminder, a new NetReminder DMS record will be installed. You can select the Disable for NetReminder check box to indicate a patient should not be called by NetReminder.
- Add a Patient Referral (Patient, Patient Referral Menu) - The Internal Comment and Report Comment from the Patient Referral information will now carry over when the referral patient is selected to be registered in Patient Registration.
- Patient Hospital Rounds - This function has been enhanced and allows you to display the hospital rounds by Doctor or Location. You can print the list of patients or admit a patient directly within this function. This function is also available from the Reports, Patient Listings menu.
- Print Recall Cards/Letters and Print Recall Labels (Patient, Patient Recall Menu) - A new Print for Location field has been added for both of these functions.
- Patient Listings - A new Print from List field has been added to every patient listing report, which you can use to print the report using a pre-defined DMS list.
Reports
- MyReports - You now have the ability to print reports to the MyReports function. Features:
- Prevents time-outs on long reports
- Produces reports in the background and does not tie up your NetPracticePM session
- You can request NetPracticePM to notify you when the report is complete in the Printer selection window
- Reports are saved by User Code
- An Archive is maintained for reprinting reports
- Supports Standard, Active, and Microsoft Word and Excel reports
- You can forward a report to another user or group of users electronically
- Note: Any Microsoft Word Mail Merge documents cannot be printed through MyReports. You should only print those directly to Word. For example, Word Superbills, Word Collection Letters and any other Mail Merge Word document.
- Active Reports (Reports, MyReports) - Provides Summary view, drill-down functionality (you can expand and collapse data); supports color and you can collate or select the page orientation printing attributes. Note: If you click Print in the Action Column after accessing an Active Report in MyReports and select the Print Here printer, it will immediately display the Printers selection dialog box listing your local workstation printers.
- Sorted Aged Receivables and Delinquent Accounts Receivable Reports (Reports, Aged Accounts Receivable Reports) - These reports can be printed to MyReports as 'Active reports'. For detailed information about Active Reports, see the entry above for Active Reports.
- Statistical Reports (Productivity Analysis Reports, Sorted Productivity Analysis Reports, Payment Analysis Reports, Adjustment Analysis Reports, and Summary Analysis Reports) - New menu functions have been added to print by Department Code and Case type. Note: these sorting options are not available for Procedure Analysis, Diagnosis Analysis, or Collection Analysis reports.
- Statistical Reports (Detailed Procedure Analysis, Sorted Procedure Analysis, Comparative Payment Analysis, and Detailed Diagnosis Analysis) - These reports have been updated to print to Excel.
- Sorted Procedure Analysis Reports by Doctor and Sorted Procedure Analysis Reports by Location (Reports, Statistical Reports, Detailed Procedure Analysis, Sorted Procedure Analysis Reports) - A new function has been added to sort by Date of Service.
- Comparative Analysis by Corporation (Reports, Statistical Reports, Productivity Analysis Reports, Comparative Productivity Reports) - This report was added to allow you to print the Comparative Productivity Analysis Report for the entire practice for a single database.
- Corporate Batch Report (Reports, Corporate Reports) - This report has been added to the corporate reports menu allowing you to print one report for multiple databases. If your practice uses the same batch numbers for multiple databases, this report provides subtotals for each database that will print under each batch number listed. For information on the contents of the Batch report, see the entry for Transactions, Batch Control Menu, Batch Report in NetPracticePM Help.
- Corporate Daily Register (Reports, Corporate Reports) - This report has been added to the corporate reports menu allowing you to print one report for multiple databases. This report only provides 'Summary' data for each database and provides the standard sorting options to print in: date order, doctor order, location order, or user order.
- NetVerify Usage Report (Reports, Insurance Related Reports, NetVerify Reports) - If your practice has NetVerify installed, you can print this report to determine the quantity of NetVerify requests performed by patient and view the detail of each request.
- Aged Accounts Receivable Reports and Delinquent Accounts Receivable Reports - These Reports (excluding the Summary Aged A/R) now include a percentage amount at the total lines.
- Sorted Summary Aged A/R Reports (Reports, Aged Accounts Receivable Reports, Summary Aged A/R) - These reports were added allowing you to print double sorted versions of the Summary Aged A/R Reports.
- Aged Accounts Receivable for Insurance (Reports, Insurance Related Reports) - A new field to Suppress Pends has been added. By selecting to Suppress Pends, any claims that have been pended will NOT be included on the report. A new Print from List field has also been added, which you can use to print the report using a pre-defined DMS list.
- Insurance Never Filed (Reports, Insurance Related Reports) - A new BAT column has been added to this report, which indicates; whether or not the batch has been locked for this particular procedure. This report is also available on the (Billing, Insurance Billing Functions, Insurance Management Reports) menu.
- Insurance Denials by Denial Reason (Reports, Insurance Related Reports, Insurance Denial Reports) - A new function has been added to print the report sorted by the Denial Reason. The Begin with and End with Denial Reason fields accept 'free text' entries, so you may receive multiple results for the same type of denial reason. This is dependant upon whether you select codes from your Denial Reason Table or if you type in the actual denial reason when posting payments. For information on printing reports for a range of data, see Selecting Ranges for Reports in NetPracticePM Help in the Introduction, Printing in NetPracticePM section.
- Add or Change a Letter (Reports, Data Management System) - New fields have been added to the Data Elements table. In the Appointments folder you now have ApptCheckIn and ApptCheckOut. In the Diagnosis folder you now have LastDiagnosisCode, which will display the code of the last diagnosis used. This element should not be confused with the LastDiagnosisUsed data element, which will display the description of the last diagnosis used.
- Add or Change a Letter (Reports, Data Management System) - A Recall Letters folder has been added containing data elements to be used when generating DMS Rich Text Recall letters. When you print recall letters using the Print Recall Cards/Letters function, the patient specific recall information will be inserted. The Recall Letters data elements should not be confused with the data elements located in the Recalls folder. Those data elements are available for processing DMS Lists. For example, if you need to generate a list of every patient that has ever had a recall for a colonoscopy. When NetPracticePM processes DMS Lists, it has to search through every recall record ever entered on all the patient accounts, whereas when DMS Letters are printed NetPracticePM has to search for information for one specific recall record. NOTE: If you currently have a DMS Rich Text Recall Letter setup you will need to edit the document and use these new Data Elements.
Schedule
- Enter Patient Appointments - You can now select the appointment time slot prior to selecting the patient account when scheduling a patient appointment.
- Enter Patient Appointments - If you have colors assigned to your Type of Visit codes and schedule an appointment for multiple units, the schedule has been corrected to display the color for each time slot containing a unit.
- Enter Patient Appointments - The Language field will now display in the Patient Information box after you have selected a patient.
- Enter Patient Appointments - The Case screen that is normally displayed when you Select a Patient has been deleted and a new Case field has been added to the appointment information screen. By adding the Case field, you can now add or change the case attached to an existing appointment.
- Enter Patient Appointments - A Pend Reason field has been added to the appointment entry screen, which you can use to assign a pend reason code to an appointment indicating there are requirements or tasks that must be performed prior to the patient being seen in the practice. For example, 'verify op report received', 'must get special authorization', 'confirm lab results received' and 'need referral information'. This field is tied to the new Schedule Pend Codes Table and prior to using this function; you must create the codes using the Maintain Schedule Pend Codes function located in Schedule, Scheduling Table Maintenance, Schedule Pend Table. A new Scheduling Pend Report has been created that you can use to print a list of the appointments that have been pended. The report is located on the Scheduling Printing Menu.
- Enter Patient Appointments - After you have selected a patient account, the Billing Group and Referring Doctor will now display in the Patient information box. The Case has been removed from the Patient information box since the Case field has been added to the detailed appointment information.
- Enter Patient Appointments - ** If your practice uses Quick Registration You are now required to quick register new patients prior to selecting and entering appointments for patients. This functionality was modified so the program can check to see if the Social Security Number you entered has already been registered for another patient and prevent duplicate patient accounts from getting registered. It will also prevent staff members from canceling out of the function prior to actually Quick Registering the new patient.
- Enter Patient Appointments - When looking up a patient in Scheduling, if a first and last name were entered as search criteria, the first name would disappear on the results screen. This problem has been corrected.
- Print Scheduling Views (Schedule, Enter Patient Appointments) - The Type of Visit code will now print to the right of the patient name.
- Morning and Afternoon View (Schedule, Enter Patient Appointments) - If you select either of these views, the program has been enhanced to continue displaying the selected view as you work within the schedule. The display will revert back to Morning view automatically when you Cancel out of Scheduling and return to the menus.
- Appointment Details (Schedule, Enter Patient Appointments) - After you select a patient appointment in the schedule and click Details in the Action column, a new Status/Location History section has been added at the bottom of the screen. This section will list each status and location the patient was processed through in the Patient Check In/Out function. The Case Information displayed has also been expanded to include the case type and the description of the case.
- Select Patient (Schedule, Enter Patient Appointments) - You can now type in dashes when you type in social security numbers, dates of birth, or phone numbers.
- Make Default View (Schedule, Enter Patient Appointments) - This function has been enhanced to take into account any scheduling Group selected and store that in the Default View too.
- Wait List Summary Screen (Schedule, Enter Patient Appointments) - A Phone column has been added to this screen, which will display the patient's telephone number.
- Print Wait List (Schedule, Enter Patient Appointments) - The patient's telephone number has been added to this report. The telephone number will be retrieved from the appointment information if one has been entered, otherwise it will print the telephone number stored on the patient's account.
- Patient Check In/Out Summary Screen - A new Filter function has been added to the Action Column, which replaces the Change Date and Change Location functions. When you access Patient Check In/Out directly from the main scheduling window within Enter Patients Appointments, the Doctor, Location, and Date selected in the main scheduling window will automatically override the values contained in the Filter. A Procedures column has also been added, which will indicate if the patient has had unposted procedures entered for that visit.
- Patient Check In/Out Summary Screen - If your practice has subscribed to NetVerify, when you select a patient an Alert message will appear if the last insurance verification for this patient failed.
- Patient Check In/Out Detailed Screen - The following informational only fields were added to this screen:
- Billing Group - Lists the billing group currently stored on the patient's account.
- Case - Lists the case that was selected for the appointment.
- Insurance Balance - Lists the current insurance balance owing on the patient's account.
- Patient Balance - Lists the current patient balance owing on the patient's account.
- Last Verified On and Last Verified By - Displays the last time the primary insurance was verified. These fields will only contain data if your practice has subscribed to NetVerify.
- Patient Deductible - Lists the deductible amount stored in the patient's primary insurance policy.
- Patient Check In/Out Detailed Screen - The following functions have been added to the Action Column:
- - Add A Task - You can add a task for the currently selected patient.
- - Co-pay Not Made - This function will make a notation that a co-payment was not made by this patient. When posting the subsequent charges for this patient, after you click Save, a message will pop up to inform you this patient did not make their co-payment for this date of service.
- - Print Superbill - You can print a superbill directly within Check In/Out.
- - Quick Post -This function is tied into the new Quick Post function available on the Transaction menus, which you can use to quickly post a single charge to the patient's account directly within Check In/Out. Quick Post will assume the performing doctor, insurance doctor, and location code based on who the appointment is scheduled with. If you exit the Check In/Out and go back in later, you will have to re-enter the batch number, if applicable. For more information on Quick Post see the entry in the Transactions section.
- - No-Show - You can mark the patient as a No Show immediately. If you have entered an adjustment code in the scheduling integration for No Shows, a No Show transaction will automatically be posted to the patient's account. The patient's appointment inquiry screen will also be updated, indicating this appointment was a No Show. If an appointment has been marked as a No Show, it will no longer appear on the Check In/Out Summary screen. The only way to un-do this action would be to delete the appointment and re-enter it.
- E-Superbill (Schedule, Patient Check In/Out Detailed Screen) - This function has been enhanced with the following changes:
- If an Authorization is entered in the appointment, an AUTH procedure will automatically be stored in the Unposted Procedures along with the other procedures entered in the E-Superbill function.
- A Claim Note function has been added to the Action Column. If you enter a Claim Note in the E-Superbill function, a NOTE procedure will automatically be stored in the Unposted Procedures along with the other procedures entered in the E-Superbill function.
- Procedure Groups can be selected on the fly in addition to individual procedure codes by selecting one of the check boxes under the Other Category in the Procedure section.
- Diagnosis codes can be selected on the fly by selecting one of the check boxes under the Other Category in the Diagnosis section.
- If you have to scroll up or down within the E-Superbill and then add either a procedure or diagnosis code on the fly, when the page refreshes you will be returned to the same position you originally scrolled to, after you have selected the code.
- Any procedure or diagnosis codes you select while entering the E-Superbill will be highlighted with a yellow background.
- Move Schedule Location (Schedule, Doctor Schedule Maintenance) - The Include AM Appointments and Include PM Appointments fields were added to this function to allow you select which appointments you want to move. If you are using Resources, this function cannot move the resources since it could result in rooms being overbooked and a message will display notifying you the schedule you have selected contains resources. You will have to manually move the resource appointments first to ensure all the resources are available at the new location.
- Move Schedule Doctor (Schedule, Doctor Schedule Maintenance) - This new function works like the Move Schedule Location but instead allows you to easily move a Doctor's schedule and all the appointments contained in it, from one Doctor code and one Location code to another Doctor code. This function also allows you to select which appointments you want to move.
- Edit Cancellation Journal (Schedule, Doctor Schedule Maintenance) - When you edit the Resched/Delete Reason in this journal, the reason listed in the Appointment Inquiry screen will also be updated.
- Scheduled Doctor Calendar (Schedule, Scheduling Printing Menu) - This function prints the schedule out in a calendar format. You can print it for a range of doctors and locations or an individual doctor or location. You can also select to print the scheduled times and patient count (the number of patients already scheduled for each day). If you select to print the patient count, it will list the number of appointments scheduled in the morning followed by the number of appointments scheduled in the afternoon. For example, if there are ten patients scheduled in the morning and five scheduled in the afternoon, '10/5' would print in the calendar box for that day. Any Doctor Codes that are set up as Resources are suppressed from printing on the calendar. This function has been available in text, but has been reformatted for NetPracticePM with more options available.
- Scheduling Audit Report (Schedule, Scheduling Printing Menu) - You can now print this report sorted by User Code.
- Scheduling Audit Report (Schedule, Scheduling Printing Menu) - This report has been enhanced to generate a DMS List. To activate this function you will need to add the report to the DMS Report Integration function located on the System, Database Maintenance Menu.
- Utilization Report (Schedule, Scheduling Printing Menu) - This new report provides you with statistics for how many time slots have been used and how many remain open in a schedule.
- Print Superbills (Schedule, Scheduling Printing Menu) - The ability to set a default location had to be disabled because it would prevent the next superbill number from automatically populating.
- Print Superbills (Schedule, Scheduling Printing Menu) - Word Superbills only - New Mail Merge fields have been added for AUTH Remaining and AUTH Used.
- Missing Charge Report (Schedule, Scheduling Printing Menu) - This report will compare your schedule for any given doctor, location, or date range and make sure that a corresponding charge for that date has been posted. It looks through both the unposted procedures and posted procedures to find a match. If it doesn't find a match, it will list the patient on the report and the last known status. If the patient is a No Show, and the confirm status was changed to 'No Show', this will also show on the report. This is a good addition to the Missing Superbill Report and can be used whether you print superbills or not. This report is also available on the Reports, Transaction Journals menu.
- Credit Manager Report (Schedule, Scheduling Printing Menu) - This report provides a list of patients that are scheduled for specific doctors, locations, and dates, including the following information: time of appointment, patient number, patient name, reason, patient and insurance balance with aging breakdown, guarantor name, date of last visit, home and cell phone number, date of birth, patient class, and billing group.
- Print Schedule Labels (Schedule, Scheduling Printing Menu) - The Scheduling data elements that are inserted into labels for printing will no longer reflect *ERROR*.
- Print the Type of Visit Table (Schedule, Scheduling Table Maintenance, Type of Visit Table) - When printing the Type of Visit table, the full color name is now printed instead of just the internal color code. If sorting the report by color, the report is now sorted by the color name instead of the internal color code.
System
- Superbill Wizard (System, Form Wizards) - This function has been enhanced with the following changes:
- Allows multiple instances of the same procedure code.
- Allows you to change the procedure code description.
- Allows blank items under categories.
- Allows custom sorting in addition to the Description and Code sorts already available
- E-mail Integration (System, Database Maintenance Menu) - A Use NetPracticePM E-mail Only field has been added. If selected, you can send e-mails through NetPracticePM and no longer be restricted to message lengths no longer than 400 characters.
- Collection Integration Options (System, Database Maintenance Menu) - The Non-Delinquent Payment Plan and Non-Delinquent Payment Plan Failed fields have been added. These fields are required for the new Non-Delinquent Payment Plan function.
- Search Integration (System, Database Maintenance Menu) - You can no longer select any multi-line data fields for any NetPracticePM function to display in the Search Results window. These fields had to be disabled to prevent errors. An example of a multi-line data field would be the Long Description field in the Diagnosis Code Table.
- Maintain Users (System, User Management) - A new Update Help Notes field has been added. You can select which users can access the new Add Notes function in Help See the entry for Help under the User Desktop section for additional information.
- Security programs enhanced (System, User Management, Function Security Menu) - If your security level is too low - the menu functions will no longer even show up.
- Maintain Image Types (System, Image Management) - Image types now require a Security Level. The update will set any existing image types that do not have a security level entered, to security level five.
- Printer Maintenance (System, System Operations Menu) - With this new function you can activate the NetPracticePM defined printers and inactivate the manually defined (Legacy) printers initially setup in Cache. If you have multiple databases setup in NetPracticePM you can also select which printers you want available for each database. NOTE: Prior to activating and using the NetPracticePM defined printers you will need to install a Printing Services program on your NetPracticePM server. For complete instructions, see the entry for Enhanced Printing Functionality under the System Conventions section.
- Change Database Parameters (System, Database Maintenance Menu) - A new Organizational NPI number field has been added. You should only enter the Organization NPI number in this field if your database in NetPracticePM is for one entity and only has one Tax ID Number. If you have multiple Tax ID Numbers within the database, then you should leave the field blank in the Change Database Parameters and enter the Organizational NPI in the Doctor Code Table. For additional information, see the Organizational NPI Number entry under the Tables section.
Tables
- Copy the Case Table (Tables, Case Management Table) - This function has been added, which you can use to copy the table from one database into another database.
- Update the Price List with RVU Values - With this new function you can update your procedure price list with the values calculated from your RVU schedule and conversion factors. Make sure you have the correct values entered prior to doing this.
- Maintain Procedure Codes (Tables, Procedure Code Table) - **Community Health Centers only** - A new Nominal Fee field has been added, which will override the Nominal Fee field in the Type of Service Table.
- Maintain Insurance Carrier Codes (Tables, Insurance Carrier Table) - A new E-Secondary field has been added to accommodate the insurance carriers that can receive secondary insurance claims electronically. Prior to this, it was only Medicare secondary carriers that could be sent electronically. Now by using the carrier code table, you can select the E-Secondary check box and the secondary claims for this payer will go electronically instead of on paper claims.
- Maintain Insurance Carrier Codes (Tables, Insurance Carrier Table) - A new Default Payment Code field has been added. This field is tied to Payment Entry and will automatically default the payment code after you enter the insurance carrier code.
- Department Code Table - You can now create codes for specific departments within your practice. These codes can then be used in Procedure Entry when posting charges, which will provide the ability to generate statistical reports sorted by Department Code. For information on the statistical reports that have been added to NetPracticePM, see the Statistical Reports entry under the Reports section. After you have created the Department codes, you can assign each doctor a Default Department Code using the Maintain Doctor Codes function. The default department is used for Procedure Entry, Quick Post, and for Cache Text applications.
- Maintain Doctor Codes (Tables, Doctor Code Table) - A new Default Department field has been added. The default department is used for Procedure Entry, Quick Post, and for Cache Text applications.
- Pharmacy Code Table and Employer Code Table - These tables are linked to the Rollodex so you can quickly look up codes.
- Maintain Doctor Codes (Tables, Doctor Code Table) - A new Organizational NPI (Org NPI) field has been added and the National Provider Number field that was added in service pack 7.1.14, has been changed to the Individual NPI (NPI Number) field. Both of these fields will be required on all electronic insurance claims. The Organizational NPI number is located in both the Change Database Parameters function and the Doctor Code Table. You should only enter the Organizational NPI in one of these functions depending on your NetPracticePM database setup. If you have multiple Tax ID Numbers within the database, then you should enter the Organizational NPI in the Doctor Code Table for each doctor code. If your database is for one entity and only has one Tax ID Number, then you should leave the field blank in the Doctor Code Table and enter the Organizational NPI number in the Change Database Parameters function. For additional information, see the Organizational NPI Number entry under the System section.
- Maintain Recall Type Codes (Tables, Recall Type Table) - The DMS Letter to Print field has been changed to a drop-down list box to display the DMS Letters available, rather than requiring you to type in the actual name of the letter.
Transactions
- Procedure Entry Function - If you type in a Superbill Number and the appointment to which it was attached had been Rescheduled or Cancelled, it will display that reason in the warning message instead of: Superbill Number has already been used.
- Procedure Entry Function - The Add a Case function has been added to the Action column. You can now add a new case for a patient without exiting procedure entry. After you have Saved the new case, the Case field on the Procedure Entry screen will be populated with the new value.
- Procedure Entry Function - A new Department Code field has been added. This field will automatically default to the department code entered in the doctor code table for the Performing Doctor but you can change it as needed. For detailed information about Department Codes, see the Department Code entry in the Tables section.
- Procedure Entry Function - Procedure Entry will now review the past 90 days when checking for duplicate charges. The previous limit was 30 days.
- Procedure Entry Function - If your practice has subscribed to NetCoder, it will Check Codes for single E and M codes if the Check on Save feature is selected in the NetCoder integration.
- Procedure Entry Function - Keyboard shortcuts have been added for all of the Action buttons on the Procedure Entry screen. Shortcuts have also been added to the Unposted Procedures screen that displays in Procedure Entry if the account has unposted procedures. The shortcut key combinations are: Store=Alt-R, History=ALT+H, Auth=ALT+A, Case=ALT+D, CheckCodes=ALT+K and NetCoder web site=ALT+W. These combinations will display when you slide the pointer over the function in the Action Column.
- Procedure Entry Function and Payment Entry Function - The summary screen that appears after posting a procedure or payment has been standardized so the same Action column functions are available, whether entering through Procedure Entry or Payment Entry. The History, Statement, and Letters functions were added to the Procedure Entry Summary screen and the Recall function was added to the Payment Entry Summary screen.
- Quick-Post - This function allows the users to quickly post same type charges quickly. An example would be flu shots or allergy injections. Quick Post only allows for a single procedure code or procedure grouping code and up to two diagnosis codes. You can enter a referring doctor and if a superbill has been printed, it will default the superbill number. Internally, the department code will automatically be posted with the default department code selected for the Performing Doctor code. Quick Post does allow for a batch number and will default the same batch number if Quick Post is used on multiple entries. There is also a new CPTDX DMS Record provided for the Quick-Post function. For additional information, see the CPTDX entry under the Patient section.
- Unposted Procedures - Multiple changes were made to the Summary screen:
- Added Department to screen.
- Add/Edit Filter - function added to the Action column.
- Remove Filter - function added to the Action column. It will remove any filters that are applied and re-display the screen.
- Changed Ins Dr to I Dr and Per Dr to P Dr.
- Removed the century from the date.
- If a Case number is attached to the unposted procedure(s) it will now display in the screen.
- Unposted Procedures - When charges are received from external programs via an interface, the charges are now re-ordered by RVU value - highest to lowest.
- Unposted Procedures - The Status (Sta) column on the Unposted Procedures Summary screen has been activated and now contains a NetCoder result indicator, if NetCoder is installed. The indicator can be red, yellow, green or a circle with a slash through it. The colored indicators mirror the results from the NetCoder results screen. A circle with a slash indicates that some issue prevented the charges from being checked by NetCoder. In either case, the charges can be re-checked by clicking on the charge and clicking 'Check Codes' on the Procedure Entry screen. Items listed on the Unposted Procedures screen with a red circle next to them cannot be selected for Auto-Posting. Charges from Interfaces, E-Superbills, and NetMobile are now automatically checked with NetCoder if NetCoder is installed.
- Unposted Procedures - Whenever any Unposted Procedures are deleted, they will now be saved in an internal journal file. This will allow Customer Service to better troubleshoot any issues. Another slight change was also made to procedure entry regarding unposted procedures - if a user is editing an unposted charge while in procedure entry and clicks Cancel, any changes that were made are ignored and the charge will remain in the unposted procedures function. If the user wants to save the changes and store the charges again, they will need to click Store. Previously when Cancel was clicked, any changes were saved.
- Payment Entry Function - Three new payment actions have been added to the Actions list box on the Payment Entry Allocation screen. These Payment Actions originated in Cache Text and were enhanced to function within NetPracticePM now. Using these Actions you can override the programming that automatically shifts the remaining line item balance after you Save a payment:
- Force to Insurance Balance - force the remaining balance to remain in the insurance balance column.
- Force to Patient Balance -Suppress Secondary - force the remaining balance to the patient balance column and do not generate an insurance claim for the secondary insurance carrier.
- Leave in Ins. Bal. - force the remaining balance to remain in the insurance balance column and do not generate an insurance claim for the secondary insurance carrier.
- Payment Entry Function - If a Doctor is setup with a Rate Schedule and the Fee Schedule Amount table does not have any amount entered for the Allowed Amount, Payment Entry will retrieve the Allowed Amount for the Normal Rate.
- Payment Entry Function - The data input fields on the Payment Entry lead-in screen have been re-ordered. After you enter an Insurance Carrier and press TAB, the Payment Code field will now default with the Default Payment Code from the Insurance Carrier table.
- Payment Entry Function - A new Calculate Payment function has been added to the Action Column. This function will only appear in Payment Entry after you click Save in Procedure Entry and then click Payment in the Action column on the Procedure Entry Summary screen. NetPracticePM will calculate the Allowed amount and Co-pay amount based on the figures entered in the Ins Liability/Default Pmt% and Co-Payment Amount fields for the patient's primary insurance policy. The Calculate payment function is designed to calculate the amounts based on the Total procedures posted for the current accounting date. The Percentage to Collect amount can be changed if necessary.
- Payment Entry Function - A Letters function was added to the Action Column in the Payment Entry summary screen that displays after posting a payment. With this function, you can print a Letter for the patient immediately after posting a payment.
- Payment Entry Function - Changes were made on the Payment Entry allocation screen to make the pop-up windows that appear when a Payment Action is selected, more keyboard friendly. These changes include:
- All of the popup windows now accept the ENTER key.
- The 'OK' buttons were changed to 'Save' for consistency.
- Keyboard Shortcut keys are now available for the Save (ALT+S) and Cancel (ALT+C) buttons.
- Payment Entry Function - When you enter an Adjustment on a charge through Payment Entry, the Reason entered on the Payment Entry screen will be stored with the Adjustment transaction and will display on the Patient's Transaction History and on the Adjustment Journal.
- Payment Entry Function - When you enter an amount in the Deny field when posting a payment, you have the option of selecting a denial code or typing in free text. If you select a denial code, NetPracticePM will now store the denial with the actual denial reason code and then list the text for the denial reason. This will allow you to view whether a code was selected or if a free text reason was typed. This update prepares for converting to the ANSI standard denial reason codes which will be released in the future.
- Refund Entry Function - The Adjustment Code list box will only display adjustment codes that are set up as Refund adjustments.
- Payment Exception Report (Transactions, Electronic Remittance Advice (ERA)) - This report has two new exceptions for non-covered charges that apply to Medicare. The first is if Medicare is sending a contractual adjustment on the remit and the adjustment is equal to the amount billed, this will generate the exception 'Contractual Amount same as amount billed'. The second is if Medicare is sending a Patient Responsibility record, with no allowed amount, and the amount of the patient responsibility is also equal to the amount billed, the exception will state 'Did not pay or allow for this item'.
- Import ERA File (Transactions, Electronic Remittance Advice (ERA)) - A Check Number and Amount columns have been added to the Import ERA File Summary screen.
- Post ERA File (Transactions, Electronic Remittance Advice (ERA)) - When posting remits, if you are posting for a form type (example: F = Commercial) that may have multiple carriers and multiple payment codes; it will get the payment code from the default payment code in the insurance carrier table. If no default payment code is in the carrier code table, it will default to the payment code entered in the ERA Integration Setup.
- Post ERA File (Transactions, Electronic Remittance Advice (ERA)) - The Post ERA File function now requires the Accounting Date you enter for posting the payments to match the Accounting Date of the Batch you select. A message will display if the dates do not match and the screen will redisplay so you can enter a new Accounting Date and/or Batch number.
- Post ERA File (Transactions, Electronic Remittance Advice (ERA)) - Medicare is now sending contractual adjustments out with the full amount of the charge as the contractual adjustment amount. According to Medicare, they are not really contractual adjustments they just had no better place to put them in the file. The program was adjusted so that if there is a contractual adjustment for the full amount of the charge and no allowed amount, the payment will be placed on the exception report and it will be at your discretion how they should be processed.
- Post ERA File (Transactions, Electronic Remittance Advice (ERA)) - If you attached an EOB image to a Batch number when posting an electronic remittance the image was not attached to the payments. This problem has been corrected.
- Batches (Payment Entry Function, Procedure Entry Function, Quick-Post, Adjustment Entry Function, Transaction Batch Control, Post ERA File, Refund Entry Function) - Every Batch Number field now provides the magnifying glass icon so you can search for the batch number you want. A list containing every 'unlocked' batch will display when you click the magnifying glass icon. You can also create a new batch directly within each of these functions by typing in a batch number that does not exist and you will be asked if you want to create it.
- Batch Report (Transactions, Transaction Batch Control) - You can print the report for a select 'User Code' now. If you do not select a specific user code, the report will contain every user code.
- Edit a Batch and Batch Inquiry (Transactions, Transaction Batch Control) - The Batch Number field has been extended from 12 characters to 18 characters.
- Bank Deposit Slip (Transactions, Transaction Journals) - This report was designed to replace the bank deposit slip you have to manually fill out when making deposits at the bank. It will print your Bank name and Account Number and includes the total amount of cash and checks collected for the Deposit Date entered. If you enter a check number during Payment entry, the individual payments posted with that check number will be totaled and a single entry will be listed on the report for that check. In the Payment Code Table, the Payment Description field for the payment code must contain the word CASH for the cash total to calculate and the payment code for personal check payments must contain the word CHECK for the check total to calculate personal check payments. Payment codes that are set up as Insurance Payments will automatically be calculated as checks. The Bank and Account Number fields will automatically default to the data last entered in the Bank and Account Number fields. This report is also available on the Reports, Transaction Journals menu.
- Procedure Journal (Transactions, Transaction Journals) - The hash total at the bottom of the procedure journal has been modified to take into consideration the unit value. If the unit value is greater than one, it will multiply the hash number for the procedure by the number of units. Note: to accommodate situations when the procedure codes begin with a letter (J or V codes), the hash total is calculated based on the last four digits of the CPT, not all five digits.
- Unposted Payment Journal (Transactions, Transaction Journals) - The Unposted Payment Journal now has the options to Print From Date and Print Through Date. This report is also available on the Schedule, Scheduling Printing Menu.
- Check In/Out Payment Journal (Transactions, Transaction Journals) - This report will now display total number of patients. This report is also located on the Schedule, Scheduling Printing Menu and Reports, Transaction Journals menu.
- Check In/Out Payment Journal (Transactions, Transaction Journals) - This report will now display under the Posted column, either: Y the payment has been posted to the account, N the payment was entered in Check In/Out but has not been posted to the account, or V the payment was voided through Check In/Out. This report is also located on the Schedule, Scheduling Printing Menu and Reports, Transaction Journals menu.
- Daily Register (Transactions, Transaction Journals) - You can print this report in Billing Group order now by selecting the Print in Group Order check box.
- Superbill Inquiry - The Superbill Inquiry function has been added to the Transactions Menu.
Summary of Steps to be Performed after Installing the Update
- The first time you access the new 7.2 NetPracticePM Launch page, you will need to click the Configure Internet Explorer icon located in the lower-left section of the new 7.2 Launch page.
- If you do not have any customizations in any of your printing programs to perform special printer functions, you can inactivate the Legacy printers in NetPracticePM.
- If you 'inactivate' your Legacy printers, you will have to re-define all the settings in the Insurance Claim Form Wizard.
- If you currently have a DMS Rich Text Recall Letter setup you will need to edit the document and use the new Recall Letter Data Elements.
- Check all DMS documents and make sure the data elements inserted are data-filling the correct information.
- You will need to identify which users you want to have access to the new Add Notes function in NetPracticePM Help. Using the Maintain Users function located on the System, User Management menu, for each applicable user code, select the Update Help Notes check box.
- Perform the setup steps necessary if you plan on using the new Non-delinquent Payment Plan function.
- If your practice only uses NetPracticePM e-mail, update the E-mail Integration function and select the Use NetPracticePM E-mail Only field to start taking advantage of the extended message length.
- If you want to customize the security settings for your Image Type Codes, modify the settings using the Maintain Image Types function located on the System, Image Management menu.
- Update your Insurance Carrier Code Table to select the Default Payment Code for the carriers you want to automatically default in Payment Entry.
- Complete the new CPTDX DMS Record on patient accounts if you plan on using the new Quick-Post function.
- Log on to the Support Web site and link your Login to a Call Center Account.
- Add the Organizational NPI and Individual NPI numbers as applicable. See the Organizational NPI entries under the System and Tables sections.
New Functionality from Previous Service Packs
System Conventions
- 7.1.17 - Mail Merge Fields for Word - The Referral Source UPIN Number is now available as a Mail Merge field when printing Word documents from NetPracticePM.
User Desktop
- 7.1.17 - Support - The Support function has been changed to access the new version of the Online Support Center.
- 7.1.15 - Announcements - After a service pack has been installed, an announcement will automatically be created. The announcement will state, 'Service Pack 7.X.X has been installed and release notes are available in NetPracticePM Help. - CGM US.'
Billing
- 7.1.18 - Move/Re-Build Transmission File (Billing, Insurance Billing Functions, Electronic Claims) - All clients that send Noridian Medicare Part B claims - Noridian is implementing a change in the values submitted in all inbound transactions as a result of the implementation of the National Provider Identifier. Currently you may be receiving 'warnings' on your confirmation reports since these changes will not be 'required' until October 2, 2006. Due to these changes, you will need to update the Electronic Claims Integrations for Form Type 30 and also your Medicare Insurance Carrier Code in the Insurance Carrier Table. You should NOT make these changes until Service Pack 7.1.18 has been successfully loaded.
- 7.1.17 - Move/Re-Build Transmission File (Billing, Insurance Billing Functions, Electronic Claims) - Some insurance carriers require a Claim Indicator for claims that are older than thirty days. The program has been enhanced so you can now include this numeric indicator when you Refile the electronic claim, by typing the indicator in the Refile Reason field.
- 7.1.17 - Transfer Insurance Balances (Billing, Insurance Billing Functions, Delinquent Insurance Menu) - The program has been enhanced to store the User Code of the person performing the function. The Print Transferred Balances report has also been enhanced to print the User Code in the report heading.
- 7.1.17 - Prepare/Send Transmission File (Billing, Insurance Billing Functions, Electronic Claims) - Emdeon-Medifax (formerly Potomac) claims only - An EPSDT indicator is now required on claims submitted with procedure codes 99381 through 99385 and 99391 through 99395. If the EPSDT DMS record on the patient's account has not been completed, the claims will be submitted with a 'U', which stands for 'Not Used' in the EPSDT indicator field.
- 7.1.17 - Create Delinquent Insurance File (Billing, Insurance Billing Functions, Delinquent Insurance Menu) - This function has been enhanced to include Electronic Secondary Medicare claims if you select 'Electronic' when creating claims.
- 7.1.16 - Move/Re-Build Transmission File (Billing, Insurance Billing Functions, Electronic Claims) - Purchased Service Updates - insurance claims containing purchased services no longer require the referral source's name or provider number. Only the place of service and the tax identification number are required. Programs were edited to accommodate the new changes.
- 7.1.16 - Move/Re-Build Transmission File (Billing, Insurance Billing Functions, Electronic Claims) - A new electronic claims exception error was created when the Commercial Claim Provider Number is missing. The electronic claims were getting rejected because the provider number contained a space in the provider number. The new Invalid Provider Number exception error was created to prevent this problem.
- 7.1.14 - Move/Re-Build Transmission File (Billing, Insurance Billing Functions, Electronic Claims) - A new Electronic Claims Exception Error has been added for NDC codes. NDC codes cannot exceed a maximum of ten characters.
- 7.1.11 - Transmission Report (Billing, Insurance Billing Functions, Electronic Claims) - A new Sec column has been added to the report. If the claim is being submitted as an Electronic Secondary Medicare claim, a Y will print in the column.
- 7.1.9 - Electronic Secondary Medicare Claims (Billing, Insurance Billing Functions, Electronic Claims) - This update forces secondary Medicare claims to be sent electronically. If the Medicare insurance carrier is set up with an electronic form number, the secondary Medicare claim will be placed in the electronic claims file and sent electronically after the primary insurance payment has been posted.
- 7.1.9 - Move/Re-Build Transmission File (Billing, Insurance Billing Functions, Electronic Claims) - New Electronic Claim Exception Errors were Added - 1) The following Upin numbers will automatically pass the 'DR Upin number is invalid' and 'Ref DR Upin number is invalid' exception errors: OTH000, RES000, VAD000, PHS000, RET000. 2) 'Location address is invalid' - The first and second lines of the Location address will be checked for invalid characters. 3. 'Auth number exceeds maximum allowed length' - A maximum of thirty characters can be entered for an authorization number.
Collections
- 7.1.14 - Review for Turnover Report (Collections, Turn Over Functions) - The Primary Insurance Carrier for each patient will now print on the report.
- 7.1.14 - Third Party Turn Over Reports (Collections, Turn Over Functions) - The Primary Insurance Carrier for each patient will now print on the report.
- 7.1.14 - Populate Collection Roster (Collections) - The Notification message informing you when the function is complete will now include the Database Number the function was performed in.
Patient
- 7.1.17 - Review Patient Information and Change Patient Data - Up to seven cases will now display in the Case Management quadrant within the Patient Summary Screen.
- 7.1.17 - User Defined Records (Patient, Change Patient Data, DMS) - The HOSP DMS record has been enhanced to include Inpatient Psychiatric Facility locations for the Hospital field.
- 7.1.17 - Change Patient Data - **Family Billing only** - You can now assign individual Billing Groups to accounts that are linked together instead of maintaining only one Billing Group for the entire family.
- 7.1.16 - Review Transaction History (Patient, Review Patient Information) - If a procedure is a dental procedure, the Tooth Surface, Tooth Number, and Oral Cavity will now display on the Transaction History Detail screen.
- 7.1.12 - Insurance Policy Information (Patient, Change Patient Data and Patient, Registration) - A new Insurance Type Code field was added for Electronic Secondary Medicare claims. This field is required by Medicare. If you do not select a type from the table, the claim will automatically be sent with '12 - Working Aged Beneficiary or Spouse with Plan'.
- 7.1.12 - DMS Hospital Record (Patient, Change Patient Data, DMS, Hosp Record) - A new Medical Record Number (MRN) field was added to the DMS Hospital Record - HOSP. This change was done primarily for NetMobile.
- 7.1.11 - Review Transaction History - Insurance Ledger (Patient, Review Patient Information, History) - When you review a procedure in the patient's transaction history, the Insurance Ledger will now show 'Secondary Filed Electronically' after you post the primary insurance payment and the Secondary Medicare claim is placed in the electronic claims file.
Reports
- 7.1.17 - DMS Letter Processor (Reports, Data Management System) - Community Health Centers only - Three new data elements have been added based off of the DMS Income Record: Current Review Date, Current Percentage, and the Current Fee.
- 7.1.14 - Comparative Summary Analysis by Corporation (Reports, Statistical Reports, Summary Analysis Report, Comparative Summary Analysis Reports) - This report has been enhanced to print to Excel.
Schedule
- 7.1.17 - Patient Check In/Out - A new 'Proc' column has been added to the Patient Check In/Out Summary screen. A checkmark will appear in the column for any patient that currently has 'Unposted Procedures'.
- 7.1.17 - Scheduling Audit Report (Schedule, Scheduling Printing Menu) - This report has been enhanced to provide sorting by Locations. In addition, if you select the Print in User Order option you can then indicate which user codes you want to print. With this new functionality, individual locations are able to track their appointment loads by user.
- 7.1.17 - Missing Superbill Report (Schedule, Scheduling Printing Menu) - This report has been enhanced to provide sorting by Locations.
- 7.1.16 - Enter Patient Appointments - If you selected a case when scheduling an appointment, there was no way to review which case was selected. The case number selected now appears when you click the appointment time slot and then click Details.
- 7.1.16 - Print Wait List (Schedule, Enter Patient Appointments - Wait List) - A new Print Deleted Entries check box has been added to the Print function, so you can print entries that have been deleted from the wait list.
System
- 7.1.17 - System Log (System, File Maintenance Menu, Look-Up Functions) - The 'Insurance Create' category has been added to the available categories. Each time the Create Insurance function is performed the: date, time, database number, user that performed the function, which billing groups were created, and the date it was created through, will be stored in the System Log.
- 7.1.17 - System Log (System, File Maintenance Menu, Look-Up Functions) - Each time the Create Delinquent Insurance File function is performed the information entered for the Cycle Number, Charges Older Than Days, and whether Paper or Electronic was selected, will now be stored in the System Log, under the 'Insurance Create' category.
- 7.1.17 - NetPracticePM Default Values (System, Database Maintenance Menu) - The program was modified to keep track internally of any changes made to any of the default values and to log which user made the changes. Currently this information is only accessible by contacting your customer service team at CGM.
- 7.1.12 - Move Patients to Inactive File (System, File Maintenance Menu, Inactive Patients Menu) - The program was changed to prevent the inactivation of current patient accounts. The Move all patients with no activity since field will no longer accept a date that is NOT 90 days prior to today's date.
- 7.1.9 - System Configuration Utilities - A new utility to Change Fiscal Year was added.
- 7.1.9 - Electronic Claims Integration (System, Database Maintenance Menu) - A new Direct Submission field has been added, which will signify if the claims will be sent directly to the Payer or CGM. This will not affect any electronic claims integrations previously stored unless the integration screen is accessed and re-Saved, then you will need to make sure the new field is answered appropriately.
Tables
- 7.1.17 - Maintain Doctor Codes (Tables, Doctor Code Table) - A new field for Social Security Number has been added to the Doctor code table. Some insurance carriers are now requiring this information in addition to the doctor's provider number.
- 7.1.17 - Maintain Doctor Codes (Tables, Doctor Code Table) - A new field for License Number has been added to the Doctor code table. Some states are requiring a license number for the performing physician in addition to doctor's provider number.
- 7.1.14 - Maintain Doctor Codes (Tables, Doctor Code Table) - A new field for the National Provider Number has been added. Modifications will be made in a future update to include this number in electronic and paper insurance claims.
- 7.1.13 - Maintain Ins Plan Code Conversion Amts - (Tables, Insurance Carrier Table, Insurance Plan Table) - The Conversion Factor field has been expanded to allow up to four decimal places.
- 7.1.12 - Print the Procedure Profile Report (Tables, Procedure Code Table) - This report was enhanced and you can print it to Excel now.
Transactions
- 7.1.17 - NetCoder (Transactions, Procedure Entry) - NetCoder can now Check Codes for up to 100 line items at a time. The previous limit was 20.
- 7.1.17 - Unposted Procedures - The Journal has been enhanced and you can now specify a date range when printing.
- 7.1.14 - NetCoder (Transactions, Procedure Entry) - NetCoder now supports facility RVU's. Previously, all NetCoder results were ordered by non-facility RVU values only. If the location code used in procedure entry has the Facility Fee Schedule option selected in the location code table, then NetCoder will return facility RVU values.
- 7.1.12 - Post ERA File (Transactions, Electronic Remittance Advice (ERA)) -Medicare recently changed their process and they are automatically adding modifier '51' to a claim when it is needed. This was causing numerous 'ERA Payment Exceptions' to occur. The program was updated to check whether Medicare is sending a '51' modifier back in the file and if so, it will now match up to the claim properly in NetPracticePM.
- 7.1.10 - Procedure Journal (Transactions, Transaction Journals) - A new Print from List field has been added, which you can use to print the Procedure Journal for patients contained in a DMS List.
Instructions for Modifying Windows Explorer Settings
If you are running Microsoft Windows 2000 or a later version, perform the following steps:
- Launch Windows Explorer - Open My Computer. On the Tools menu, click Folder Options.
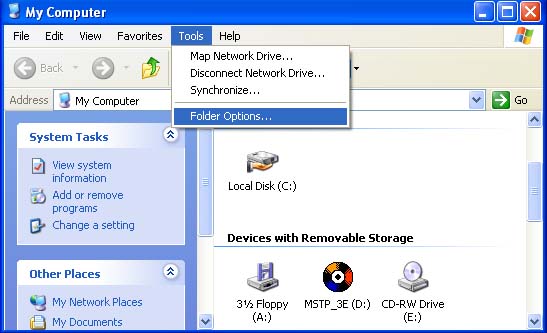
- In the File Options dialog box, click the File Types tab.
- In Registered file types, click Microsoft Word Document, and then click Advanced.
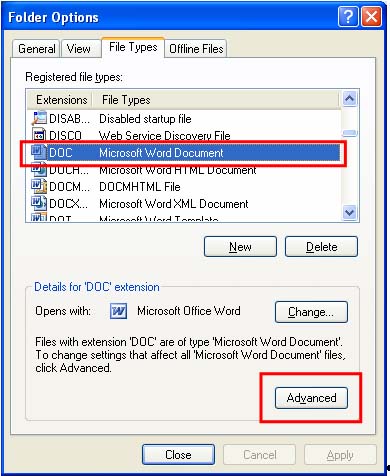
- From the Edit File Type screen, click to clear the Browse in same window check box, which toggles whether a Word document is launched outside of Internet Explorer.
- Click OK to close the dialog box.
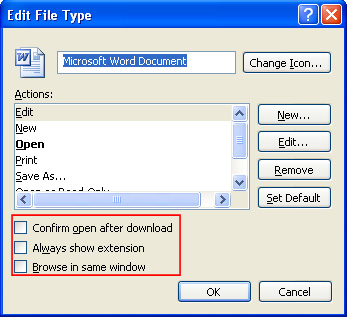
- In Registered file types, click Microsoft Excel Worksheet, and then click Advanced.
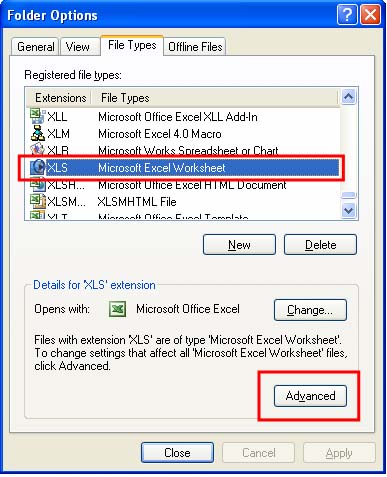
- From the Edit File Type screen, click to clear the Browse in same window check box, which toggles whether an Excel worksheet is launched outside of Internet Explorer.
- Click OK to close the dialog box.
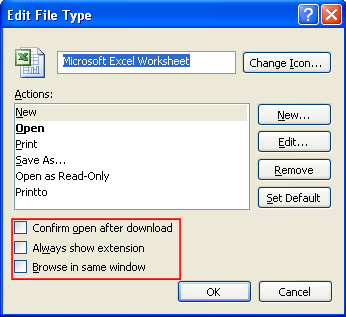
- Click Close to close the Folder Options dialog box.