5010 Electronic Claim Loop and Segment Editor
With the 5010 Electronic Claim Loop and Segment Editor function,
you can set up special requirements for your 5010 electronic claim files
that deviate from the standard requirements. CGM maintains the standard
payer rules in the background, but you can manage payer-specific or carrier-specific
customizations yourself using this Editor. For example, practices submitting
claims through a Direct Connection will likely have at least one custom
profile defined, because the header loop will contain different information
than what would be sent, by default, through CGM eMEDIX.
You can set up as many profiles as necessary for your particular circumstances
and use them in as many rules as necessary. A profile must be attached
to a rule for it to be in effect.
NOTE: Loops and segments are advanced features that require a higher
skill set than those of the standard user. It is strongly recommended
that the user profiles for your designated administrator(s) of this feature
have a higher functional security level than standard users in your practice.
Functional security levels are maintained under System > User Management.
5010 Electronic Claim Loop and Segment Editor Screen
The Editor screen includes two tabs:
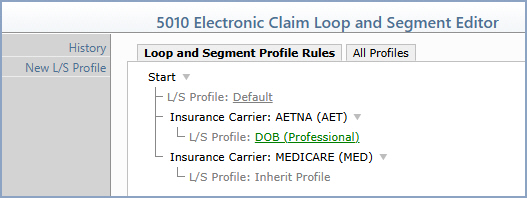
- Loop and Segment Profile Rules tab – a tree view of the
rules that have been defined. When you first open the Editor, before
any custom profile rules have been defined for your practice, you
will see one Default Profile. As you create more profile rules,
they appear in the tree.
- All Profiles tab – a list of all of the profiles that have
been created, with an indication of whether each profile is currently
used in a rule. A profile must be associated with a rule to be in
effect.
Action Column Functions
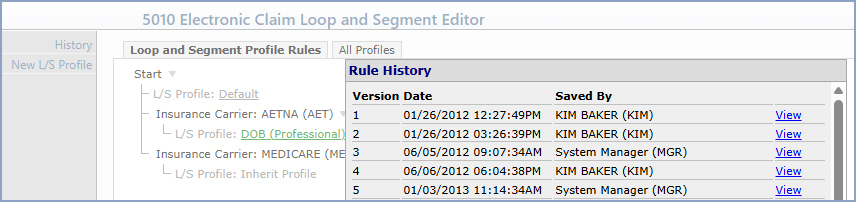
History – Click History in the Action Column to view a list
of changes that have been made to rules. The current version (what you
saw on the Loop and Segment Profile Rules tab before clicking History)
is indicated by the word Visible. To view a different version of
the rules in effect, click the View link for that entry. Each version
is listed with the date and the user who made the change.
New L/S Profile – Click to create a new Loop and Segment profile.
Adding a New Profile
- Click New L/S Profile in the Action Column.
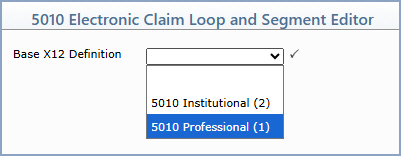
- Select the appropriate Base X12 Definition.
- Type a Description for the profile.
The next screen is where you will define the profile. It includes a
list of all of the loops in a claim file that can be edited, before the
claim is sent out.
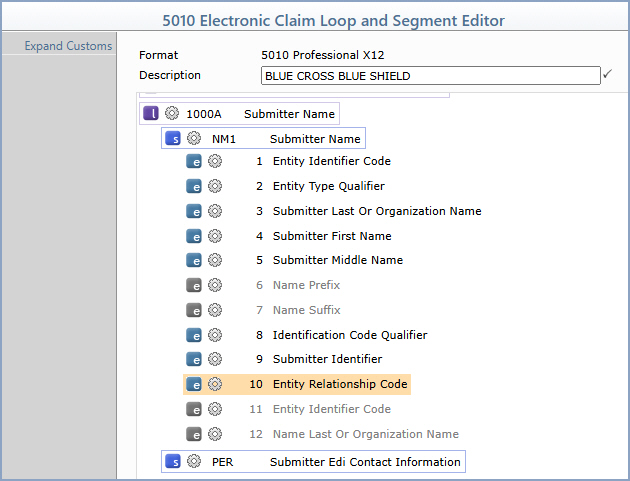
Each loop contains segments and each segment contains elements. The
box with the “l” on it is your visual cue for a loop; it is referred to
as the “Loop icon.”
- If the Loop icon is purple, the loop is currently active.
- If the Loop icon is grey, the loop is currently inactive.
- If there is a lock symbol next to the loop icon, the loop may not
be edited.
- Each loop contains one or more segments. To expand a loop to see
the segments within it, click the Loop icon.
The box with the “s” on it is your visual cue for a segment; it is referred
to as the “Segment icon.”
- If the Segment icon is blue, the segment is currently active.
- If the Segment icon is grey, the segment is currently inactive.
- If there is a lock symbol next to the Segment icon, the segment
may not be edited—regardless of whether it is active or inactive.
- Each segment contains one or more elements within it. To expand
a segment to see the elements within it, click the Segment icon.
The box with the “e” on it is your visual cue for an element; it is
referred to as the “Element icon.”
- If the Element icon is green-blue, the element is currently active.
- If the Element icon is grey, the element is currently inactive.
- If there is a lock symbol next to the Element icon, the element
may not be edited—regardless of whether it is active or inactive.
- If there is a profile symbol next to the Element icon, it means
the value of the element is pulled from an existing billing profile
in the Billing Profile Rules menu.
- If an element is highlighted in orange, it means it has been modified
using this Editor.
- In most cases, the element is the end point; however, some elements
may have one or more components within them. To see the components,
click the Element icon.
Note - The icon colors may appear
differently on your screen depending on your settings.
To quickly view all changes for the profile, click the Expand
Customs Action Column button. The loops and segments for any modified
elements will expand to show the highlighted, modified element.
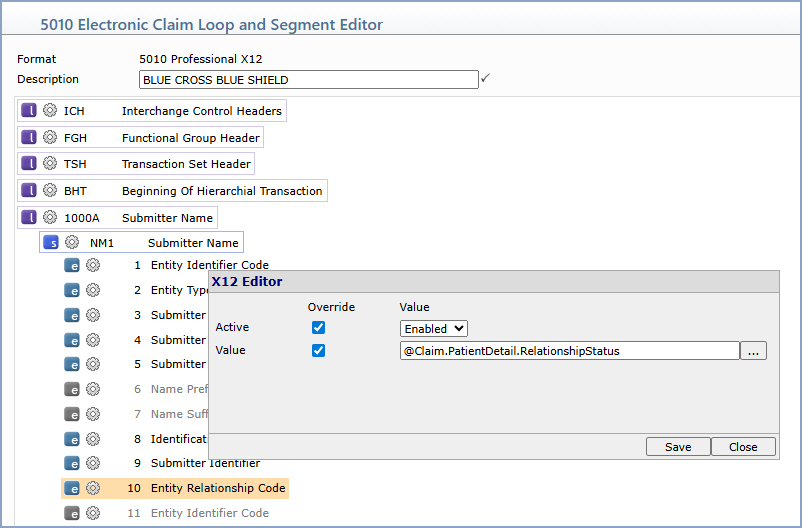
- Navigate to the loop and segment you want to customize (for example,
Loop 1000A Segment NM1).
- In the X12 Editor window, you may do the following.
To disable the element, click
the Active check box,
and click Disable from
the drop-down list.
To enable the element, click
the Active check box,
and click Enabled from
the drop-down list.
To set a value for an enabled
element, click the Value
check box and then type the value into the Value
box or click the ellipsis button to access a list from which to
select.
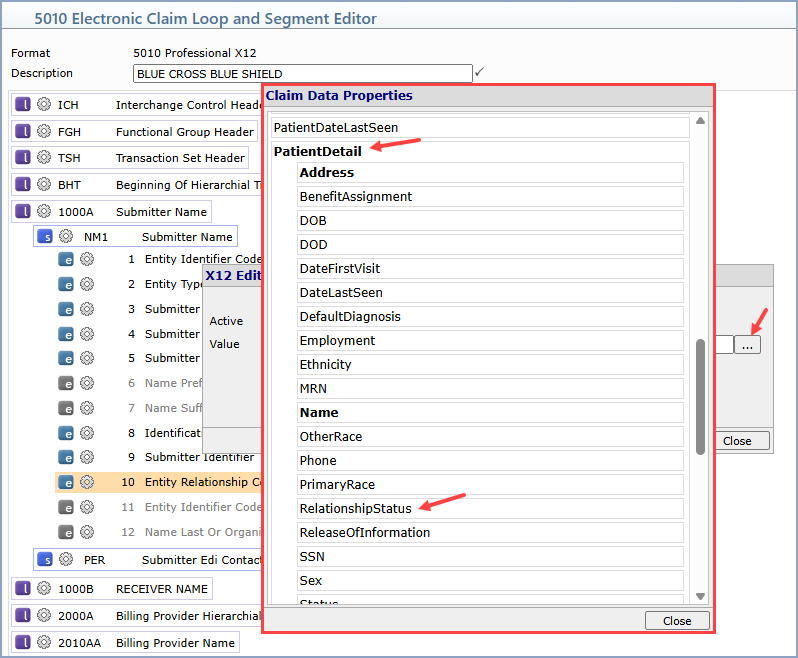
- The Claim Data Properties window opens. Select the property
you want to send (for example, to override the Submitter Name, select
PatientDetail and then RelationshipStatus).
- Click Save on the X12 Editor window and Save again
to return to the rule tree screen.
- Add the new profile to an existing rule, or create a new rule for
the specific payer that requires this customization.
Adding a New Rule
You can add a rule that links a profile to a specific condition (such as
a carrier, form number, or plan code).
- On the Loop and Segment Profile Rules tab, click Start
on the rule tree and then click New Rule Below.
- In the When field, select the criteria the rule should match
against. Available options include Insurance Carrier, Insurance
Form Number, Insurance Plan Code, Doctor, Form
Type, and Location.
- In the Equals field, type or select the value the criteria
must equal for the rule to apply.
- In the Use field, select the profile to apply when the rule
matches.
- Click Insert to add the rule to the tree, and then click
Save to save the changes.
Notes
- The Editor is preconfigured with a Default Profile. CGM
updates the Default Profile with the standard payer rules as part
of regular maintenance, so most practices do not need to modify the
Default Profile directly. Use new profiles and rules to handle payer-specific
customizations.
- The Anesthesia claim configuration requires three loop/segment
overrides: Loop 2400 SV1-03 Value = UN; Loop 2400 SV1-04 Value
= @Claim.Procedures.Multiplier; Loop 2300 Segment NTE Value
= @Claim.Calculated.ClaimNoteAnesthesia. Add these overrides
to an existing Profile or create a new Profile and Rule for Anesthesia
claims to prevent denials when the carrier requires start and stop
time in the claim level note.
- See Billing
Profile Rules for detailed
samples to set up additional rules. Any rules defined
here apply only after the Editor's Default Profile has been evaluated.
Related Topics
- Billing Profile Rules
- 5010 Claim Hold Rules
- 5010 Claim Exception Rules
- 5010 Submitter ID Rules
- Electronic Direct Connect Claims Integration (Self-Hosted
Direct Connect clients only)