

| Prompt | Response | Req | Len |
|---|---|---|---|
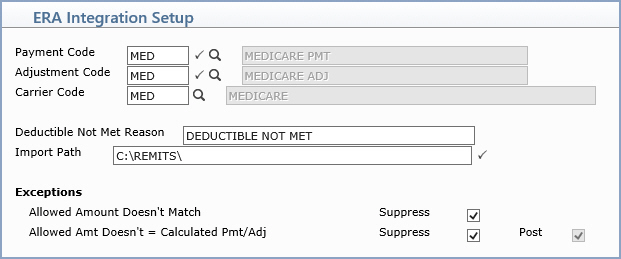
| Payment Code | The Payment Code indicates the code you want to use when posting electronic remits. Type the code you want or click the magnifying glass icon to display the available codes. |  |
5 |
| Adjustment Code | The Adjustment Code indicates the code you want to use when posting electronic remits. Type the code you want or click the magnifying glass icon to display the available codes. |  |
5 |
| Carrier Code | The Carrier code needs to be the carrier code you have set up in your Insurance Carrier Code Table. Type the code you want or click the magnifying glass icon to display the available codes. | 5 | |
| Deductible Not Met Reason | If the deductible amount matches the billed amount, the denial will be posted to the patient's account and will display in the Insurance Ledger. Enter the reason for denial if deductible has not been met. | 40 | |
| Import Path | This field specifies the folder where CGM webPRACTICE will look for remittance files. This must be a valid path accessible from the CGM webPRACTICE server. |  |
50 |
| Allowed Amount Doesn't Match | Suppress: If you want to suppress this exception and allow payments/adjustments to be posted, select this check box. When the Suppress check box is selected, this exception will not print on the Electronic Remittance Exception Report. | 1 | |
| Allowed Amt Doesn't = Calculated Pmt/Adj | Suppress:
If you want to suppress this exception and allow payments/adjustments
to be posted, select this check box. When you select this check
box, the Post check box will be automatically selected and this
exception will not print on the Electronic Remittance Exception
Report.
Post: If you want to always allow payments to be posted that have this exception, select this check box. If you want these exceptions to print on the Electronic Remittance Exception Report, do not select the Suppress check box for this exception. |
1 |