| Prompt | Response | Req | Len |
|---|---|---|---|
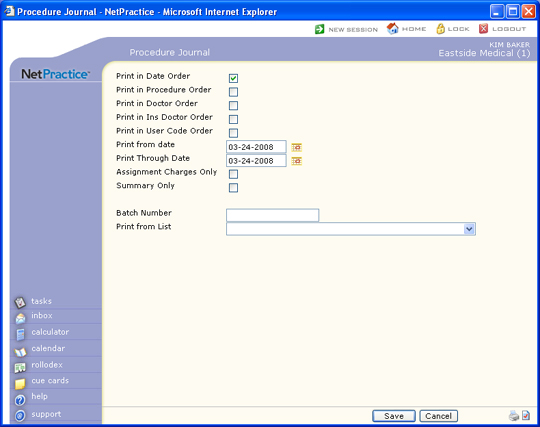
| Print in Date Order | If you want to print the report in date order, select this check box. If you select multiple sorting options, a separate report is generated for each option. | 1 | |
| Print in Procedure Order | If you want to print the report in procedure order, select this check box. If you select multiple sorting options, a separate report is generated for each option. | 1 | |
| Print in Per Doctor Order | If you want to print the report in performing doctor order, select this check box. If you select multiple sorting options, a separate report is generated for each option. | 1 | |
| Print in Ins Doctor Order | If you want to print the report in insurance doctor order, select this check box. If you select multiple sorting options, a separate report is generated for each option. | 1 | |
| Print in Location Order | If you want to print the report in location order, select this check box. If you select multiple sorting options, a separate report is generated for each option. | 1 | |
| Print in User Code Order | If you want to print the report in user order, select this check box. If you select multiple sorting options, a separate report is generated for each option. | 1 | |
| Print By | Select Accounting Date to include transactions based on their accounting date, or select Service Date to include transactions based on their date of service. The header on the printed report reflects the option selected. | ||
| Print from date | Type the date you want to start with or click the calendar icon to select a date. | 10 | |
| Print Through Date | Type the date you want the report to end with or click the calendar icon to select a date. | 10 | |
| Assignment Charges Only | If you only want to include charges that Assignment was accepted for, select this check box. | 1 | |
| Summary Only | If you only want to print a summary, select this check box. | 1 | |
| Batch Number | Type the code you want or click the magnifying glass to search a list of every 'unlocked' batch. You can also create a new batch by typing in a batch number that does not exist and you will be asked if you want to create it. |
17 | |
| Default Last Batch | If you want the last batch number (used by the current user, in the current database, for the current date) to default, select this check box. If you select this check box while in any function in the system that contains a Batch Number field and then you access a different function that contains a Batch Number field, the Batch Number field will automatically default the last batch number used. |
||
| Print from List | If you want to print this report based only on the patients contained in a previously defined DMS List, select the list you want to use. For example, if you want a report only for Medicare patients, first create a list of all your Medicare patients, then print the Procedure Journal and select the Medicare patient list for Print from List. | 20 |
Copyright and Trademark Notice. Copyright © 2019 CompuGroup Medical, Inc. CGM®, CompuGroup Medical® and the CGM logo are registered trademarks and CGM webPRACTICE™ and CGM webTOOLS™ are trademarks of CompuGroup Medical AG in the United States and/or other countries. Any rights not expressly granted herein are reserved.