![]()
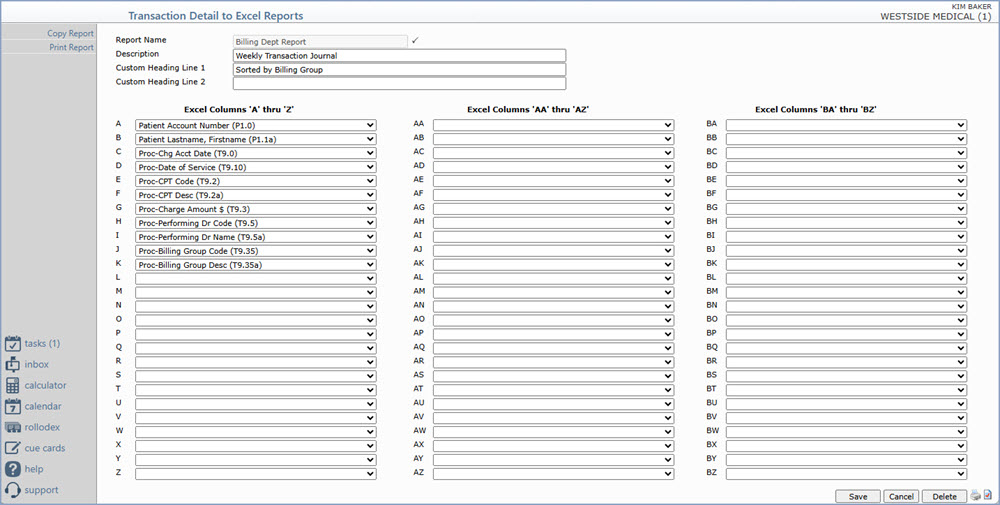
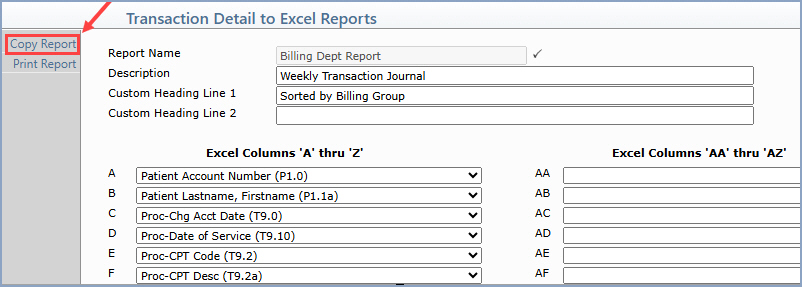
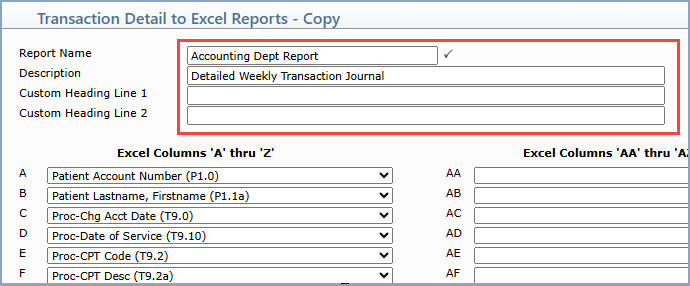
Upon accessing the function, any previously saved report definitions will be listed. You can select an existing report to Print or Copy it by clicking anywhere in the row or you can click the New Report Action Column button to create a new report.


| Prompt | Response | Req | Len |
|---|---|---|---|
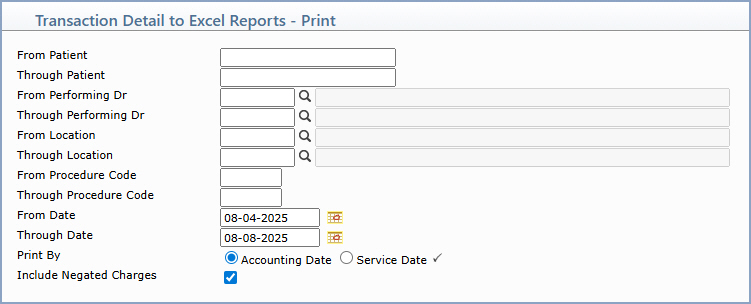
| From Patient | Type the patient account number you want to begin with, or leave the field blank to start with the first account number in the system. | 10 |
|
| Through Patient | Type the patient account number you want to end with, or leave the field blank to end with the last account number in the system. | 10 |
|
| From Performing Dr | Type the code you want to begin with, click the magnifying glass to search the table or leave the field blank to start with the first code in the table. | 4 | |
| Through Performing Dr | Type the code you want to end with, click the magnifying glass to search the table or leave the field blank to end with the last code in the table. | 4 | |
| From Location | Type the code you want to begin with, click the magnifying glass to search the table or leave the field blank to start with the first code in the table. | 10 | |
| Through Location | Type the code you want to end with, click the magnifying glass to search the table or leave the field blank to end with the last code in the table. | 10 | |
| From Procedure Code
Through Procedure Code |
Type the code you want to begin
with, or leave the field blank to start with the first code in
the table.
Type the patient account number you want to end with, or leave the field blank to end with the last code in the table. If you enter data in these fields, the report will print any posted charges for the specified procedure code(s) and any related data for the procedure code(s) based on the data fields you have defined for the report and any additional print parameters you specify.
Note: These fields allow input of up to five characters and do not provide the magnifying glass table search feature in order to allow you to include procedure codes with modifiers. For example, if you enter '99999' in the From Procedure Code field and '99999' in the Through Procedure Code field, the report will contain all procedure codes that start with 99999, including any codes that also have modifiers (99999, 9999950, 99999LT, etc.) |
5 | |
| From Date | Type the date you want the report to begin with or click the calendar icon to select a date. | 10 | |
| Through Date | Type the date you want the report to end with or click the calendar icon to select a date. | 10 | |
| Print By | Select the date you want the report to use when gathering data. | 1 |
|
| Include Negated Charges | If you want the report to include negated charges, select this check box. | 1 |
Copyright and Trademark Notice. Copyright © 2019 CompuGroup Medical, Inc. CGM®, CompuGroup Medical® and the CGM logo are registered trademarks and CGM webPRACTICE™ and CGM webTOOLS™ are trademarks of CompuGroup Medical AG in the United States and/or other countries. Any rights not expressly granted herein are reserved.
