Manage Payment Plans
With the Manage Payment Plans
function you can view every patient that has a payment plan in a sortable
list. You can click anywhere in payment plan row to edit or delete it.
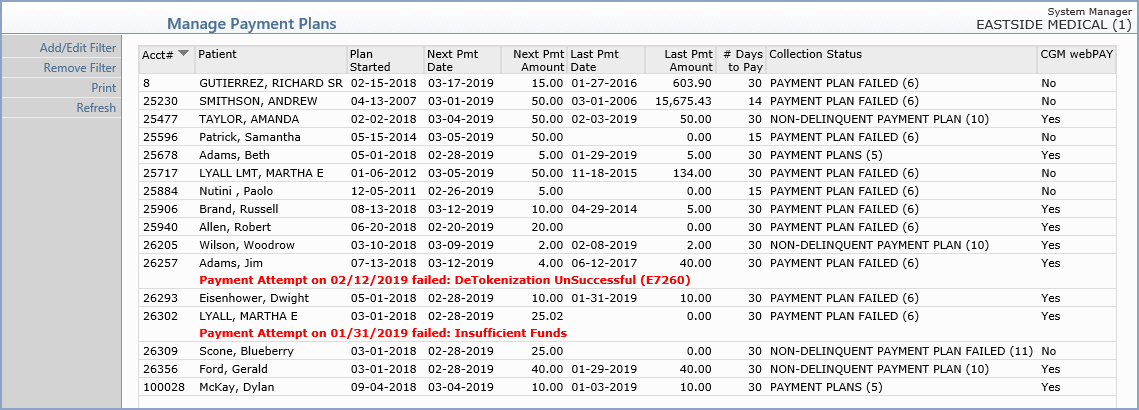
A column indicating whether the payment plan is a CGM
PAY payment plan or not is included.
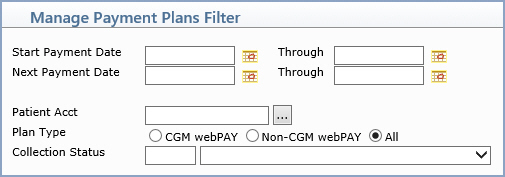
You can filter the payment plan listing by clicking the
Add/Edit Filter Action Column
button and remove any previously applied filter by clicking the Remove Filter Action Column button.
You can print a report of every payment plan using the
Print Action Column button. The
report will print in the same order as the listing displayed on the screen
and can also be printed to Excel via MyReports.
The following functionality only applies if your practice
has a current subscription to CGM PAY. For additional information on CGM
PAY in Manage Payment Plans, see the CGM
PAY User Guide.
If you only want to see the current payment plans that
were requested through CGM PAY or the eMEDIX Payment Portal, you can select
the Payment Plans Requested check
box.
If you want to view all payment plan requests (both current and in the
past) made through CGM PAY or the eMEDIX Payment Portal, you can use the
Pmt Plan Req History Action Column
button.
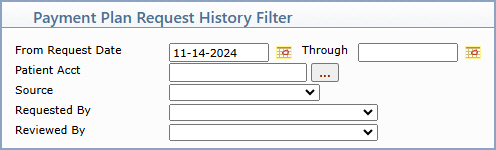
Upon accessing the Payment Plan Request History screen, the filter is automatically
set to show the last 90 days of requests.

The following fields are displayed for each payment plan request:
- Acct# – Patient account
number
- Patient – Patient name
- Request Date – Date the
payment plan was requested
- Source – CGM PAY or eMEDIX
Payment Portal
- Request – Details of the
payment plan request
- Requested By – Who requested
the payment plan. “User Code” if requested through CGM PAY or “Patient”
if requested through eMEDIX Payment Portal
- Status – Shows the status
of the payment plan request
- Reviewed By – User Code
of the staff member that reviewed/dismissed the payment plan request
- Reviewed Date/Time – Date
and time the payment plan request was reviewed/dismissed
You can filter the payment plan request history listing by clicking the
Add/Edit Filter Action Column
button and remove any previously applied filter by clicking the Remove Filter Action Column button.
After you filter the data, you can use the Print
Action Column button to print the history screen to Excel. The resulting
excel document will contain the data sorted exactly as it shows on the
screen.
