![]()
| Prompt | Response | Req | Len |
|---|---|---|---|
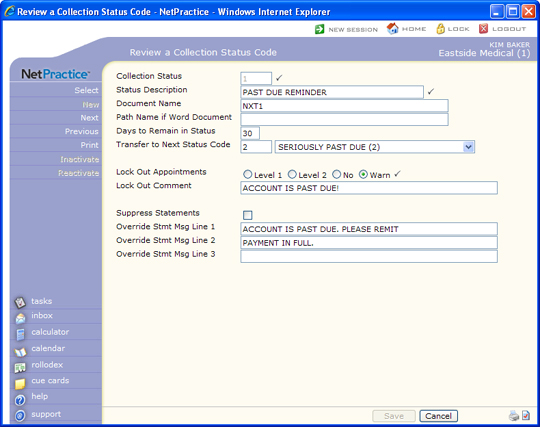
| Collection Status | Type the code you want or click the magnifying glass to search the table. This code cannot begin with a zero. | 3 | |
| Status Description | Type a description for the code. |  |
35 |
| Document Name | Type a name for the collection letter you want to use for this status code. This name needs to match the name of the letter in Reports, Data Management System, DMS Letter Processor, Add or Change a Letter. | 40 | |
| Path Name if Word Document | If you are using a Microsoft Word document, type the full path and file name of the document. (Otherwise, leave this field blank.) For example, C:\Collections\Letter1.doc. You MUST type the complete path and document name, including .doc, or the letters will not print. NOTE: Although original clients can use Word letters, CGM webPRACTICE no longer supports the implementation of Word documents for collection letters. The DMS letter processor must be used. |
40 | |
| Days to Remain in Status | Type the number of days you want the accounts to remain in this status. If the account is still past due after this time frame, the status will be changed to the status indicated in the Transfer to Next Status Code field. Leave this field blank when creating the Payment Plan status since CGM webPRACTICE automatically migrates the patient accounts as needed based on whether the patients meet the payment plan arrangements or not. Leave this field blank when creating the Payment Plan Failed code. Since this code is considered a 'dead-end' code, it will always require the user to work the account, so CGM webPRACTICE will never transfer any accounts out of the Payment Plan Failed status. |
2 | |
| Transfer to Next Status Code | Type the status code you want the accounts to transfer to after the number of days specified in the Days to Remain in Status field. You can leave this field blank if you do not want the accounts transferred to another status. Leave this field blank when creating the Payment Plan status since CGM webPRACTICE automatically transfers the patient accounts to the code selected in the Collection Payment Plan Failed field in the Patient Collections Integration or to the status code selected when the payment plan information is set up on the patient account. Leave this field blank when creating the Payment Plan Failed code. Since this code is considered a 'dead-end' code, it will always require the user to work the account, so CGM webPRACTICE will never transfer any accounts out of the Payment Plan Failed status. |
3 | |
| Lock Out Appointments | Select the lock-out option you want to limit or prohibit scheduling appointments for patients in the collections process. Level 1 You will not be allowed to enter an appointment for a patient in this collection status without typing the Level 1 password stored in the Scheduling System Integration. Level 2 You will not be allowed to enter an appointment for a patient in this collection status without typing the Level 2 password stored in Scheduling System Integration. No You will be able to schedule appointments for patients in this collection status. Warn You will receive either the standard 'Collection Status has been locked out' message or any custom text from the Lock Out Comment field to inform you the patient is in a collection status that has been 'Locked-out'. You will not be required to type a password to continue scheduling the appointment. |
|
1 |
| Lock Out Comment | If you selected 'Warn' for the Lock Out Appointments options, type the warning message you want to appear when scheduling an appointment for a patient in this status. If you leave this field blank, the standard 'Collection Status has been locked out' message will display. | 50 | |
| Suppress Statements | If you do not want patients to receive statements when they are in this status code, select this check box. | 1 | |
| Override Stmt Msg Line 1 | If you still want to send statements to patients in this collection status, you can type the first line of text for the message on the statement. This will override the standard Statement Message, even if there was a payment posted within the past 30 days. | 50 | |
| Override Stmt Msg Line 2 | If you still want to send statements to patients in this collection status, you can type the first line of text for the message on the statement. This will override the standard Statement Message, even if there was a payment posted within the past 30 days. | 50 | |
| Override Stmt Msg Line 3 | If you still want to send statements to patients in this collection status, you can type the first line of text for the message on the statement. This will override the standard Statement Message, even if there was a payment posted within the past 30 days. | 50 |
Copyright and Trademark Notice. Copyright © 2019 CompuGroup Medical, Inc. CGM®, CompuGroup Medical® and the CGM logo are registered trademarks and CGM webPRACTICE™ and CGM webTOOLS™ are trademarks of CompuGroup Medical AG in the United States and/or other countries. Any rights not expressly granted herein are reserved.
