
Prior to using this function, you must complete the following pre-requisites:
With this function, you can set up various profiles and rules to dictate the data provided on paper claims in multiple situations. You may need to include different information on claims depending on the provider, the location, the insurance carrier, the insurance form type or the insurance plan. For example, if you need to send a specific provider number to one insurance carrier but not the rest, you can set up a profile and rule to do that.
Step 1: Complete the Pre-Requisites
Step 2: Create a Profile
Step 3: Create a Rule and Assign it to the Profile
The Profile Rules tree stores the rules and profiles. A good way to think about it is, a rule is the 'if' and the profile is the 'then'; the rule is the condition and the profile is the result. For example, IF charges are for Insurance Carrier= Aetna (the rule), THEN this different Provider Number should be used (the profile).
After accessing the function, select the Claim Type you want from the Claim Type list and click Save.

The Paper Claim Editor screen will display the profile rules tree for the current database. For example, if you select CMS-1500 (02/12), the CMS-1500 (02/12) Profile Rules tab will be active, and the profile rules ‘tree’ will list the CMS-1500 (02/12) Base Form along with any additional existing rules assigned to profiles.
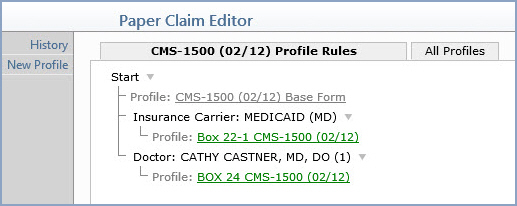
The Base Form is a protected system profile for each Claim Type. The information contained in the Base Form is automatically included on all claims unless you create another rule and profile below it or unless you have an overriding customization in place. If you have billing situations that require information that is different from the Base Form, you can create a profile and then assign a rule to it to accommodate those situations.
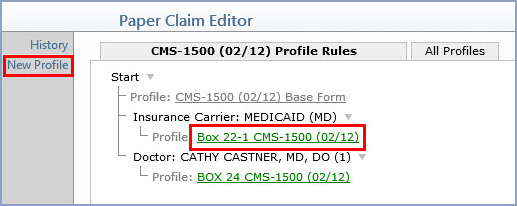
To add a new Profile, click the New Profile Action Column button or to edit an existing profile, click the Profile link.
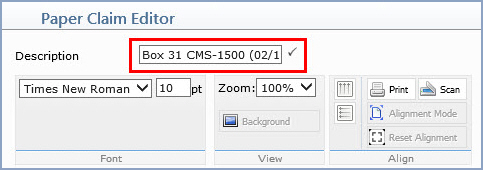
The top portion of the screen contains the Description of the Profile form and defaults the name of the Claim Type. When adding a new profile, you should edit the name to reflect the purpose of the profile. For example, if you are creating a profile to control the data in Box 31 – Provider Number you could add the box number in front of the Claim Type.
The Font and View boxes provide actions you can take on the entire form or a selected field. The fields and information that appear in the top portion of the screen depend on whether or not you have selected a field on the form.
The remainder of the screen shows the form layout and each individual field. Fields that already have a value specified will appear in black; otherwise, they will appear in red.
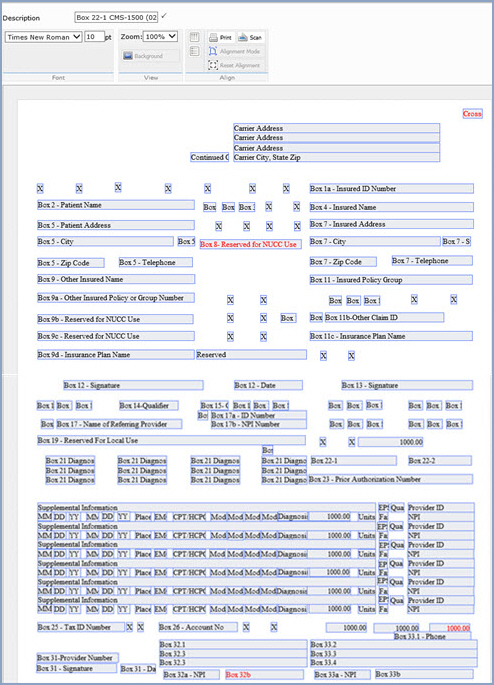
Click on any box to select it for editing. The Elements Option box will appear to the right of the Font box containing the Name and Value fields for the selected box.

Type the data you want to populate in the Value box or click the ellipsis button to select a property from the Claim Data Properties list. Any property category that displays in bold text contains multiple properties and can be expanded by clicking on it to view the properties available.
Notes:

When you have completed editing the fields, click Save. The profile will be saved but will not display in the Profile Rules tree until after you assign a rule to it. You can click the All Profiles tab to view a list of every profile that has been created and also see if a rule has been assigned to them.
Creating and Assigning Rules to Profiles
Adding a New Rule
To create a new rule, click Start and select New Rule Below. This will create a new rule directly below the Base Form.
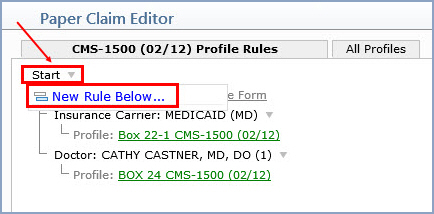
Complete the fields in the Insert Rule window.

Click Insert to save the rule.
Additional Rule Options
To edit an existing rule, click the Rule link in the Profile Rules tree.
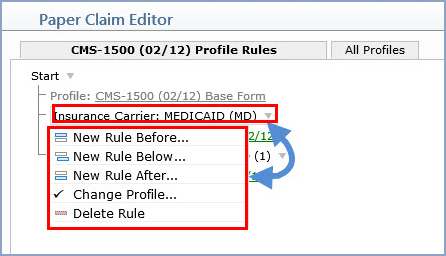
New Rule Before – Select this function to insert a new rule before the selected rule on the Profile Rules tree. This does not mean that it takes any precedence to the rule you are inserting it before, because the rule will be on the same branch of the Profile Rules tree.
New Rule Below - You can create nested rules under existing rules, when you have a situation where you need define additional criteria for an existing rule. When you create a nested rule, the rule above it does take precedence in the hierarchy.
New Rule After – Select this function to insert a new rule after the selected rule on the Profile Rules tree. This does not mean that it indicates any hierarchy to the rule you are inserting it after, because the rule will be on the same branch of the Profile Rules tree.
Note: Providing the two different options to insert a New Rule ‘Before’ or ‘After’ an existing rule, simply allows you to maintain organization in the Profile Rules tree. For example, you may want to keep the rules organized in alphabetical order.
Change Profile - You can change the profile that a rule is assigned to. Select the Change Profile option, select the profile you want from the list in the Edit Rule Value window and click Insert to save your changes.
Delete Rule - You can delete any existing rule. Caution: the rule will be deleted immediately upon clicking Delete Rule and any profiles that existed under that rule are removed from the Profile Rules tree. The profiles are not deleted - they still remain in the profile list as accessible profiles.
Inherit Profile - A rule can also inherit the profile directly above it. You can select Inherit Profile when you create a new rule or change a profile for an existing rule.
History Action Column Function
You can view a complete history of the Profile Rules Tree and the changes made to it using the History Action Column function.To view the Profile Rules Tree History
In the Action column, click History.
The Rule History box appears showing an historical listing of all changes made to the paper claim rules.
The data for the most current version of the Profiles Rule Tree displays with the text “Visible” to the right of it, since it is the version displayed after accessing the Paper Claim Editor for the selected Claim Type. You can view previous versions of the Profiles Rule Tree by clicking the “View” link provided to the right of each version.
Warning
You will revert the Profile Rules Tree back to an earlier version if you click Save after you finish reviewing it and that will delete all of the changes made after that time. You should click Cancel when you are done reviewing an older version if you want to retain the current version of the Profile Rules Tree.
CMS-1500 (02/12) Paper Claim Definitions