![]()

| Prompt | Response | Req | Len |
|---|---|---|---|
| Create Ins for Paid Chgs | If you want to create insurance claims
for charges that have been paid, select this check box.
Note: If a negative charge is applied to a charge transaction in Procedure Entry, which zeroes it out, a claim will not file to insurance even if this check box is selected. |
1 | |
| Create Sec/Ter on $0 Claim | If you still want secondary and tertiary claims to generate for charges that have been paid/adjusted in full, select this check box. | 1 | |
| Create Ins on Locked Batches Only | If you want to create insurance on locked
batches only, select this check box.
Note: If this check box is selected and you Print Patient Statements or Print History Statements, a warning message will display to notify you when there are procedures in an unlocked batch that insurance has not been created for yet. Since charges are stored as ‘patient balances’ until insurance has been created, this message will appear when you click Save, so you can prevent sending statements to patients for balances that have not been filed to insurance yet. This message will always display if:
|
1 | |
| Save 837 Claim Files | If you want to save the claim files after they have been sent to provide them to an alliance partner for reporting purposes, select this check box. | 1 | |
| File Path | If you selected the 'Save 837 Claim Files' check box, type the full file path name where you want the files saved. Example: C:\837_Claim_Files\. The file destination path must be a valid path on the CGM webPRACTICE server or be a path accessible by the server, such as a network path. This method does not save the files to your workstation. | 50 | |
| Anesthesia Minutes per Unit | Type the number of minutes contained
in each Anesthesia unit, if it is different than 15. This value
will populate the Anesthesia
Minutes per Unit field in the Insurance Carrier Table when
you add new codes.
The hierarchy for determining the Anesthesia Minutes per Unit value when a claim is created:
|
3 |
| Prompt | Response | Req | Len |
|---|---|---|---|
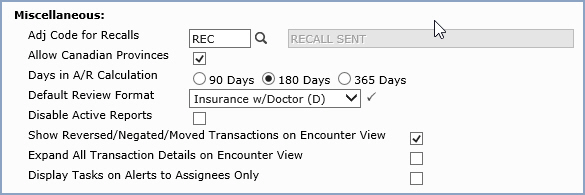
| Adj Code for Recalls | Select an adjustment code if you want to automatically post an adjustment to a patient's account each time you generate Recall Letters/Cards. | 5 | |
| Allow Canadian Provinces | If you want to include the Canadian provinces in the State Code lists throughout the system across all databases, select this check box. | 1 | |
| Days in A/R Calculation | Select the option to indicate the number of days' worth of charges to include in the Days in A/R calculation on the Practice Vitals Dashboard. To ensure the figure provided for the Days in A/R represents a valid snap shot for your practice; make sure the number of days selected is close to the same number of days (or less) than your practice has been posting charges in CGM webPRACTICE. If you do not select an option, the Days in A/R calculation uses 90 days. | 1 | |
| Default Review Format | Select the option you want from the list for the Transaction History screen default view. |  |
2 |
| Disable Active Reports | If you want reports sent to MyReports to print in standard, rather than active format, select this check box. | 1 | |
| Show Reversed/Negated/Moved Transactions on Encounter View | If you want to display the detail of all reversed, negated and moved transactions while reviewing a patient's History in Encounter View, select this check box. | 1 | |
| Expand All Transaction Details on Encounter View | If you want to automatically expand all the transaction details while reviewing a patient's History in Encounter View, select this check box. | 1 | |
| Display Tasks on Alerts to Assignees Only | If you want tasks to display in the Alerts window only for the User or User Group assigned to the tasks, select this check box. | 1 |
| Prompt | Response | Req | Len |
|---|---|---|---|
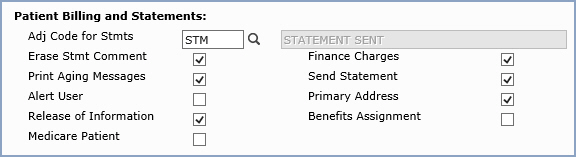
| Adj Code for Stmts | If you want to automatically post an adjustment to a patient's account each time you generate Patient Statements, type the code or use the magnifying glass icon to search the table. | 5 | |
| Erase Statement Comment | If you want the statement comment contained in the Billing Information screen to be erased when the Erase Statement Comments function has been selected, select this check box. | 1 | |
| Finance Charges | If you want finance or service charges to be added to the patient's account, select this check box. | 1 | |
| Print Aging Messages | If you want the standard aging messages to be printed on the patient's statement, select this check box. | 1 | |
| Send Statement | If you want to send a statement to the patient, select this check box. | 1 | |
| Alert User | If you want to be alerted whenever this patient account is accessed, select this check box. | 1 | |
| Primary Address | If you want patient statements sent to the patient's primary address (versus secondary), select this check box. | 1 | |
| Release of Information | If the patient has authorized the release of medical data to other organizations, select this check box. | 1 | |
| Benefits Assignment | If you have the patient's Signature on File, select yes, otherwise select the applicable option. | 1 | |
| Medicare Patient | If the patient has Medicare insurance, select this check box. | 1 |
| Prompt | Response | Req | Len |
|---|---|---|---|
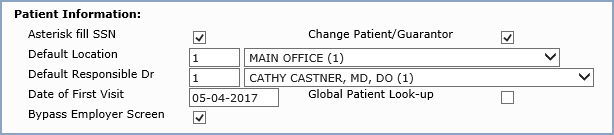
| Asterisk fill SSN | If you want the patient's summary screen and DMS Alerts messages to display asterisks for all but the last four digits of the social security number (***-**-1234), select this check box. You can still access the entire number in the Patient Name and Address Information screen. | 1 | |
| Change Patient/Guarantor | When you make a change to a patient name or address, you will be asked if you want to make the same change to the guarantor (and vice versa). If you want the standard default value to be yes, select this check box. | 1 | |
| Default Location | Type the code you want for the Default Location to be used in Patient Registration or Quick-Register, or select from the Location code list. | 3 | |
| Default Responsible Dr | Type the code you want for the Default Responsible Doctor in Patient Registration or select from the Doctor code list. If you use Quick-Register when scheduling patient appointments and you complete the Quick-Register information for the patient before selecting an appointment time slot, the doctor selected for this field will default on the Quick-Register screen. | 3 | |
| Date of First Visit | Type a default date for the 'Date of
First Visit' field in patient registration. Type the Default Date
as MM-DD-YYYY or leave the field blank to default the current
date. This date may be overridden in Patient Registration if you select a patient account that has already been 'Pre-registered'. In that situation, the default date will contain the date the patient was pre-registered. In addition, if you schedule any future appointments for the pre-registered patient account (prior to registering the account), the future appointment date will override any previous default date. The date stored in this field may also used as the default date for the Ins Effective Date in the patient's Insurance Policy Information screen in Patient Registration, if you select the Date of First Visit option for the Ins Effective Date field in the Patient's Insurance Information section below. |
10 | |
| Global Patient Look-up | If you want the patient look-up function to scan all databases, select this check box. The look-up screen will display the database number, a slash (/) and the account number in the first column, for each account that meets your criteria. | 1 | |
| Bypass Employer Screen | If you want to bypass the Employer screen when registering new patients, select this check box. | 1 |
| Prompt | Response | Req | Len |
|---|---|---|---|
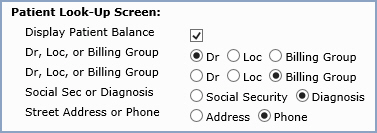
| Display Patient Balance | If you want the patient balance to display on the patient look-up screen, select this check box. | 1 | |
| Dr, Loc, or Billing Group | Select a column heading to display on the patient look-up screen. | 1 | |
| Dr, Loc, or Billing Group | Select an additional column heading to display on the patient look-up screen. | 1 | |
| Social Sec or Diagnosis | Select a column heading to display on the patient look-up screen. | 1 | |
| Street Address or Phone | Select a column heading to display on the patient look-up screen. | 1 |

| Prompt | Response | Req | Len |
|---|---|---|---|
| Bill this Carrier | Select the billing option you want to
use for insurance policies, when creating insurance claims. Y - Yes, create an insurance claim for all procedures that have accounting dates falling within the effective and termination dates for this policy and store entries for each procedure in the insurance ledger showing all activity. N - No, do not create an insurance claim for any procedures for this policy. C - Courtesy, create an insurance claim for all procedures that have accounting dates falling within the effective and termination dates for this policy but do not store any activity in the insurance ledger. |
|
1 |
| Default Policy with SSN | If you want the patient's social security
number to default in the Policy Number field when adding a new
insurance policy, select this check box.
If you select this check box and Rel to Guarantor = Self: the policy number defaults to the patient's SSN, otherwise the policy number defaults to the guarantor's SSN. |
1 | |
| Ins Effective Date | Select a date option to be used as the
default date when entering insurance policies on accounts or when
Quick-Registering patient accounts. You can type the date as MM-DD-YYYY
or click the calendar icon to select a date, select to default
the Current System Date, the patient's Date of First Visit or
select None so no date will default, which will require the date
to be manually entered.
Note: If Date of First Visit or None is selected; when you enter a new patient appointment in Scheduling and the Scheduling System Integration is set to Register, all new insurance policies will store the Current System Date for the Insurance Effective Date. |
10 | |
| Primary Insurance Default | If you want the Carrier Type field on
the Insurance Policy Information screen to default to 'Primary',
select this check box.
Note: You must select this check box if you want the following functionality to work when adding a Secondary policy to a patient account. The Bill this Carrier option will automatically be set to E, IF the secondary Insurance Carrier code has a Medigap number entered in the Insurance Carrier Table and ONLY IF the primary carrier on the patient's account is Medicare. |
1 |
Copyright and Trademark Notice. Copyright © 2019 CompuGroup Medical, Inc. CGM®, CompuGroup Medical® and the CGM logo are registered trademarks and CGM webPRACTICE™ and CGM webTOOLS™ are trademarks of CompuGroup Medical AG in the United States and/or other countries. Any rights not expressly granted herein are reserved.
