![]()
| Prompt | Response | Req | Len |
|---|---|---|---|
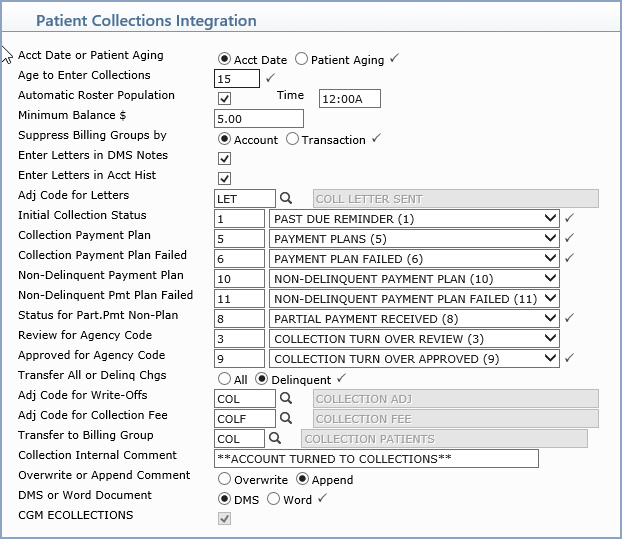
| Acct Date or Patient Aging | Select the option to have balance age by either Accounting Date or by the date they enter the Patient Balance. |  |
1 |
| Age to Enter Collections | Type the number of days the delinquent charges should age before they enter the collection process. | |
3 |
| Automatic Roster Population | If you want the collection roster to automatically populate every night, select this check box. | |
1 |
| Time | Time to start automatic roster population. | 6 | |
| Minimum Balance $ | Type the minimum balance required in order to transfer a patient account into Collections. | 10 | |
| Suppress Billing Groups by | Select the option to suppress Billing
Groups by either Account or Transaction. In the Billing Group Table, you can choose to suppress collections activity for an entire billing group. Here, you indicate whether you want that billing group suppressed by the billing group on the account in the patient's Billing Information screen, or if you want it suppressed by the billing group on the individual transaction. This is useful, for example if you change a patient's billing group and the new billing group is set to 'suppress collections', but there are old transactions on the patient's account for the previous billing group that should still be allowed to enter the collection process. |
|
1 |
| Enter Letters in DMS Notes | If you want a DMS note created each time a collection letter is sent to a patient, select this check box. | |
1 |
| Enter Letters in Acct Hist | If you want an adjustment to be posted in the patient's transaction history each time a collection letter is sent to the patient, select this check box. Note: These $0.00 adjustments will not print on the Adjustment Journal. | |
1 |
| Adj Code for Letters | If you selected Yes for the Enter Letters in Account History field, type the adjustment code you want or click the magnifying glass to search the table. | 5 | |
| Initial Collection Status | Select the status code to assign to accounts that are new to the collection process. | |
3 |
| Collection Payment Plan | Select the status code to use when accounts
within the collections process are set up on a payment plan. With
this status, the guarantor or patient has been making payments
in accordance with this Collection Payment Plan. Accounts remain
in this status until they are no longer past due or until they
fail to meet the payment plan arrangements. Any accounts that fail to meet the criteria of the payment plan are automatically transferred (when you perform the Populate Collection Roster function) to the collection status selected in the Collection Payment Plan Failed field in the Patient Collections Integration, unless there is a different code selected in the Status for Default field in the specific Collection Payment Plan. |
|
3 |
| Collection Payment Plan Failed | Select the status code to use when accounts
within the collections process fail to meet the criteria of the
Collection Payment Plan. Any accounts that fail to meet the criteria of the payment plan remain in this status until they are no longer past due, or until the status code is manually changed. These accounts appear in the Work Accounts function and on the Dead-End Report for your attention. |
|
3 |
| Non-Delinquent Payment Plan | Select the status code to use when non-delinquent
accounts are set up on a payment plan. With this status, the guarantor
or patient has been making payments in accordance with this Non-Delinquent
Payment Plan. Accounts remain in this status until they have paid
the patient balance in full or until they fail to meet the payment
plan arrangements. Any accounts that fail to meet the criteria of the payment plan are automatically transferred (when you perform the Populate Collection Roster function) to the collection status selected in the Non-Delinquent Pmt Plan Failed field in the Patient Collections Integration, unless there is a different code selected in the Status for Default field in the specific Non-Delinquent Payment Plan. |
3 | |
| Non-Delinquent Pmt Plan Failed | Select the status code to use when non-delinquent
accounts fail to meet the criteria of the Non-Delinquent Payment
Plan. Any accounts that fail to meet the criteria of the payment plan remain in this status until they are no longer past due, or until the status code is manually changed. These accounts appear in the Work Accounts function and on the Dead-End Report for your attention. |
3 | |
| Status for Part.Pmt Non-Plan | Select the status code to assign to
accounts (that are NOT on a fixed payment plan) that make a payment
that does not satisfy the past due amount in full. These accounts
usually require different attention than the accounts that have
fixed payment plans set up, that fail to make a scheduled payment. If a document name is entered in the collection status code table for the selected code, a 'partial payment' letter will automatically be generated for any accounts entering this status. |
|
3 |
| Review for Agency Code | Select the status code to assign to accounts that are on the Review for Turn Over Report. | 3 | |
| Approved for Agency Code | Select the status code to assign to accounts after they have been approved for turn over to a third party collection agency. | |
3 |
| Transfer All or Delinq Chgs | Select the option to indicate if you
want the Move Accounts to Collection Database function to transfer
All charges, whether past due or not, or only Delinquent charges
to the Collection Database for each patient. Note: This function writes off only the delinquent charges on the patient's account, even if you have selected to have All the open charges on the patient's account transferred to the collection database. The purpose for transferring All the open charges is strictly to provide a comprehensive picture of all the charges on a patient's account to the person working the collection database. |
|
1 |
| Adj Code for Write-Offs | Select the adjustment code to use when writing off delinquent balances transferred to the collection database. | 5 | |
| Adj Code for Collection Fee | Select the adjustment code to use when adding a collection fee to the account. | 5 | |
| Transfer to Billing Group | Select the billing group code to transfer the collection accounts into, after their balances have been written off. | 3 | |
| Collection Internal Comment | Type the comment you want placed in the Internal Comment field in each patient's Billing Information after they are turned over to a third party collection agency. | 45 | |
| Overwrite or Append Comment | If you entered a Collection Internal Comment, select the option to either Overwrite the existing Internal Comment or Append the Collection Internal Comment to each patient's existing Internal Comment. | 1 | |
| CGM ECOLLECTIONS | Informational only - If CGM ECOLLECTIONS has been activated for this database by the Implementation Department, this check box will be selected. | |
1 |
| Display Payment Plan Alert | If you want an Alert to display when you access a patient account that has a Payment Plan, select this check box. |
|
1 |
| Default # of Days for Next Contact | Enter the number of days to default for the Next Contact date field if a User adds a Note and fails to enter a date while working a patient's account. | 3 |
Copyright and Trademark Notice. Copyright © 2019 CompuGroup Medical, Inc. CGM®, CompuGroup Medical® and the CGM logo are registered trademarks and CGM webPRACTICE™ and CGM webTOOLS™ are trademarks of CompuGroup Medical AG in the United States and/or other countries. Any rights not expressly granted herein are reserved.
