![]()
| Prompt | Response | Req | Len |
|---|---|---|---|
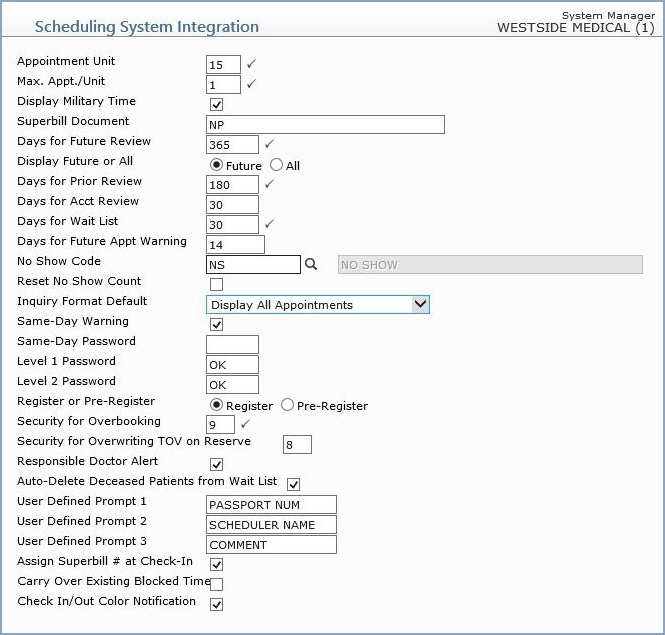
| Appointment Unit | Type the number of minutes each appointment unit should contain (10, 15, 20, etc.). This value defaults in the Appointment Unit field in the New Location function in Edit Doctor Schedules. |  |
2 |
| Max. Appt./Unit | Type the maximum number of appointments allowed to be scheduled per time slot. This value defaults in the Max. Appt./Unit field in the New Location function in Edit Doctor Schedules. | |
2 |
| Display Military Time | If you want to display military time (13:00) in the schedules, select this check box. | |
1 |
| Superbill Document | This field instructs CGM webPRACTICE which document or method you want to use when you print superbills. If you use DMS, type the name of the DMS superbill document. If you use Microsoft Word, type lower-case 'word', and if you use a CGM webPRACTICE Wizard superbill, type upper-case 'NP'. | 30 | |
| Days for Future Review | Type the number of days in the future (from the current date) you want CGM webPRACTICE to review a patient's account to see if they have any future scheduled appointments. If any appointments exist within that specified number of days, then CGM webPRACTICE displays the Inquiry function and lists the future appointments whenever you use the Select Patient function to schedule an appointment. | |
4 |
| Display Future or All | If you typed a number of days in the Days for Future Review field, select the option to indicate whether you want to see just the Future appointments or All appointments in the Inquiry function when selecting a patient to schedule an appointment. Whether you select to display Future or All appointments, the number of future appointments displayed is limited to the ones scheduled within the number of days specified in the Days for Future Review field. | 1 | |
| Days for Prior Review | If you typed a number of days in the Days for Future Review field and selected to display All appointments in the Display Future or All field, you can limit the quantity of past appointments that display within the Inquiry function. Type the number of days prior to the current date that you want CGM webPRACTICE to list appointments. | |
4 |
| Days for Acct Review | Type the number of days you want to require since the patient last had an E/M charge posted to provide a warning when scheduling a patient appointment. CGM webPRACTICE displays the Last Visit information in red in the Patient Information section. This warns you the account information should be reviewed and updated if necessary. | 4 | |
| Days for Wait List | Type the number of days you want to indicate how many days past the Entry Date that you want patients on the Wait List (added not from within a specific appointment, but through the Move Patients to Wait List options when you edit a doctor's schedule, for example) to remain on the Wait List. The entries will be removed from the Wait List after this set number of days after the Entry Date. If you leave this field blank, the Wait List operates as if 30 days was stored in this field. |
|
4 |
| No Show Code | Type the code you want or click the magnifying glass to search the table and select the procedure code you want to use, for the Post No Show Appointments function on the Schedule menu. | 10 | |
| Reset No Show Count | If you want the No Show count for each patient account to be reset to zero at the beginning of each calendar year, select this check box. The No Show count is listed when scheduling a patient appointment. | |
1 |
| Inquiry Format Default | Select the format you want to automatically display when performing an appointment inquiry. | 1 | |
| Same-Day Password | Type a password if you want the same-day appointments password protected. | 4 | |
| Level 1 Password | Type the password that will be required to override a Lock-out when scheduling a patient appointment. You can lock-out scheduling an appointment for a patient account that is in a Billing Group that has the Lock-out Appointments field selected or for a patient in a Collection Status that has the Lock-out Appointments field set to Yes. If you leave this field blank, you will not be given the option to override the lock-out when scheduling a patient appointment. You will have to change the patient's billing group or collection status that is causing the lock-out before you will be allowed to schedule the appointment. | 4 | |
| Level 2 Password | Type the password that will be required to override a Warn Lock-out when scheduling a patient appointment. You can lock-out scheduling an appointment for a patient account that is in a Billing Group that has the Lock-out Appointments field selected or for a patient in a Collection Status that has the Lock-out Appointments field set to 'Yes'. If you leave this field blank, you will not be given the option to override the lock-out when scheduling a patient appointment. You will have to change the patient's billing group or collection status that is causing the lock-out before you will be allowed to schedule the appointment. | 4 | |
| Register or Pre-Register | Select whether you want to register or pre-register new patients when scheduling an appointment. For additional information see the Patient Registration and the Add a Patient Referral help sections. | 1 | |
| Security for Overbooking | Type the security level required to allow a user to overbook appointments. | |
1 |
| Responsible Doctor Alert | If you want to be notified when the patient's responsible doctor is different than the doctor selected when you are scheduling an appointment, select this check box. | |
1 |
| Auto-Delete Deceased Patients from Wait List | If you want patients in the Wait List automatically deleted when Status 3 is set in Patient screen, select this check box. | 1 | |
| User Defined Prompt 1 | You can customize this field for your practice to capture additional data when scheduling a patient appointment. Type the field description you want to use. For example, 'Date of Last X-ray', 'Surgery Date', and so on. | 15 | |
| User Defined Prompt 2 | You can customize this field for your practice to capture additional data when scheduling a patient appointment. Type the field description you want to use. For example, 'Date of Last X-ray', 'Surgery Date', and so on. | 15 | |
| User Defined Prompt 3 | You can customize this field for your practice to capture additional data when scheduling a patient appointment. Type the field description you want to use. For example, 'Date of Last X-ray', 'Surgery Date', and so on. | 15 | |
| Assign Superbill # at Check-In | If you are integrating with an EMR partner or using the Electronic Superbill, you can elect to have a superbill number automatically assigned to the patient when you check them in using the Patient Check In/Out function. This will allow you to track missin |
|
1 |
| Carry Over Existing Blocked Time | If you want to carry over existing blocked time when replacing a schedule with a template (set up with same time increments), select this check box. | 1 | |
| Check In/Out Color Notification | If you want the appointment times to be highlighted when the patient checks in (green), checks out (blue) and if it is 15 minutes past the appointment time with no check-in activity (dark red), select this check box. | 1 |
Copyright and Trademark Notice. Copyright © 2019 CompuGroup Medical, Inc. CGM®, CompuGroup Medical® and the CGM logo are registered trademarks and CGM webPRACTICE™ and CGM webTOOLS™ are trademarks of CompuGroup Medical AG in the United States and/or other countries. Any rights not expressly granted herein are reserved.
