![]()
| Prompt | Response | Req | Len |
|---|---|---|---|
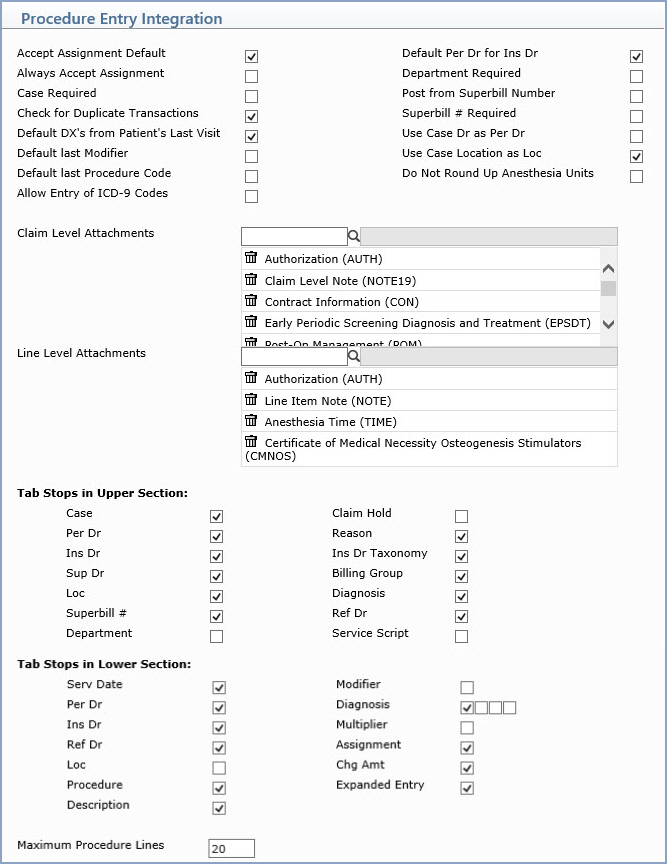
| Accept Assignment Default | If you want the Accept Assignment default to be 'Yes', select this check box. | 1 | |
| Default Per Dr for Ins Dr | If you want the Ins Dr field to default for the Per Dr code, select this check box. The following criteria is used to determine the default doctor:
If you select a case:
|
1 | |
| Always Accept Assignment | If you want to always accept assignment on all claims, select this check box. This overrides any other 'accept assignment' settings throughout the system. If you leave this check box blank, assignment is determined based on a hierarchy of the other assignment fields. For more information, see the Accept Assignment Protocol section under Introduction, System Processes. | 1 | |
| Department Required | If you want the department to be required, select this check box. | 1 | |
| Case Required | If you want a case to be required, select this check box. | 1 | |
| Post from Superbill Number | If you want to post charges using ticket/superbill numbers, select this check box. |
1 | |
| Check for Duplicate Transactions | If you want to receive a warning message to prevent posting duplicate charges, when a charge matches the procedure code, date of service, and location of a previously posted charge in the last 90 days, select this check box. | 1 | |
| Superbill # Required | If you want a superbill # to be required, select this check box. | 1 | |
| Default DX's from Patient's Last Visit | If you want the diagnoses from the patient's last posted visit to default in the Procedure Entry Function, select this check box. This field will override what is entered in the 'Default Diagnosis' field in the Patient Name and Address Information screen. | 1 | |
| Use Case Dr as Per Dr | If you want the Case Dr to default for the Per Dr, select this check box. | 1 | |
| Default last Modifier | If you want the last modifier entered to default in procedure entry, select this check box. |
1 | |
| Use Case Location as Loc | If you want the Case Location to default for the Loc, select this check box. | 1 | |
| Default last Procedure Code | If you want the last procedure code entered to default in procedure entry, select this check box. |
1 | |
| Do Not Round Up Anesthesia Units | If you do not want to have the anesthesia units rounded up for Anesthesia Attachments (which will affect the Amount Charged), select this check box. | 1 | |
| Allow Entry of ICD-9 Codes | If you want to allow the entry of ICD-9 Codes, select this check box. | 1 | |
| Claim Level Attachments | Select your practice’s most-frequently
used attachments that you want available for quick selection from
the attachments list during procedure entry. You can use the View More option during procedure
entry to see all of the available attachments, so you will be
able to select lesser-used attachments and not clutter up your
quick selection list.
Type the attachment abbreviation or click the magnifying glass to search the table. To remove an attachment from the list, click the trash can icon to the left of the attachment name. |
||
| Line Level Attachments | Select your practice’s most-frequently
used attachments that you want available for quick selection from
the attachments list during procedure entry. You can use the View More option during procedure
entry to see all of the available attachments, so you will be
able to select lesser-used attachments and not clutter up your
quick selection list.
Type the attachment abbreviation or click the magnifying glass to search the table. To remove an attachment from the list, click the trash can icon to the left of the attachment name. |
||
| Tab Stops in Upper Section
Tab Stops in Lower Section |
You can customize the tab stops on the upper and lower sections of the Procedure Entry screen. When you select a check box, a tab stop is set for that field. By default, all of the check boxes will be selected, which means that pressing TAB on the Procedure Entry Function screen will move the focus of your pointer through the fields in the order as displayed on this Integration screen—down each column, from left to right. If you do not want the pointer to stop at a particular field when you press TAB, clear the check box for that field. | ||
| Maximum Procedure Lines | Type the maximum number of procedure lines (up to 400) that each encounter can contain. | 3 |
Copyright and Trademark Notice. Copyright © 2019 CompuGroup Medical, Inc. CGM®, CompuGroup Medical® and the CGM logo are registered trademarks and CGM webPRACTICE™ and CGM webTOOLS™ are trademarks of CompuGroup Medical AG in the United States and/or other countries. Any rights not expressly granted herein are reserved.
