Review/Send Electronic Statements
With the Review/Send Electronic Statements function, you can prepare
your electronic statement file to be transferred to CGM US.
The Review/Send Electronic Statements function provides the following
functions/sections:
Statement
Summary Screen
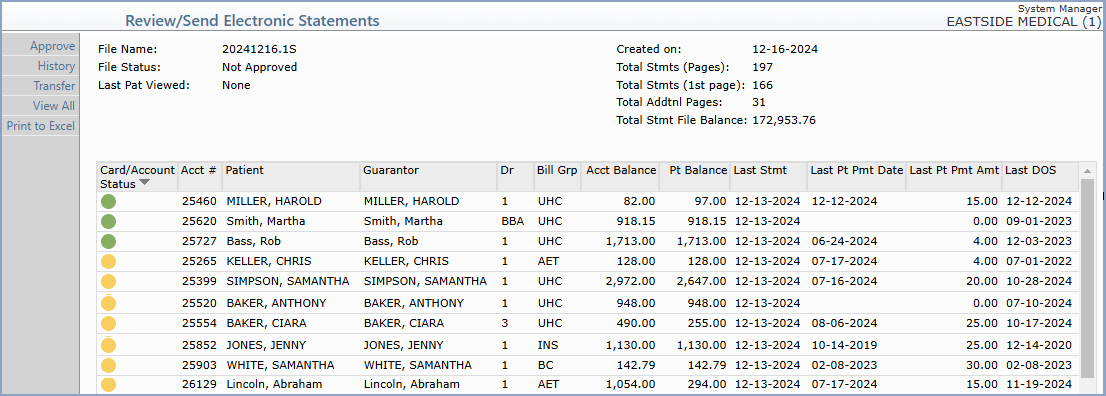
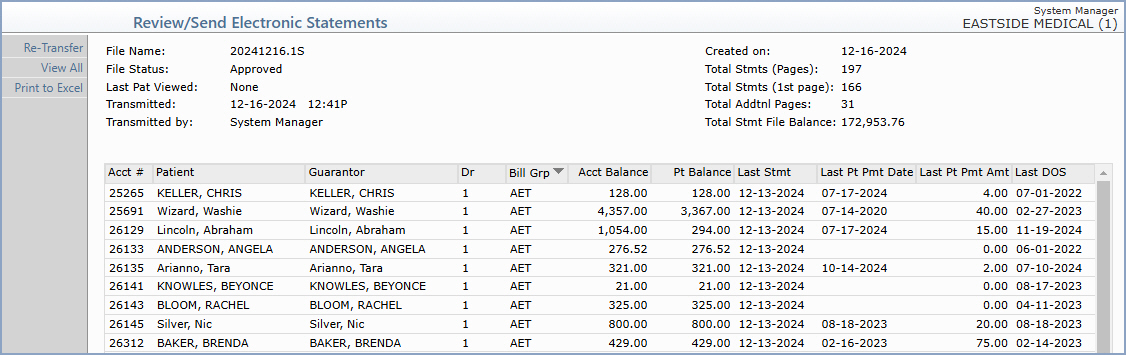
Upon accessing this function, the current statement file loads and the
Review/Send Electronic Statements summary screen displays the statistics
for the currently loaded statement file. It includes: the file name; file
status, account number of the last patient viewed, the date the file was
created; the total number of statements (pages and 1st page) contained
in the file; total additional pages and the total statement file balance.
If there is not a current statement file to display, the Statement Summary
Screen will be blank. You can click History in
the Action Column to access previously transferred statement files.
The statements included in the file are listed below the statistics section.
It displays the credit card (payment method) status; account number; patient
name; guarantor name; responsible doctor code, billing group code, patient
balance, last statment date, last patient payment date, last patient payment
amount and the last date of service. If a statement file contains any
zero balance statements, you will receive a warning message when you first
access this function after creating the file. This notifies you there
may be a problem with the statement file.
You can view and edit the statements prior to approving and transferring
them, or you can elect to approve the file immediately without viewing
or editing any statements.
View
and Edit Statements
- View Individual Statements - You can view an individual statement
by clicking anywhere in the row containing the statement information.
- View All Statements - If you prefer to view all the statements
in the file, click View All in the Action column. This function
displays the first statement in the file and allows you to work your
way through the file viewing one statement at a time.
- When viewing a patient statement on the screen, it displays in
the same format as the paper statements printed to a printer. You
must to scroll down to see the balance due and any comments or aging
messages that will print on the statement.
- Since the scroll bar only scrolls through a single page of an individual
statement, click Next Statement in the Action Column to view
the additional pages of a multi-page statement.

Next/Prev
Statement
Click Next Statement or Prev Statement in the Action Column
to scroll through the statements in the file.
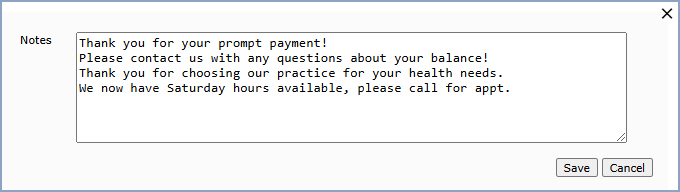
Add/Chg Notes
Click Add/Chg Notes in the Action Column to add individualized notes
or edit the existing notes on the statement. After you select this option,
a dialog box displays with any aging messages or other notes generated
by the statement program. You can edit or delete the existing notes or
add new notes. If the patient has a multi-page statement, you must be
on the final page to enter notes.
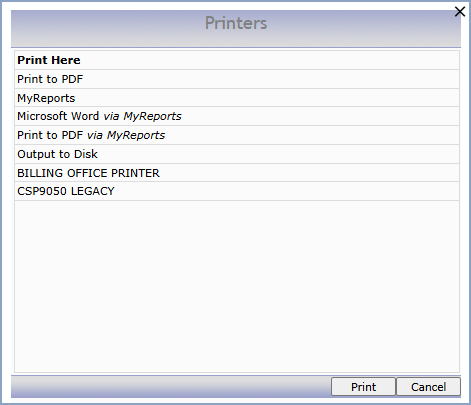
Print
Click Print in the Action Column to print the current statement.
NOTE: The statement prints in the standard paper statement format
and not in the electronic format as they do when they are printed at CGM.
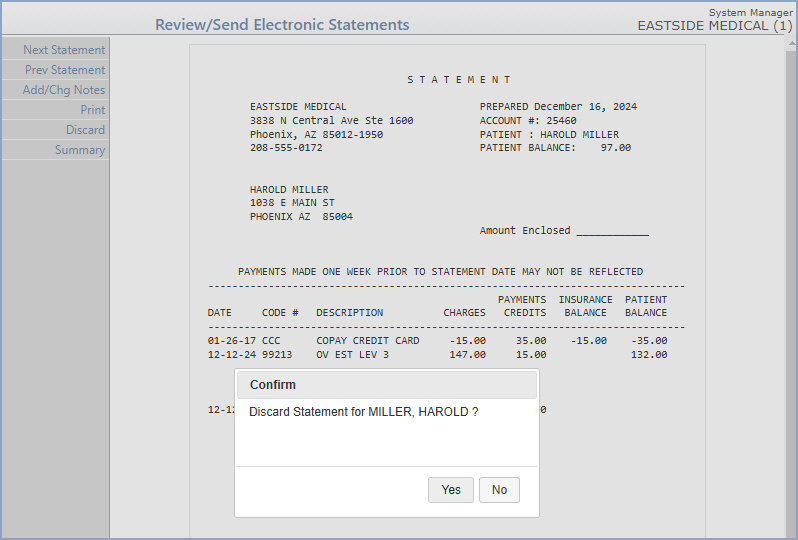
Discard
Click Discard in the Action Column to delete an individual statement
from the statement file. When the file is approved and transferred, any
discarded statements will not be forwarded to eMEDIX.
When a statement is discarded:
- If you use the function to post a 'Statement Sent' adjustment code
to the patient's account each time a statement is sent (see CGM
webPRACTICE Default Values), this is automatically reversed off
the account as long as you discard before
the file is approved. If you discover that you need to discard a statement
but have already approved the file (but not transferred it yet), you
can Unapprove the file and discard the statement.
- The patient's name is deleted from the Statement
Register.
- The Last Statement Date
field stored on the patient's account on the Summary
screen in Change
Patient Data is changed back to reflect the last date a statement
was generated.
Note: If the 30-day cycle setting
(or any # of days) is active for your statements, this setting looks at
the Last Statement Date stored
on the patient's account to determine if a statement should be generated
or not. If you discard a statement because changes need to be made to
the patient's account, the Last Statement
Date will be reverted back to its original setting, so a new statement
can be generated after the changes are made .
Approve
After you are done viewing or entering notes and you are ready to send
the statements, click Approve in the Action Column. When the message,
"This statement file has been approved for transfer." displays,
click OK. The File Status
field in the Statistics section is updated to Approved and the
Approve button in the Action Column toggles to Unapprove.
You can change the status of a file as many times as needed prior to transferring
the file. Files must be approved before they can be transferred to CGM.
If you are creating statements for multiple databases and want to send
them all to CGM within one 'transfer', do not click Transfer until
you have created and approved the statement file for each applicable database.
After approving the file in one database, you should exit the statement
function and switch to the next database to be created. Only proceed with
transferring your statement files when you are in the last database you
need to create statements for and have approved the last file.
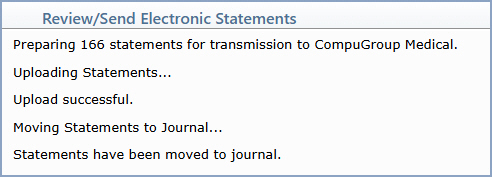
Transfer
After you have approved your statement file(s), click Transfer in
the Action Column. This function prepares and automatically sends the
statement file(s) to CGM.
History
Click History in the Action Column to display a summary list of
every electronic statement file that has been created and/or transferred
in CGM webPRACTICE including the file name and date it was transferred.
You can re-transfer a file or view the individual statements in a file
by selecting the file. To select a file, click anywhere in the row containing
the file information.

After you have selected a file, you can only re-transfer, view, or print
statements. The Add/Chg Notes and Discard functions are
unavailable.
Re-Transfer
You should use this function when you need to re-send a file to CGM that
has previously been sent. Select a file from the History summary list
and then click Re-Transfer to send the file to CGM. The file is
sent immediately.
NOTE: If you send statements electronically for multiple databases
within one 'transfer' or on the same date:
If you need to Re-Transfer the files for all databases - perform the
Re-Transfer function from within one of the databases originally
sent. CGM webPRACTICE automatically checks every existing database to
see if any other statement files were originally transferred on the same
date and if so, it automatically re-sends them.
If you only need to re-transfer one or more of the files originally
sent, contact CGM webPRACTICE customer service and notify them you will
be re-sending some statement files within the next fifteen minutes. Ask
them to notify the mailroom staff and inform them specifically which databases
you want processed and to delete the rest.
