Image Scanning
You can scan and save various types of images. The most common types include:
- Patient Photographs
- Guarantor Photographs
- Insurance Carrier Cards
- Explanations of Benefits
- Patient Documents
Although there are multiple types of images, there are
three methods available for saving them. The following sections contain
instructions for each method and also scanning multiple page documents:
- Scanning
within CGM webPRACTICE - Acquire and Scan
- Scanning
outside of CGM webPRACTICE - Acquire and Attach
- Scanning
outside of CGM webPRACTICE - Link Images
- Scanning Multiple Page
Documents
Prior to using any of these functions, you will need
to perform the Scanned
Image Management Setup Steps listed in the Introduction, System
Processes section.
Scanning within CGM webPRACTICE - Acquire and Scan
The following steps are specific to a Scanshell scanner
but can be used for other scanner types since they all typically function
in a similar manner.
Note: Any images
scanned and saved using this method can only be saved as .jpg, or .gif.
image types.
There are various functions you can acquire and scan an image, such as
Change Patient Data, Patient Registration, Payment Entry and Create
a Batch.
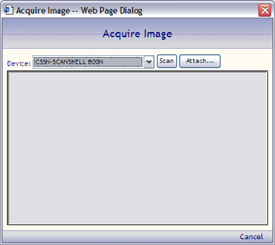
Step 1. After you click Acquire Image in the Action Column
the Acquire Image window will display.
Step 2. Select the scanner you want to use from the Device
list.
Step 3. Click Scan.
Step 4. Insert the document you want to scan into
the scanner and click Scan. We recommend you insert the card or
item to be scanned as close to one edge of the scanner as possible and
set the resolution to 300 dpi.
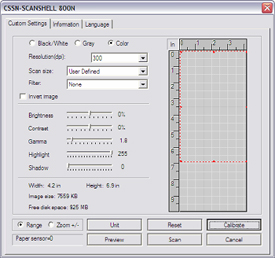
Note: If you
are having problems capturing the image while scanning, you can click
Preview in the ScanShell settings window prior to clicking Scan.
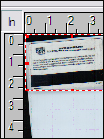
Drag the corners of the dotted red box until they more closely match the
scanned item. When you are satisfied, replace the card or item in the
scanner, align it with the same edge as before and click Scan.
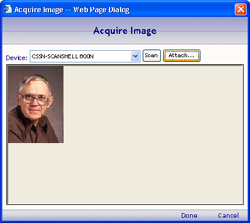
Step 5. After the image has been scanned, the
Acquire Image window will display the image that was scanned. Click
Done.
Scanning outside of
CGM webPRACTICE - Acquire and Attach
Any images scanned and saved using this method can only
be saved as .jpg or .gif image types.
NOTE: * .tiff,
.pdf and .bmp image types can only be used for Explanations of Benefits
and only when you use the Link
Images function located on the
System, Image Management
menu.
Step 1. Images should be scanned and saved into the C:\TempImages\9999_1
folder. Replace C:\ with your drive letter, 9999 with your
client number and replace the number 1 with your database number.
Step 2. After you click Acquire Image, the Acquire Image
window will display.
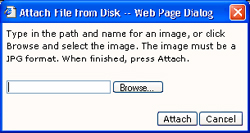
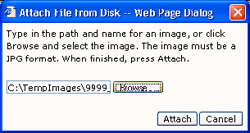
Step 3.Click Attach.
Step 4. Type the path and image name,
click Attach and then proceed to Step 8, or click Browse.
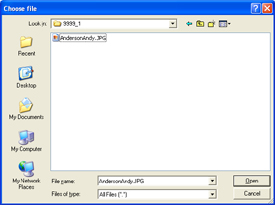
Step 5. Navigate to the the C:\TempImages\9999_1
folder. Replace C:\ with your drive letter, 9999 with your
client number and replace the number 1 with your database number.
Step 6. Click on the image you want and then click Open.
Step 7. After the path and image name are shown
in the Browse text box, click Attach.
Step 8. When the Acquire Image window displays
the image that was attached, click Done.
Note: A copy
of the image file is made and the original image is not deleted from the
C:\TempImages\9999_1 folder.
Scanning outside of CGM webPRACTICE - Link Images
With the Link Images function, you can upload
and link image files scanned outside of CGM webPRACTICE, assign an Image
Type to each file, and link the image file to a patient account or payment.
For information about linking images, see Link
Images located on the System, Image Management menu.
Scanning
Multiple Page Documents
You can scan multiple page documents by scanning them
outside of CGM webPRACTICE using the software provided with your scanner.
You should save them as .tiff or .pdf image types, which accommodate multiple
pages. For detailed information or instructions on scanning the images,
you will need to contact your Hardware or IT specialist for assistance.
NOTE: * .tiff,
.pdf and .bmp image types can only be used for Explanations of Benefits
and only when you use the Link
Images function located on the
System, Image Management
menu.
You will need to have an image viewing software application loaded on each
workstation that will be viewing multiple page images. CGM webPRACTICE
does not support viewing multiple page documents from within the application.
For example, if you use .pdf image types, you will need Adobe Acrobat
Reader to view the images.
