![]()
| Prompt | Response | Req | Len |
|---|---|---|---|
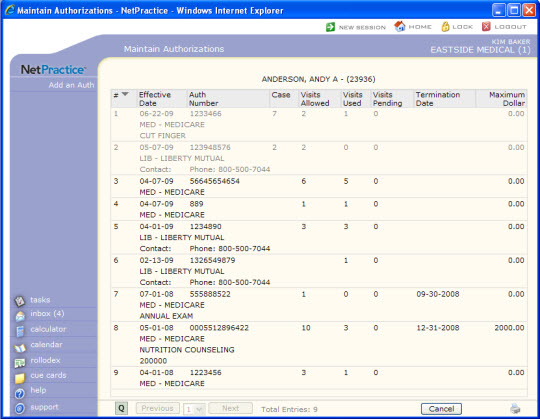
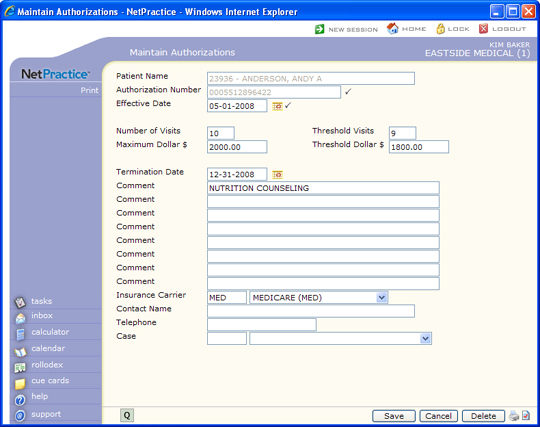
| Authorization Number | Type the authorization number assigned by the insurance carrier for this patient. |  |
50 |
| Equiv Auth Number | Type the equivalent authorization number wich will be the Auth number that is sent electronically and printed on paper claims | 50 | |
| Effective Date | Type the effective date of this authorization or click the calendar icon to select a date. | |
10 |
| Number of Visits | Type the number of visits allowed for this authorization. When you enter appointments, check patients in or out, or post procedures tied to this authorization, CGM webPRACTICE will alert you when the maximum number of visits has been reached. | 3 | |
| Threshold Visits | Type the number of visits you consider as threshold for this authorization. For example, if the authorization allows ten visits, you might want to set the threshold at eight visits. When you enter appointments, check patients in or out, or post procedures tied to this authorization, CGM webPRACTICE will alert you when the threshold has been reached. | 3 | |
| Maximum Dollar $ | Type the maximum dollar amount allowed for this authorization. When you post procedures tied to this authorization, CGM webPRACTICE will alert you when the maximum dollar amount has been reached. | 10 | |
| Threshold Dollar $ | Type the dollar amount you consider as threshold for this authorization. For example, if the authorization allows $1,000.00, you might want to set the threshold at $800.00. When you post procedures tied to this authorization, CGM webPRACTICE will alert you when the threshold has been reached. | 10 | |
| Termination Date | Type the expiration date of this authorization or click the calendar icon to select a date. This field indicates when the authorization expires, regardless of the number of visits allowed or used. | 10 | |
| Comment | Type any necessary comment text. | 45 | |
| Comment | Type any necessary comment text. | 45 | |
| Comment | Type any necessary comment text. | 45 | |
| Comment | Type any necessary comment text. | 45 | |
| Comment | Type any necessary comment text. | 45 | |
| Comment | Type any necessary comment text. | 45 | |
| Comment | Type any necessary comment text. | 45 | |
| Comment | Type any necessary comment text. | 45 | |
| Insurance Carrier | Type the insurance carrier code you want, select a code from the Insurance Carrier list or leave the field blank to not tie any carrier to the authorization. The field defaults to the patient's primary insurance carrier. | 5 | |
| Contact Name | Type the name of the contact person for the insurance carrier. This field will default with the contact name entered for the insurance carrier code but may be changed as needed. | 40 | |
| Telephone | Type the telephone number for the insurance carrier. This field will default with the number entered for the insurance carrier code but may be changed as needed. | 20 | |
| Case | Type the case code you want, select a code from the Case list or leave the field blank to not tie any case to the authorization. | 5 |

Copyright and Trademark Notice. Copyright © 2019 CompuGroup Medical, Inc. CGM®, CompuGroup Medical® and the CGM logo are registered trademarks and CGM webPRACTICE™ and CGM webTOOLS™ are trademarks of CompuGroup Medical AG in the United States and/or other countries. Any rights not expressly granted herein are reserved.
