Billing Profile Rules
With the Billing Profile Rules function you can control the information
that goes on your electronic and paper claims with a high degree of specificity.
Billing
Profile Rules Overview
This function allows you to set up various rules to dictate the data on
claims in multiple situations. You may need to include different information
on claims depending on the provider, the location, the insurance carrier,
the insurance form type or the insurance plan. For example, if you need
to send a specific taxonomy code when a certain doctor provides services
at a certain location, but not the other locations, you can do that. Or,
if you need to send a specific provider number to one insurance carrier
but not the rest, you can set up a billing profile rule to do that, too.
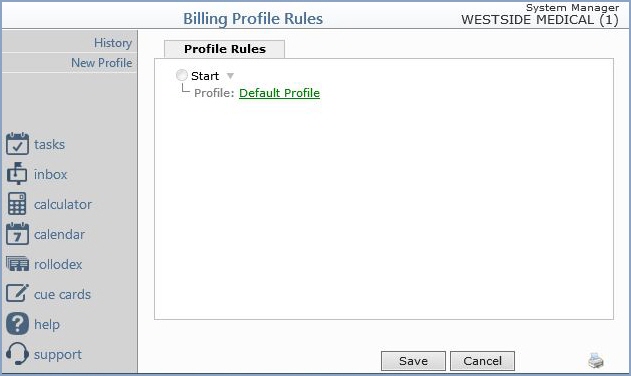
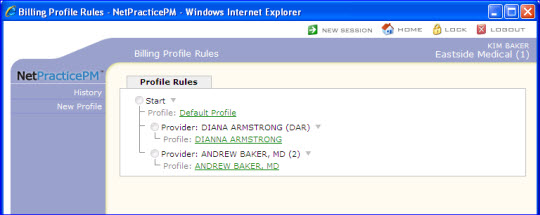
When you access this function, the Billing Profile Rules screen opens displaying
the profile rules 'tree' for the current database. The tree is set up
with your Default Profile at the top. The information stored in
the Default Profile is what goes on all claims unless there is
another rule and profile set up below that (or unless there is an overriding
customization in place), so it is very important to ensure that the details
in the Default Profile are correct.
NOTE: When this function was introduced with the release of CGM
webPRACTICE version 7.4.0, a Default Profile was set up with your
most commonly used billing scenario, focusing primarily on the billing/pay
to data that goes into Box 33 on the HCFA (and its electronic equivalent).
You can make any necessary changes to the Default Profile at any
time. You can also create a New Profile to be used under a rule
at any time, but there is always, only one Default Profile.
Default Profile
Click Default Profile to view or edit the data. The Edit Profile
screen opens and the Profile Name is unavailable, indicating that
you cannot change the default profile name. The Override column
of check boxes is also unavailable, indicating that this is the Default
Profile. Any time you change any of the information in CGM webPRACTICE
that the Default Profile pulls from, the Default Profile automatically
updates with the changed information.
NOTE: You can reach the full Doctor
Code Table and Location
Code Table from the Claim Management menu so you do not have
to exit the System Menu entirely to access information that you might
need to set up the provider and location information for your rules and
profiles.
The Edit Profile window has been divided into three separate images that
reflect what you see as you scroll down.
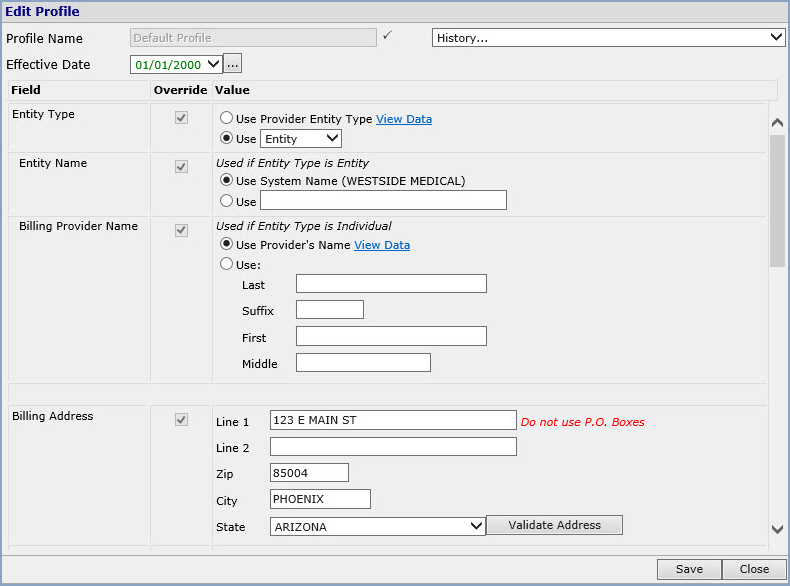
Profile Name
- Type the name of the profile.
- Default Profile Setup: Default Profile defaults here
and you cannot change the name of the Default Profile.
Effective Date
- Select an effective date from the list. To add a new effective
date, click the ellipsis (...) icon. The Manage Profile Effective
Dates dialog box opens. Type the date you want in the Add field
and click Insert or click the calendar icon to select a date
and click Insert. The newly inserted effective date appears
above the Add field. Click the trash can icon next to the date
to remove that effective date. All dates added here are available
from the Effective Date drop-down list.
- Default Profile Setup: The effective date of 01/01/2000
defaults in this field and you can change it per the instructions
above.
Entity Type
- Select the option you want to control claim data based on an individual
doctor or group.
- Use Provider Entity Type: Select this option if you want
to pull information onto the claim based on the Ins Dr on the
charges, whether that doctor has the Individual check box selected
in Maintain Doctor Codes (Individual), or not (Entity). Click
View Data to view a list of doctors in the Doctor Code Table.
The Table Preview: Entity Types dialog box opens. The list includes
the doctor Code, the Description (the doctor's name
as stored in the Printing Name field in Maintain Doctor
Codes), and an Individual column which indicates Yes
if the Individual check box is selected and No if it
is not. You cannot select a doctor from this list. This list is for
informational purposes only.
- Use: Select this option and select either Individual
or Entity from the drop-down list if you want claims to always
pull data as Individual or Entity regardless of what is selected in
Maintain Doctor Codes for the insurance doctor.
NOTE: If you select the Use option and select Entity
and the Individual check box for the Ins Dr is selected
and that Ins Dr is not a sole proprietor, those claims will
be denied.
- Default Profile Setup: This defaults with the Use Provider
Entity Type option selected.
Entity Name
- If, in the Entity Type field above, you have selected to
Use Provider Entity Type and the Ins Dr on the charges
does not have the Individual check box selected in Maintain
Doctor Codes, or if you have selected Entity in the Use
field, you can control which Entity Name prints in Box 33 of
the HCFA (and its electronic equivalent).
- Use System Name: Select this option to use the name stored
in the System Name field in Change Database Parameters
(for all claims). The name in parentheses is the name stored
in the Printing Name field in Change Database Parameters.
- Use: Select this option to use a different name. Type the
name you want to use.
- Default Profile Setup: This defaults with the Use System
Name option selected.
Billing Provider Name
- If, in the Entity Type field above, you have selected to
Use Provider Entity Type and the Ins Dr has the Individual
check box selected in Maintain Doctor Codes, or if you have
selected Individual in the Use field, you can control
which individual provider's name prints in Box 33 of the HCFA (and
its electronic equivalent).
- Use Provider's Name: Select this option to use the name
stored in the Printing Name field in Maintain Doctor Codes
for the Ins Dr on the charges. Click View Data to view
a list of doctors from the Doctor Code Table. The Table Preview:
Provider Names dialog box opens and includes the doctor Code,
the Description (the doctor's name as stored in the Printing
Name field in Maintain Doctor Codes), and the doctor's
Last Name, Suffix, First Name and Middle Name.
You cannot select a doctor from this list. This list is for informational
purposes only.
- Use: Select this option to use a different name on all claims,
regardless of the Ins Dr selected on the charges. Type the
provider's Last name, Suffix, First name and
Middle name.
- Default Profile Setup: This field defaults with the Use
Provider's Name option selected.
Billing Address
- Type the Billing Address that you want to print in Box 33 on the
HCFA (and its electronic equivalent). This address must be a valid
street address and not a P.O. Box number. Click Validate
Address to convert the address to the standard acceptable United
States Postal Service (USPS) address.
NOTE: If you have a different Pay To Address, the Pay
To Address is what prints in Box 33 on the HCFA (and its electronic
equivalent).
- Default Profile Setup: These fields default with the first
non-P.O. Box address stored in the Electronic Claims Integration
(before the address fields were removed). If no address was found
or if only P.O. Box addresses were found, the address from Change
Database Parameters defaults here.
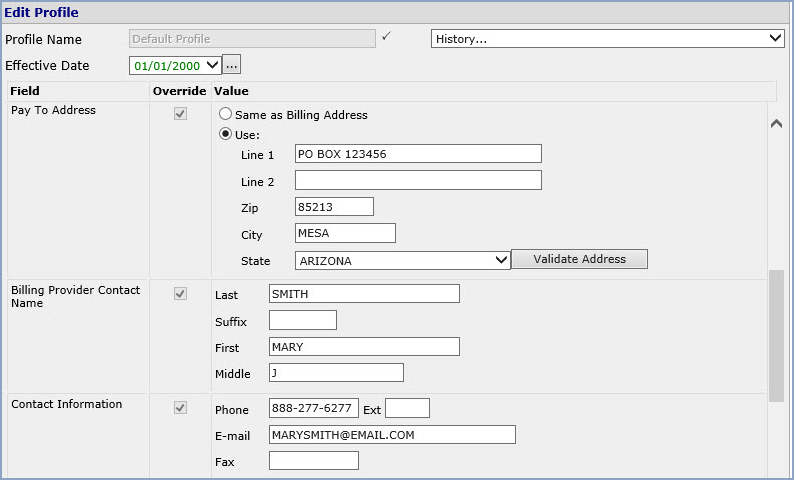
Pay To Address
- Same as Billing Address: Select this option to have Box
33 (and its electronic equivalent) print with the address as stored
in the Billing Address field.
- Use: Select this option to use an address different from
the billing address - a P.O. Box, for example. Type the address in
the address line fields, Click Validate Address to convert
the address to the standard acceptable USPS address. If you select
this option and enter a different address, this address prints in
Box 33 on the HCFA (and its electronic equivalent), even if you have
a different billing address stored in the Billing Address field.
- Default Profile Setup: This field defaults with the Use
option selected and the first P.O. Box address found in the Electronic
Claims Integration (before the address fields were removed), defaults
here. If no P.O. Box address was found, the Same as Billing Address
option is selected.
Billing Provider Contact Name:
- Type the full name of the person whom the insurance carrier should
contact if there are problems with the submission process. The Contact
Name and Contact Information will always be pulled from
the Default Profile for all claims even if you have created
other profiles.
- Default Profile Setup: These fields default with the first
name found in the Contact Name field in the Electronic Claims
Integration (before that field was removed).
Contact Information:
- Type the Phone, E-mail and Fax for the Billing
Provider Contact so the carrier can contact that person if there are
problems with the submission process. The Contact Name and
Contact Information will always be pulled from the Default
Profile for all claims even if you have created other profiles.
- Default Profile Setup: Since this information was not captured
previously in the Electronic Claims Integration, these fields
default as blank.
Tax ID Number
- Use Provider Tax ID: Select this option to use the Tax
ID Number stored in Maintain Doctor Codes for the Ins
Dr on the charges. Click View Data to view a list of the
doctors in the Doctor Code Table. The Table Preview: Tax ID
Numbers dialog box opens. The list includes the doctor Code,
the Description (the doctor's name as stored in the Printing
Name field in Maintain Doctor Codes), and the Tax ID
Number. You cannot select a doctor from this list. This list is
for informational purposes only.
- Use: Select this option and type a Tax ID Number to use
on all claims regardless of what Tax ID Number is stored for the Ins
Dr on the claim.
- Default Profile Setup: This defaults with the Use Provider
Tax ID option selected.
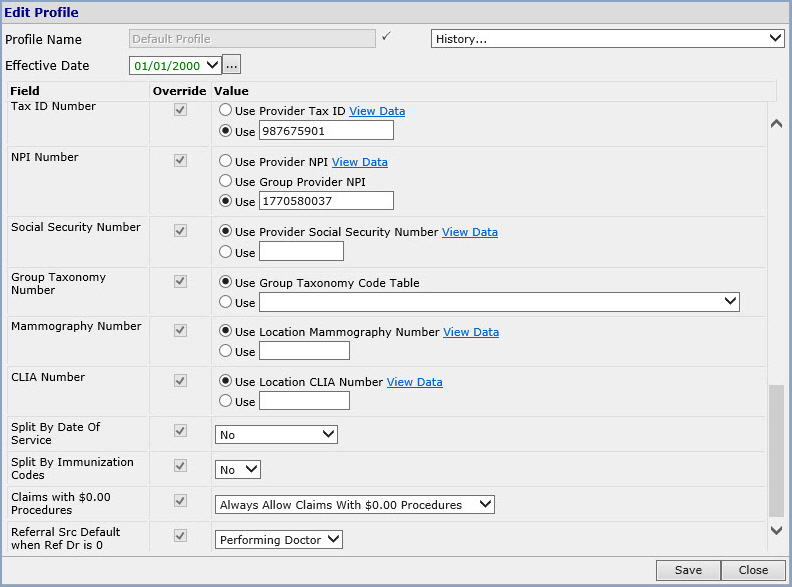
NPI Number
- Use Provider NPI: Select this option to use the NPI Number
stored in Maintain Doctor Codes for the Ins Dr on the
charges. Click View Data to view a list of the doctors in the
Doctor Code Table. The Table Preview: NPI Numbers dialog box
opens. The list includes the doctor Code, the Description
(the doctor's name as stored in the Printing Name field in
Maintain Doctor Codes), and the NPI Number. You cannot
select a doctor from this list. This list is for informational purposes
only.
- Use Group Provider NPI: Select this option to use the NPI
Number as stored in Maintain Group NPI Numbers.
- Use: Select this option and type an NPI Number to use on
all claims regardless of what NPI Number or Group NPI Number is stored
for the Ins Dr on the charges.
- Default Profile Setup: This defaults with the Use Group Provider
NPI option selected.
Social Security Number
- Use Provider Social Security Number: Select this option
to use the Social Security Number stored in Maintain Doctor
Codes for the Ins Dr on the charges. Click View Data
to view a list of the doctors in the Doctor Code Table. The
Table Preview: Social Security Numbers dialog box opens. The list
includes the doctor Code, the Description (the doctor's
name as stored in the Printing Name field in Maintain Doctor
Codes), and the Social Security Number. You cannot select
a doctor from this list. This list is for informational purposes only.
- Use: Select this option and type a Social Security Number
to use on all claims regardless of what Social Security Number is
stored for the Ins Dr on the charges.
- Default Profile Setup: This defaults with the Use Provider
Social Security Number option selected.
Group Taxonomy Number
- Use Group Taxonomy Code Table: Select this option to use
the Group Taxonomy Code as stored in Maintain Group Taxonomy
Numbers.
- Use: Select this option and select a Taxonomy Code to use
on all claims regardless of which Taxonomy Code is stored in the Group
Taxonomy Number Table for the Ins Dr on the charges.
- Default Profile Setup: This defaults with the Use Group
Taxonomy Code Table option selected.
Mammography Number
- Use Location Mammography Number: Select this option to use
the Mammography Certificate number stored in Maintain Location
Codes for the location selected on the charges. Click View
Data to view a list of the locations in the Location Code Table.
The Table Preview: Mammography Numbers dialog box opens. The list
includes the location Code, the Description (from the
Location Name field in Maintain Location Codes), and
the Mammography Certificate. You cannot select a location from
this list. This list is for informational purposes only.
- Use: Select this option and type a Mammography Certificate
Number to use on all claims regardless of whether or not a Mammography
Certificate Number is stored in the Location Code Table.
(Note: If you want the Mammography Certificate Number to go
on the claim, you must also select the Mammography Code check
box in Maintain Procedure Codes for that procedure.)
- Default Profile Setup: This defaults with the Use Location
Mammography Number option selected.
CLIA Number
- Use Location CLIA Number: Select this option to use the
CLIA Number stored in Maintain Location Codes for the
location selected on the charges. Click View Data to view a
list of the locations in the Location Code Table. The Table
Preview: CLIA Numbers dialog box opens. The list includes the location
Code, the Description (from the Location Name
field in Maintain Location Codes), and the CLIA Number.
You cannot select a location from this list. This list is for informational
purposes only.
- Use: Select this option and type a CLIA Number to use on
all claims whether or not a CLIA Number is stored in the Location
Code Table.
(Note: If you want the CLIA Number to go on the claim, you must
also select the Include CLIA Number on Claims check box in
Maintain Type of Service Codes for that type of service.)
- Default Profile Setup: This defaults with the Use Location
CLIA Number option selected.
Building
the Profile Rules Tree
The Billing Profile Rules tree is built using rules and profiles.
A good way to think about it is, a rule is the 'if' and
the profile is the 'then'; the rule is the condition and
the profile is the result. For example, IF charges are for Ins Dr
= Dr. Baker (the rule), THEN this different Pay to Address should
be used (the profile).
As mentioned above, all of your claims are generated off of what is stored
in the Default Profile. If you have billing situations that require
information that is different from the Default Profile, you must
create a rule. To create a new rule, click Start at the top of
the tree and select New Rule Below. This will create a new rule
directly below the Default Profile.
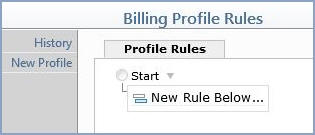
The Insert Rule window opens so you can select the new rule and its associated
profile.

- When: Select the parameter from the list. The only choices
are Provider, Location, Insurance Carrier, Insurance
Form and Plan Code.
- Equals: Select the 'condition' based on the parameter selected
in the When field. Depending on the size of the list from your
tables, select from the drop-down list or click the magnifying glass
to search the table.
- Use Profile: Select the profile to be used with this rule.
This list initially provides two options, Inherit Profile and
New Profile. After you start saving profiles, all saved profiles
will be available from this list.
NOTE: There is no way to delete a profile after it has been saved.
The profile must be saved as history so you can always refer to exactly
what was billed on claims based on that profile.
To continue the example, select New Profile in the Use Profile
field to create a new profile for the 'When Provider (Ins Dr
on the charges) Equals Andrew Baker (2)' rule.

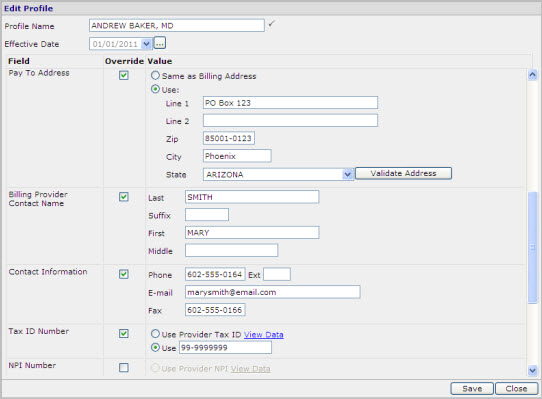
The Edit Profile window opens so you can create the profile information
you want to store. Enter a Profile Name and select an Effective
Date. For example, if you want to have a Pay To Address, Billing
Provider Contact Name, Contact Information and Tax ID Number
that is different from what is on the Default Profile for when
Andrew Baker, M.D. is the Ins Dr on the charges, then you
must select the check boxes in the Override column next to those
fields. The fields become active and you can enter the different information.
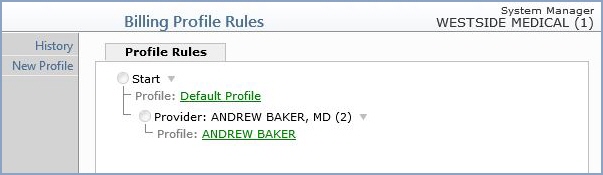
Click Save and the Insert Rule window shows the newly named new
profile (Andrew Baker, MD).

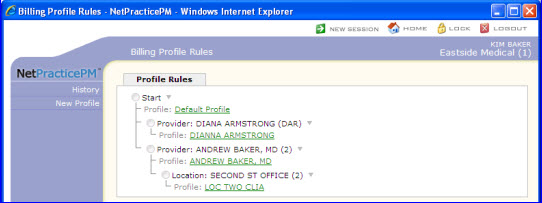
Click Insert and the tree reflects the newly added rule and profile.
You must click Save for this newly added information to be saved
to the tree. When you click Andrew Baker, MD the Edit Profile screen
containing just the overridden information displays. So now, when a claim
is sent for Andrew Baker, MD, it will contain everything in the Default
Profile with the exceptions of what is different in this separate
rule/profile.
Now you can continue to add rules and profiles in this manner under the
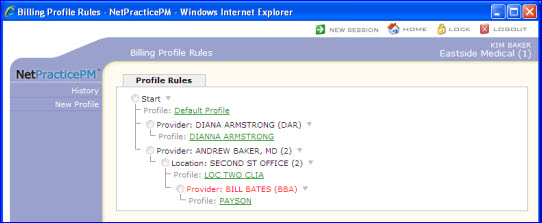
Default Profile, or you might need to add an additional rule for
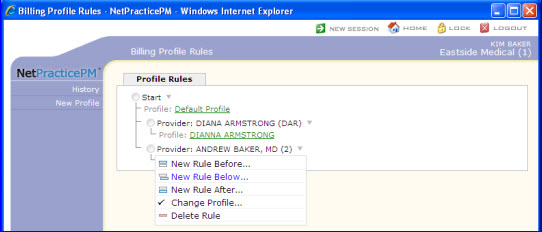
the Andrew Baker, MD profile (for example). To do this, click the
rule that you want to perform an action on (Provider: ANDREW BAKER,
MD (2)) and the rule selection list appears.
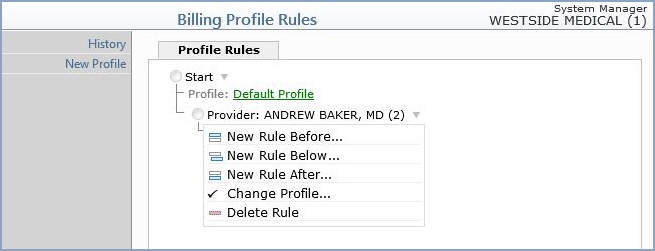
Click New Rule Before to insert a new rule and profile before the
ANDREW BAKER, MD rule on the tree. This does not mean that it takes
any precedence to the rule you are inserting it before. The rules and
profiles in this case are on the same hierarchy. In this example, you
may just want to keep the profiles organized in alphabetical order by
the provider's last name. Rule Provider: DIANNA ARMSTRONG (DAR)
and profile DIANNA ARMSTRONG were added before the ANDREW BAKER,
MD rule. This just means that as claims are creating, they will create
with information from the Default Profile until it runs across
a claim for Ins Dr = DAR, then it pulls in the overridden
portions of that profile. Then when it runs across a claim for Ins
Dr = 2, it pulls in the overridden portions of that profile,
and so on.
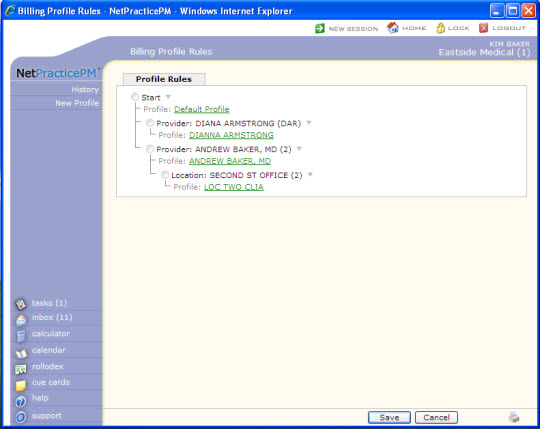
You might have a situation where you need to further specify a rule. For
example, if the ANDREW BAKER, MD profile is always in effect except
when he is seeing patients at a specific location, then a rule can
be set up for that. Click the Provider: ANDREW BAKER, MD rule and
select New Rule Below.
Now, when Dr. Baker is the insurance doctor on the claim and the claim
is for Location=2, the claim pulls the Default Profile information
and pulls in the overridden information from the ANDREW BAKER, MD
and LOC TWO CLIA profiles.
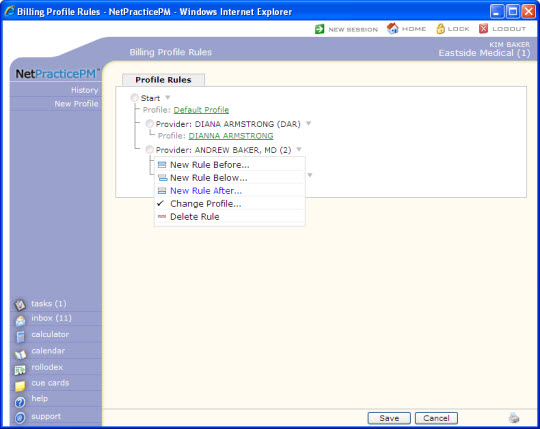
You can also select any of the existing rules and choose to select a New
Rule After. Again, this does not indicate any hierarchy in the rules.
It just inserts a rule on the same branch of the tree as the rule that
you are choosing for the new rule to go after. So, rather than an additional
rule underneath an existing rule - like the location rule that was inserted
under the Provider: ANDREW BAKER, MD - this creates a new rule
on the same level.
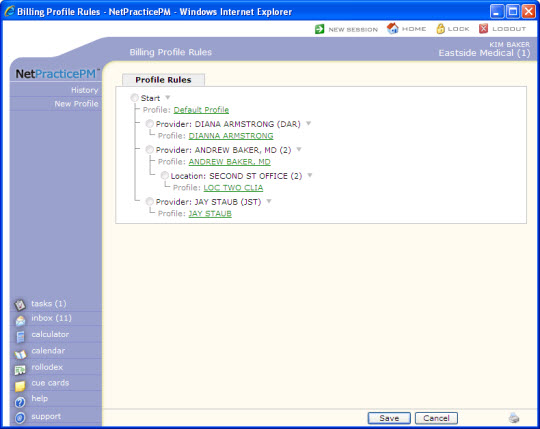
Now, the new rule and profile for provider Jay Staub has been inserted
after the rule and profile for Andrew Baker, MD. Therefore, it is its
own rule and profile under the Default Profile and has nothing
to do with the rules and profiles set up for Dianna Armstrong or Andrew
Baker, MD.
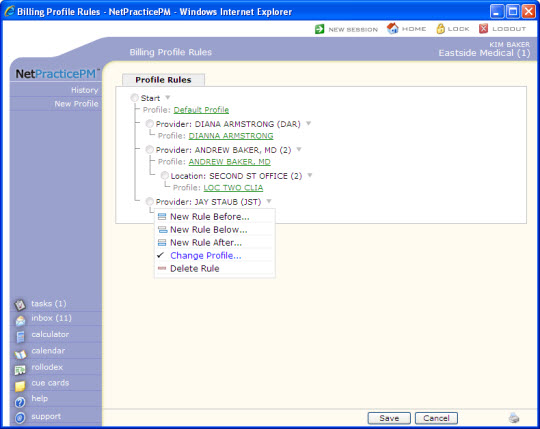
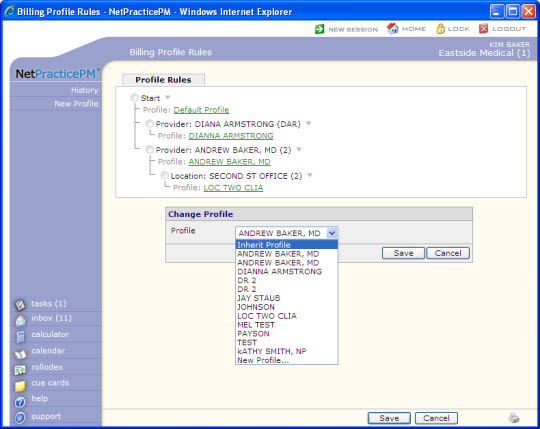
You can change the profile that exists under a rule by clicking the rule
you want to change the profile on and selecting Change Profile.
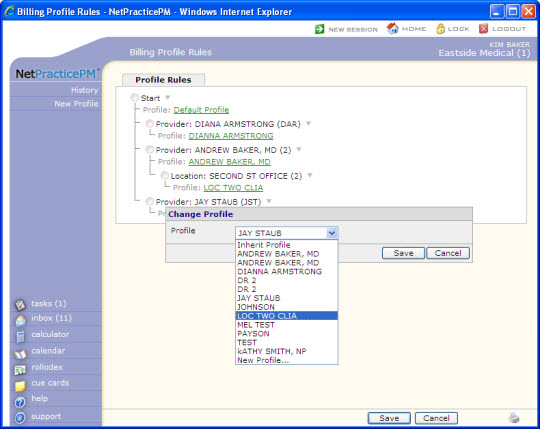
The Change Profile window opens. Select another existing profile from the
Profile drop-down list.
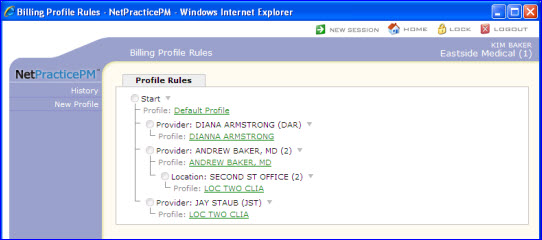
Now the LOC TWO CLIA profile is under the Jay Staub rule.
To delete a rule, click the rule you want to delete and click Delete
Rule.

The rule is deleted and any profiles that existed under that rule are removed.
The profiles are not deleted. They still remain in the profile list as
accessible profiles. Again, after a profile is created and saved, it cannot
be deleted. The Jay Staub rule and the LOC TWO CLIA profile
are now gone.
A rule can also inherit the profile directly above it. You can select Inherit
Profile when you create a new rule or change a profile under an existing
rule. In this example, the ANDREW BAKER, MD rule, no longer needs
the ANDREW BAKER, MD profile. Now, when Andrew Baker, MD is the
insurance doctor on the claim, we want it to send the claims based on
what is stored in the DIANNA ARMSTRONG profile. Click, ANDREW
BAKER, MD and select Change Profile and select Inherit Profile.
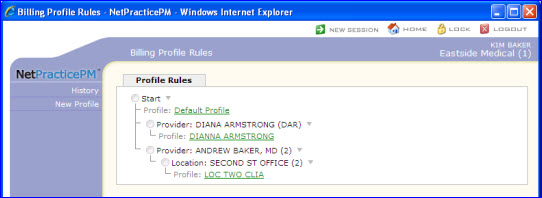
The ANDREW BAKER, MD profile has been removed from beneath the Provider:
ANDREW BAKER, MD rule.
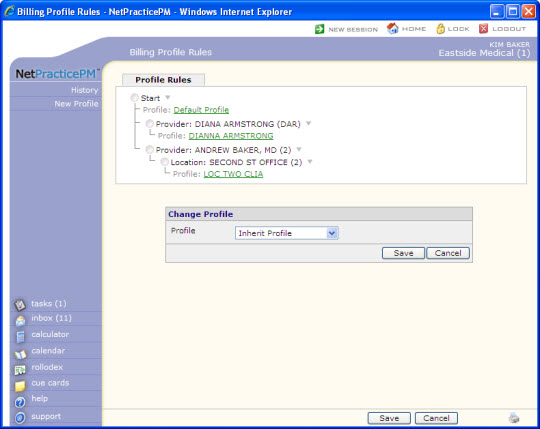
But, if you click the ANDREW BAKER, MD rule and select Change
Profile, the Inherit Profile is selected, which indicates that
when Andrew Baker, MD is the insurance doctor on the claim, that it inherits
the profile directly above it (in this example, the DIANNA ARMSTRONG
profile.
If you select a profile that cannot be used because of how the tree is
set up before it, that rule displays in red font, indicating that this
is a 'dead-end' rule selection and there is no way for the rule or information
in the profile below to pull into the claim. In this example, the rule
is when BILL BATES is the insurance doctor on the claim, the PAYSON
profile should be used. But, it is inserted under the rule of when Andrew
Baker is the insurance doctor on the claim. There cannot be more than
one insurance doctor on the claim, so there is no way that the claim creation
would ever get to this rule. There are many rule and profile scenarios
that could result in a 'dead end' rule.
Action
Column Functions
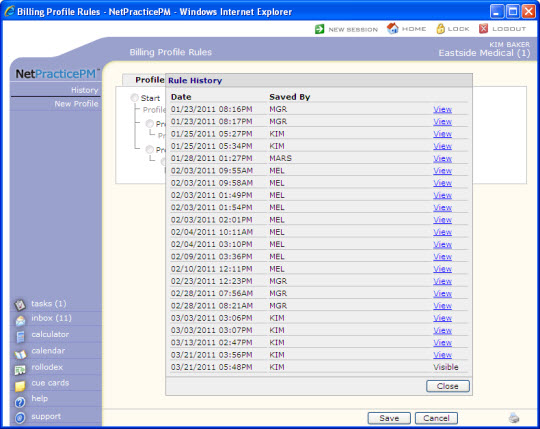
Click History in the Action Column to view a historical list of
the profile tree. The Rule History window opens displaying the Date
and time that the tree was saved and the user code it was Saved By.
The list is in chronological order. The last entry on the list is the
most currently saved profile and the one listed as currently Visible.
Click the View link next to any entry that you want to review.
This is helpful when you need to see exactly what was billed on a claim
for a particular moment in time.
The Billing Profile Rules screen for the selected view displays as it existed
on the date and time it was saved. Note the warning message at the top
of the screen. If you click Save while viewing any tree in the
history, that tree will be saved as the current tree.
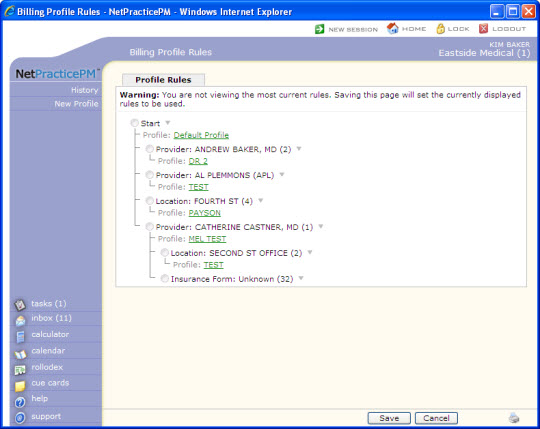
To return to your current tree, click Cancel or click History
in the Action Column to return to the Rule History screen where you can
select to view the most current tree.
Click New Profile in the Action Column to create a new profile.
The standard Edit Profile screen opens and you can create a profile, as
instructed at the beginning of this help section. The profiles created
here are not immediately visible anywhere on the tree. They are added
to the profile lists to select from when you are creating a rule and want
to add or change a profile.
