![]()
| Prompt | Response | Req | Len |
|---|---|---|---|
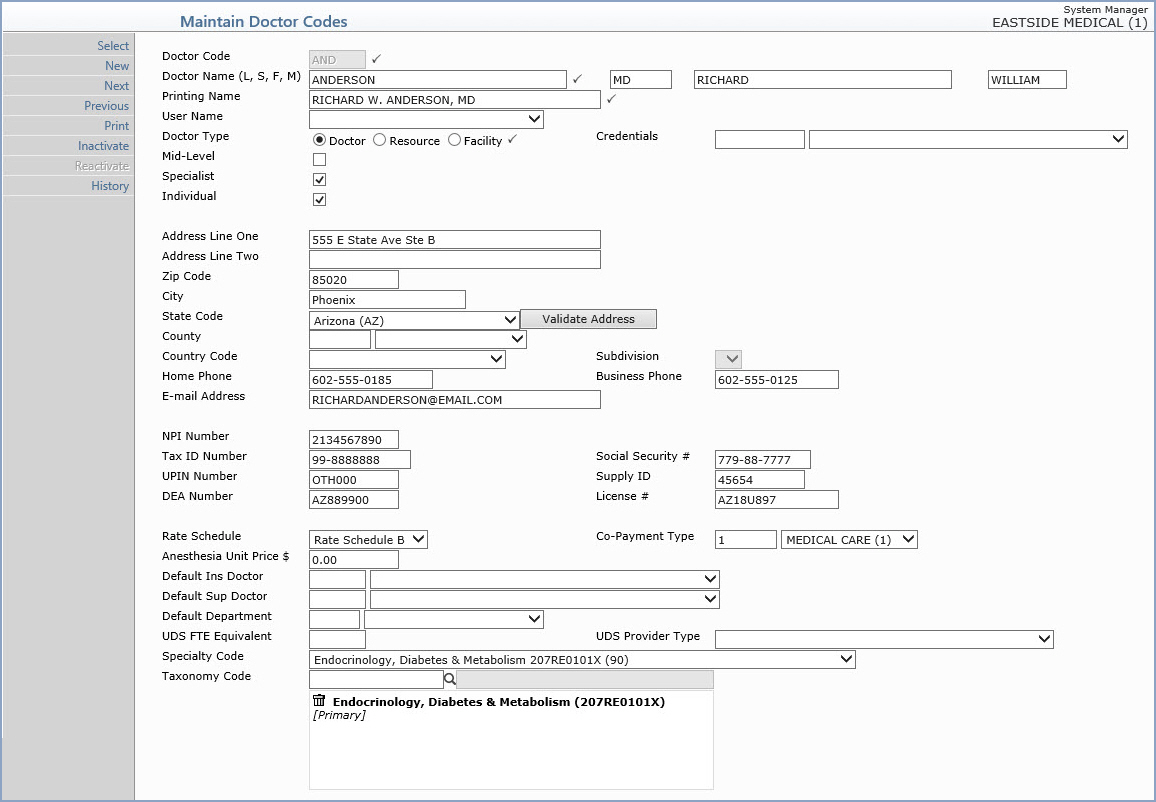
| Doctor Code | Type the code you want or click the magnifying glass to search the table. This code cannot begin with a zero. NOTE: Due to internal programming requirements, the pointer will automatically move down to the Printing Name field after you type the doctor code and press TAB. |
4 | |
| Last Name | Type the doctor's last name. |  |
60 |
| Suffix | Enter the doctor's Suffix. | 10 | |
| First Name | Type the doctor's first name. | 35 | |
| Middle Name | Type the doctor's middle name, if applicable. | 25 | |
| Printing Name | Type the doctor's name in the format you want to print on insurance claim forms (if indicated in the profiles in Billing Profile Rules) and on reports. | |
40 |
| User Name | Select the CGM webPRACTICE user name assigned to this doctor from the User list. | 10 | |
| Doctor Type | Select the option to indicate if this is an actual doctor or if it represents an office resource or a facility. The purpose of this field is to allow the system to suppress Resource codes from displaying in the doctor code table during transaction entry. Some examples of resources would be: EKG room, Treadmill Room, Lab, Nurse, and so on. | |
1 |
| Mid-Level | If this doctor is a Mid-Level provider, select this check box. For example, a Nurse Practitioner or Physician's Assistant would be considered a mid-level provider. | 1 | |
| Specialist | If this provider is a specialist, select this check box. | 1 | |
| Individual | If a doctor is a sole practitioner without a group practice or group numbers, select this check box. CGM webPRACTICE will create claims with the individual doctor's information instead of the group/organizational practice information. | 1 | |
| Address Line One | Type the doctor's business address if it is not the same as the practice address stored in the Change Database Parameters function, located on the System, Database Maintenance Menu. | 40 | |
| Address Line Two | Type any additional address information. | 40 | |
| Zip Code | Type the zip code. | 10 | |
| City | Type the city. | 20 | |
| State Code | Type the State. | 3 | |
| County | elect the applicable county from the County Code list. | 5 | |
| Country Code | Select a country from the Country list. | 2 | |
| Subdivision | 2 | ||
| Home Phone | Type the doctor's home phone number. | 15 | |
| Business Phone | Type the doctor's e-mail address. | 15 | |
| E-mail Address | Type the doctor's e-mail address. | 40 | |
| NPI Number | Type the NPI number assigned to this physician by CMS. | 10 | |
| Tax ID Number | Type the doctor's Tax ID number. Leave this field blank if the Tax ID number to be printed on insurance claims for this doctor is the same as the Employer ID number entered in the Change Database Parameters function, located on the System, Database Maintenance Menu. For information about entering a provider number for a specific insurance carrier, see the Provider Number Table or Group Provider Number Table functions. | 12 | |
| Social Security # | Type the doctor's social security number. | 11 | |
| UPIN Number | Type the doctor's UPIN number. | 10 | |
| Supply ID | Type the doctor's Medicare Supply ID number, if applicable. | 10 | |
| DEA Number | Type the doctor's DEA number. This field is used for the Rx module. | 10 | |
| License # | Type the doctor's license number issued by the state. | 15 | |
| Rate Schedule | Select the rate schedule for this doctor from the Rate Schedule list, if applicable. If this doctor's fees are different from other doctors in the practice or from the normal fee schedule assign, the rate schedule here. These different rates can then be entered in the Procedure Code Table. For more information see the help section under Transactions, Procedure Entry Function. | 1 | |
| Co-Payment Type | Type the co-payment type code you want or select from the drop-down list. This assigns a specific co-payment type to the doctor so that the correct co-payment amount defaults in Patient Check In/Out. This field pulls from the codes created in the Co-Payment Code Table. | 5 | |
| Anesthesia Unit Price $ | Type the unit price for this doctor, if applicable. This field will override the Normal Price field for any Anesthesia Procedure code when posting anesthesia transactions for this doctor. | 10 | |
| Default Ins Doctor | Type the doctor you want or select from the list. This field indicates which Doctor code you would like to automatically default for the Insurance Doctor field in Procedure Entry. NOTE: If procedures are generated from the E-superbill, CGM webPRACTICE will determine the insurance doctor for the claim in the following order: -If there is a Default Insurance Doctor selected under the Performing Doctor Code, that insurance doctor code will be used, -If there is no Default Insurance Doctor selected, then it will check to see if the Performing Doctor is supposed to default for the Insurance Doctor in System, Database Maintenance Menu, CGM webPRACTICE Default Values. If this check box is not selected and there isn't a Default Insurance Doctor, then it will still display the Performing Doctor as the Insurance Doctor. |
4 | |
| Default Sup Doctor | Type the doctor you want or select from the list. This field indicates which Doctor code you would like to automatically default for the Supervising Doctor field in Procedure Entry. | 4 | |
| Default Department | Type the department code you want to default in procedure entry, select a code from the Department list, or leave the field blank. | 3 | |
| UDS FTE Equivalent | Community Health Centers only - Type 1.0 if this is a full time clinician, 0.5, for 20 hours/week, and so on. | 5 | |
| UDS Provider Type | Community Health Centers only - type the UDS provider type for this doctor or select a code from the UDS Provider Type list. Note: This field must be completed for some of the UDS Report printing functions. | 3 | |
| Specialty Code | Select the specialty for this doctor from the Specialty Code list. | 3 | |
| Taxonomy Code | Type a taxonomy code for this provider or click the magnifying glass to search the standard taxonomy code table. The first code entered populates into the field below and is set as the Primary (default) code, as indicated by bold font. You can select multiple codes. Click any entry in the field below to change it to the primary code. Click the trash can icon to remove the code from the field. | 10 |
Copyright and Trademark Notice. Copyright © 2019 CompuGroup Medical, Inc. CGM®, CompuGroup Medical® and the CGM logo are registered trademarks and CGM webPRACTICE™ and CGM webTOOLS™ are trademarks of CompuGroup Medical AG in the United States and/or other countries. Any rights not expressly granted herein are reserved.
