![]()
With the Paper Claim Alignment function, you can set up various profiles and rules to control where the data prints in each box on a paper claim for Professional (CMS-1500) and Institutional claims (UB). This is especially useful if you have multiple printers or different brands of printers in your office that you use to print paper claims. You can control the alignment for each printer or brand of printer by creating a separate profile for each.
Note: If you need help at any point in the setup process, contact Customer Support for assistance in customizing your system. Every profile that you save will always remain in history to provide an audit trail and cannot be deleted.
Prior to using this function, you must complete the following pre-requisites:
Step 2: Create an Alignment Profile
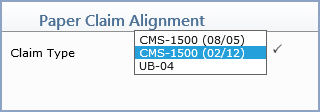
After accessing this function, select the Claim Type you want from the Claim Type list and click Save.
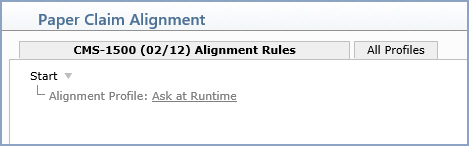
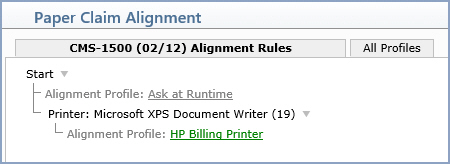
The Paper Claim Alignment screen will display the alignment rules tree for the current database. For example, if you select CMS-1500 (02/12), the CMS-1500 (02/12) Alignment Rules tab will be active, and the alignment rules ‘tree’ will list the Alignment Profile along with any additional existing rules assigned to profiles. The Alignment Profile is a standard system profile that contains the base alignment settings and it cannot be edited. Only the profiles that currently have rules assigned to them will display in the alignment rules tree.
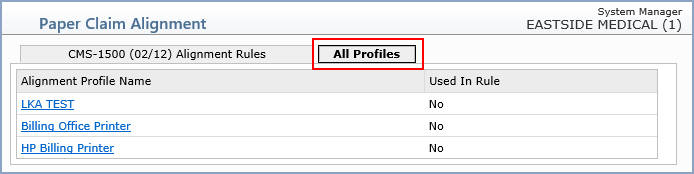
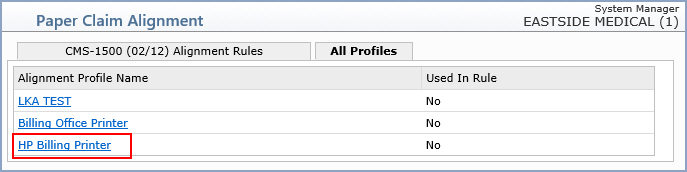
You can use the All Profiles tab to access any profile that has been created, including the ones that do not have a Rule assigned to them.
In the Action Column, click New Alignment Profile.

In the Description field, type the name for the Alignment Profile.
Perform the following steps to align the claim form to the printer:

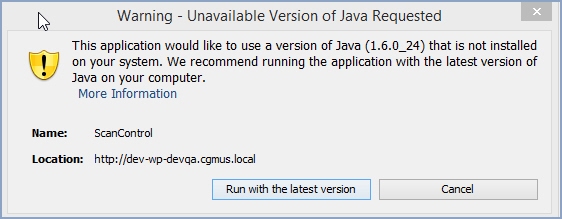
If you receive a warning message stating Unavailable version of JAVA Requested, click Run with latest version.
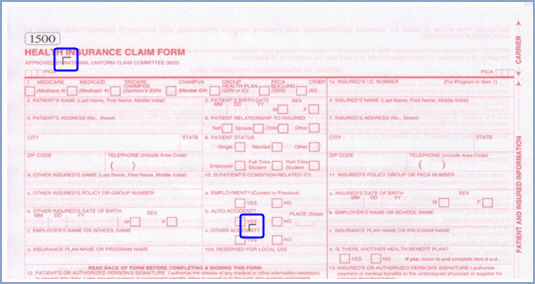
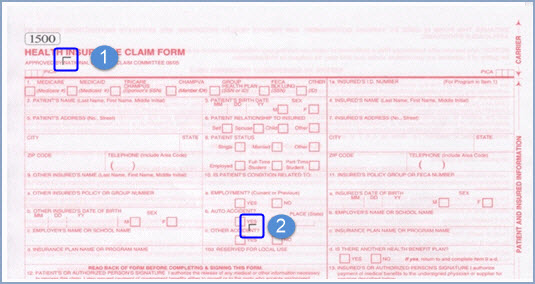
Locate the alignment marks in the image and click on the alignment mark in the upper left corner.
Click on the alignment mark in the middle of the page to complete the alignment.
To save the profile, click Save.
Step 4: Align the Fields on the Claim Form
To determine which fields need to be aligned on the claim form, you will need a paper claim that was printed using the same printer you selected when you created the profile.
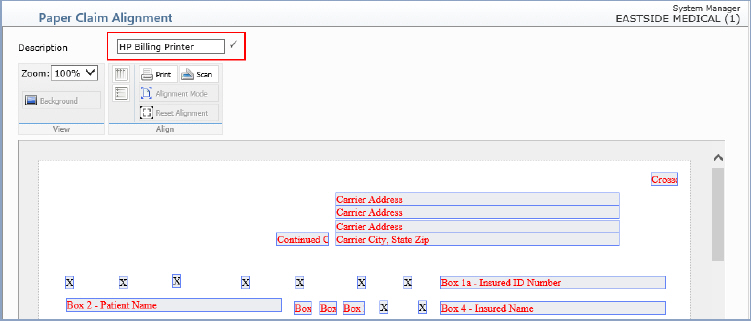
Select the profile you want to edit from the CMS-1500 (02/12) Alignment Rules tab or the All Profiles tab. In the example below, the HP Billing Printer profile does not have a rule assigned to it yet so it has to be accessed from the All Profiles tab.
After you select the profile, the Paper Claim Alignment screen displays the form with the available alignment fields. You can align a single field, multiple fields at one time or all of the fields on the form at one time.
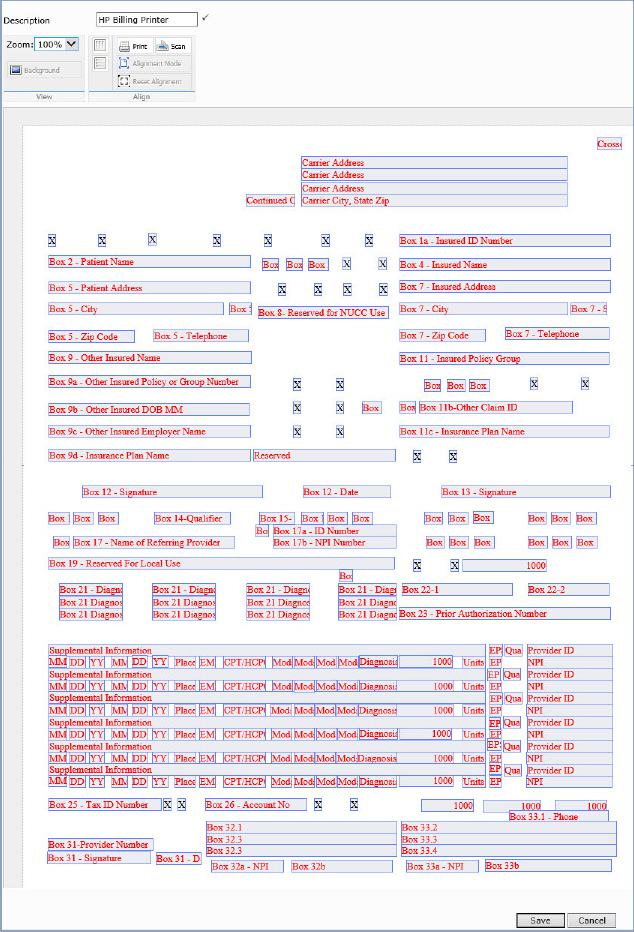
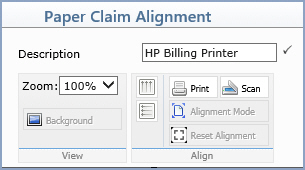
The top portion of the Alignment Profile screen contains the Description of the Alignment Profile and also View and Align boxes that provide actions you can take on the entire form or a selected field.
 (vertical Snap)
  (horizontal Snap)
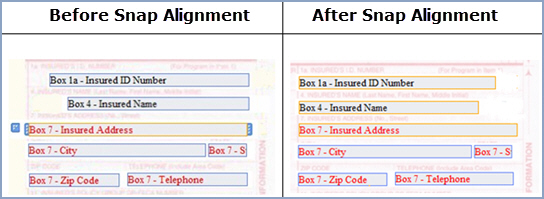
How to Snap Fields
1. Identify the properly aligned field you want to use as the anchor to align the other fields up to it.
2. Select that field.
3. Press Ctrl and click on the other fields that you want to align to the anchor field.
4. Click the applicable Snap button to align the fields.
Example:
Box 7 is aligned correctly and Boxes 1a and 4 do not line up horizontally.
Select Box 7 to make it the anchor field to align the other boxes up to it.
Select Box 1a and Box 4.
Click the Horizontal Snap button.
Note: After you select Boxes on the form, they will display with a yellow frame so you can visually confirm the selection.
Additional Alignment Options
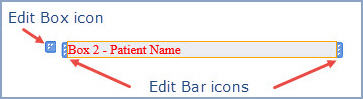
After you select a Box on the form, a blue Edit Box icon will appear to the left of the Box and blue Editing Bar icons will appear at each end of the Box.
To de-select a Box, click anywhere outside of the Box on the Form.
Align Individual Fields - To move the entire Box, click and drag the Edit Box icon or use the Arrow keys.
Re-size a Field - To increase or decrease the length of a Box, click and drag either of the Editing Bar icons.
Align Multiple Fields at One Time - Select all of the Boxes you want to move (press Ctrl and click on the Boxes), then click and drag the Edit Box icon or use the Arrow keys.
Align All Fields on the Form at One Time - Press Ctrl+A to select all of the Boxes on the form, then click and drag the Edit Box icon or use the Arrow keys.
Click Save to save any field alignment changes you made or click Cancel to exit the profile without saving the changes.
Step 5: Create a Rule and Assign it to a Profile
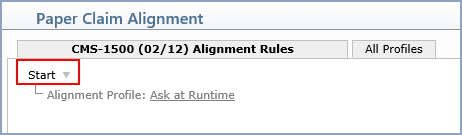
Whether you actually create a rule and assign a profile to it depends on your individual workflow setup and personal preference. If you only use a single printer to print paper claims, then you may want to create a profile and assign a rule to it. If you use multiple printers, you may want to create a profile for each printer and assign the Ask at Runtime rule to it. The Ask at Runtime rule will provide a list of the available Profiles each time you print paper claims, so you can select the appropriate profile.
A good way to think about rules and profiles is, a rule is the 'WHEN' and the profile is the 'then'. For example, WHEN printer=HP Billing Printer, THEN these alignment (profile) settings should be used.
Create a New Rule
To create a new rule, click Start.
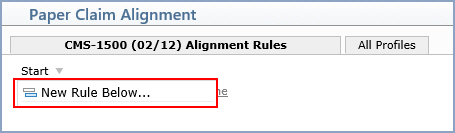
Select New Rule Below. This will create a new rule directly below the standard system profile.
Complete the fields in the Insert Rule window.
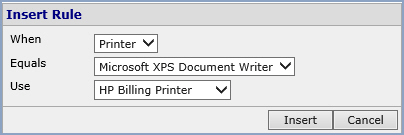
Click Insert to save the rule.
Click Save to save the changes to the Alignment Rules tree.
Additional Rule Options
To edit an existing rule, click the Rule link in the Alignment Rules tree.
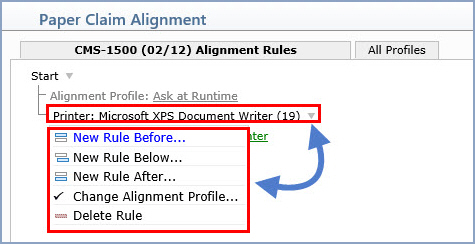
Note: Providing the two different options to insert a New Rule ‘Before’ or ‘After’ an existing rule, simply allows you to maintain organization in the Alignment Rules tree. For example, you may want to keep the rules organized in alphabetical order.
History Action Column Function
You can view a complete history of the Alignment Rules Tree and the changes made to it with the History Action Column function. After accessing the function, the Rule History window displays an historical listing of all the changes made to the paper claim alignment rules.
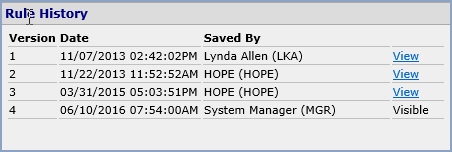
Version - Indicates the version number with “1” being the oldest change.
Date - Indicates the date the change was saved.
Saved By - Indicates the user who saved the change.
The data for the most current version of the Alignment Rules Tree displays at the bottom of the list with the text “Visible” to the right of it. This is always the version that displays when you access the Paper Claim Alignment function for the selected Claim Type. To view previous versions of the Alignment Rules Tree, click View to the right of any version.
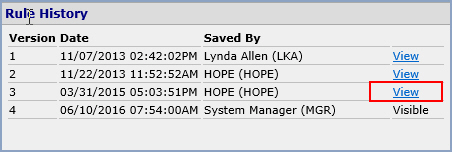
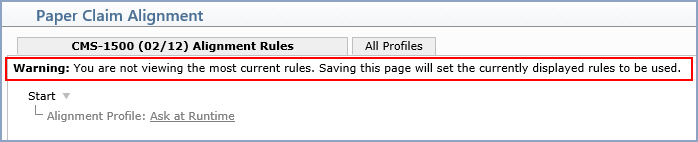
Warning
If you click Save after you finish reviewing the historical version of the Alignment Rules Tree, the Alignment Rules Tree will revert back to that earlier version and any changes made after that historical version will be deleted. Click Cancel when you are done reviewing an historical version if you want to retain the current version of the Alignment Rules Tree.
Copyright and Trademark Notice. Copyright © 2019 CompuGroup Medical, Inc. CGM®, CompuGroup Medical® and the CGM logo are registered trademarks and CGM webPRACTICE™ and CGM webTOOLS™ are trademarks of CompuGroup Medical AG in the United States and/or other countries. Any rights not expressly granted herein are reserved.
