
| Prompt | Response | Req | Len |
|---|---|---|---|
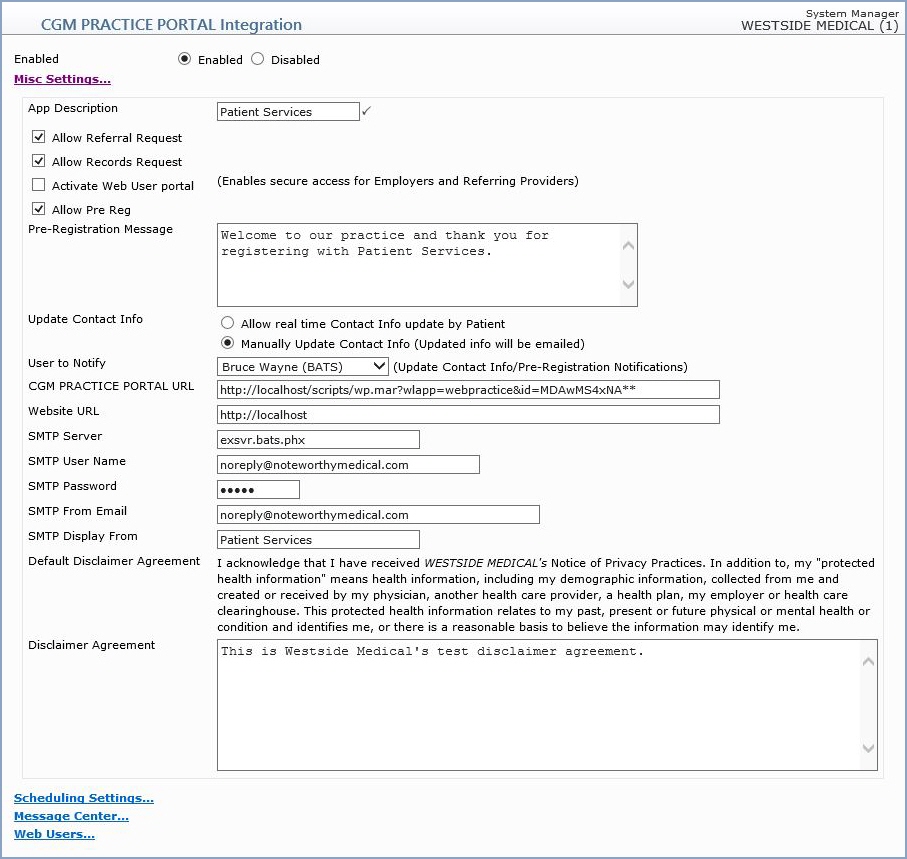
App Description |
'Patient Services' will default for the app name to display when CGM PRACTICE PORTAL is accessed via your website but you can change it as needed. | 20 | |
Allow Referral Request |
If you want to allow your patients to request referrals, select this check box. | 1 | |
Allow Records Request |
If you want to allow your patients to request records, select this check box. | 1 | |
Activate Web User Portal |
If you want to enable Employers and Referring Providers secure access to specific functions that you designate, select this check box. | 1 |
|
Allow Pre Reg |
If you want to allow patients who have never been to your practice the ability to pre-register, select this check box. | 1 |
|
Pre-Registration Message |
If you selected the 'Allow Pre Reg' check box, type the message that you would like to display to pre-registered patients after they complete pre-registration with your practice. | 1 |
|
Update Contact Info |
Select either ‘Allow real time Contact Info Update by Patient’ to allow your patients to update their demographic information immediately without staff approval; or select ‘Manually Update Contact Info’ to allow your patients to update their demographic information, but have this information sent in an email to a designated user in your practice and that staff member must then update the patient’s demographic information manually. | 1 |
|
User to Notify |
If you selected the 'Allow Pre Reg' check box or the 'Manually Update Contact Info’ option, select the user in your practice or email group that you want to receive email notifications for pre-registered patients and demographic update information | 1 |
|
| CGM PRACTICE PORTAL URL | Do not change this field. This field is populated when CGM PRACTICE PORTAL is activated by CGM. |
|
|
Website URL |
This field is populated when CGM PRACTICE PORTAL is activated by CGM. |
|
|
SMTP Server |
This field is populated when CGM PRACTICE PORTAL is activated by CGM. |
|
|
SMTP User Name |
This field is populated when CGM PRACTICE PORTAL is activated by CGM. |
|
|
SMTP Password |
This field is populated when CGM PRACTICE PORTAL is activated by CGM. |
|
|
SMTP From Email |
This field is populated when CGM PRACTICE PORTAL is activated by CGM. |
|
|
SMTP Display From |
Enter 'Patient Services', your Practice Name or customize as needed. This name will appear on outgoing emails to patients when they sign up for a portal account or take actions from within their account. |
|
|
Default Disclaimer Agreement |
This is the disclaimer that displays when a patient first accesses their account, unless you have typed something in the ‘Disclaimer Agreement’ field, which overrides the ‘Default Disclaimer Agreement’ field. |
|
|
Disclaimer Agreement |
If you do not want to use the text provided in the Default Disclaimer Agreement, enter the text to be used. |
|


Copyright and Trademark Notice. Copyright © 2019 CompuGroup Medical, Inc. CGM®, CompuGroup Medical® and the CGM logo are registered trademarks and CGM webPRACTICE™ and CGM webTOOLS™ are trademarks of CompuGroup Medical AG in the United States and/or other countries. Any rights not expressly granted herein are reserved.
![]()