![]()
| Prompt | Response | Req | Len |
|---|---|---|---|
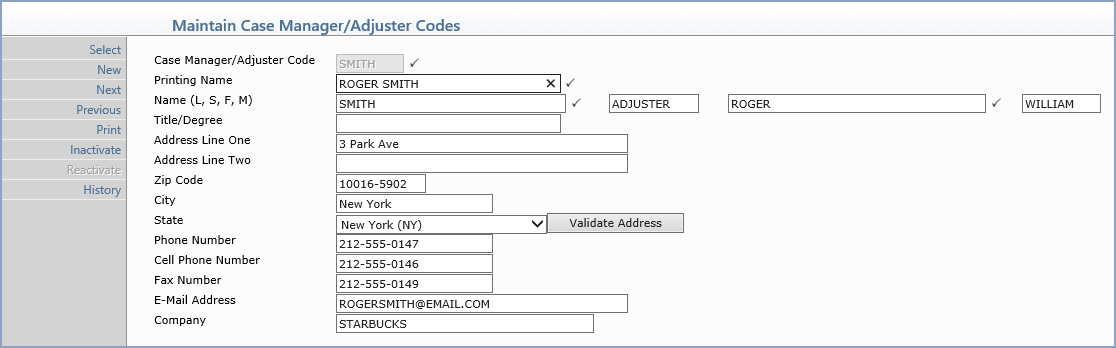
| Case Manager/Adjuster Code | Type the code you want or click the magnifying glass to search the table. This code cannot begin with a zero. | 6 | |
| Printing Name | Type the name in the format you want to print on reports. |  |
30 |
| Middle Name | Type the middle name of the Case Manager/Adjuster. | 25 | |
| Suffix | Type the Suffix for the Case Manager/Adjuster. | 10 | |
| Title/Degree | Type the title/degree for the Case Manager/Adjuster. | 30 | |
| Address Line One | Type the address for the Case Manager/Adjuster. | 40 | |
| Address Line Two | Type any additional address information for the Case Manager/Adjuster. | 40 | |
| Zip Code | Type the five digit zip code or the zip+four. If you type the zip+four, the dash is automatically inserted before the last four digits. | 10 | |
| City | The city automatically populates based on the Zip Code entered, or you can type the name of the city. | 20 | |
| State | The state automatically populates based on the Zip Code entered, or you can type the state code or select from the drop-down list. Click Validate Address to convert the address entered into the standard United States Postal Service format. The Address Line One will be converted; the information in Address Line Two (if standard) moves up to the end of Address Line One; the Zip Code is converted to Zip+4 and the City and State are converted based on the Zip Code. If a standard match cannot be found, messages display to explain. You can still choose to override what is converted by Validate Address by typing in any address information you choose. |
40 | |
| Phone Number | Type the telephone number for this Case Manager/Adjuster. | 20 | |
| Cell Phone Number | Type the cell phone number for this Case Manager/Adjuster. | 20 | |
| Fax Number | Type the fax number for this Case Manager/Adjuster. | 20 | |
| E-Mail Address | Type the e-mail address for this Case Manager/Adjuster. | 40 | |
| Company | Type the company name for this Case Manager/Adjuster. | 35 |
Copyright and Trademark Notice. Copyright © 2019 CompuGroup Medical, Inc. CGM®, CompuGroup Medical® and the CGM logo are registered trademarks and CGM webPRACTICE™ and CGM webTOOLS™ are trademarks of CompuGroup Medical AG in the United States and/or other countries. Any rights not expressly granted herein are reserved.
