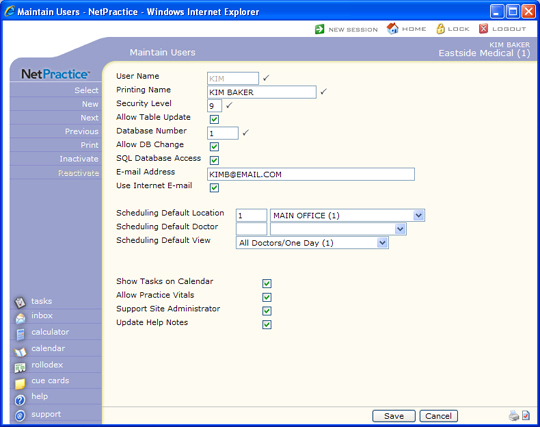
Maintain Users

With the Maintain Users function, you can add new users, change the information for existing users, review information for a specific user, inactivate a user, and reactivate a user that has been previously inactivated.

NOTE: After creating a new user code, you must assign menu functions to it, using the Model User Menus function, otherwise the user will not be able to navigate or access any functions throughout CGM webPRACTICE.

NOTE: If your practice has multiple databases, each user code's information is shared across the databases.

Upon accessing this function the Maintain Users screen will be displayed containing blank data fields.

Data Field Information
Prompt Response Req Len
User Name Type the code you want to edit or create or click the magnifying glass to search the table. Blank spaces should not be entered when you create a new code. CGM webPRACTICE cannot prevent you from entering spaces but you will encounter performance issues if they are entered. 8
Printing Name Type the user's full name that you want to print on reports and for display purposes. 20
Security Level Type the security level for this user. This must be a number between one and nine. Nine is the highest level of security, meaning users with this level can access all functions. 1
Allow Table Update If this user is allowed to update Table codes, select this check box. 1
Database Number Type the database number you want this user to initially log on to. 4
Allow DB Change If this user code is allowed to change to another existing database, select this check box. The security level and menu functions of the user code remain the same, regardless of the database they transfer to. 1
SQL Database Access If this user code is allowed access to the SQL Database to export data to another application, select this check box. 1
E-mail Address Type the Internet e-mail address for this user code.   40
Use Internet E-mail If you want e-mail messages, created in CGM webPRACTICE, sent to this user's Internet e-mail account, select this check box.   1
Scheduling Default Location Type the code for the location you want to be displayed upon accessing the Schedule module, or select from the Location list.   3
Scheduling Default Doctor Type the code for the doctor you want to be displayed upon accessing the Schedule module, or select from the Doctor list.   3
Scheduling Default View Select the scheduling view you want to be displayed upon accessing the Scheduling module from the View list.   1
Show Tasks on Calendar If you want assigned Tasks to be copied to this user's Personal Calendar, select this check box.   1
Allow Practice Vitals If you want this user to have access to the Practice Vitals Dashboard on their Desktop, select this check box.   1

After the code has been saved, the code information refreshes on the screen. If you want to edit or create additional codes you can use the Action Column functions.

Inactive Codes - If you select a code that has been inactivated, CGM webPRACTICE will display the existing information for the code but the data fields will be unavailable and you cannot make any changes. Reactivate will be the only active function in the Action Column. You must reactivate the code first, if you want to change any of the data stored for the code.

If you are the System Manager for CGM webPRACTICE, you should limit access to the Maintain Users function to select staff members in your practice. You should also provide guidelines customized for your practice to these staff members for entering code data in a consistent manner. This should protect the integrity of your user code information. Certain functions within CGM webPRACTICE are tracked by user names; therefore each user of the system should be given their own unique user name.

Action Column Functions
The Action Column functions are provided so you can perform multiple functions quickly and efficiently from within the Maintain function.

Select - Will display a new screen with blank data fields so you can select another code.

New - Will display a new screen with blank data fields so you can enter the information for a new code.

Next - Will display the next code entered in the table. If you are currently viewing the last code in the table and click Next, CGM webPRACTICE will return you to the menu.

Previous - Will display the previous code in the table. If you are currently viewing the first code in the table and click Previous, CGM webPRACTICE will return you to the menu. Next and Previous are very helpful when you want to navigate through the table sequentially.

Print - You can print all or part of the contents of the table. For additional information about printing, see Print a List of Users and Menus.

Inactivate - Will immediately inactivate any active code currently displayed on the screen. When you inactivate a code in the table, it is not actually removed from the table but is assigned an inactive status. CGM webPRACTICE needs to retain information about the inactivated code for any data that was previously entered with that code. After a code has been inactivated you cannot use it for any data entry operation. An entry will be logged in the Changes to Tables category in the System Log function located on the System, File Maintenance, Look-Up Functions menu.

Reactivate - Will immediately reactivate any inactive code currently displayed on the screen and allow it to be used in data entry again.

The first time (and only the first time) a user logs on, they will need to enter a password. When selecting the password, they should use something meaningful, easy to remember, and easy to type. The system manager does not have access to a user's password but if a user forgets their password, it can be reset using the Reset User Password function.