
| Prompt | Response | Req | Len |
|---|---|---|---|
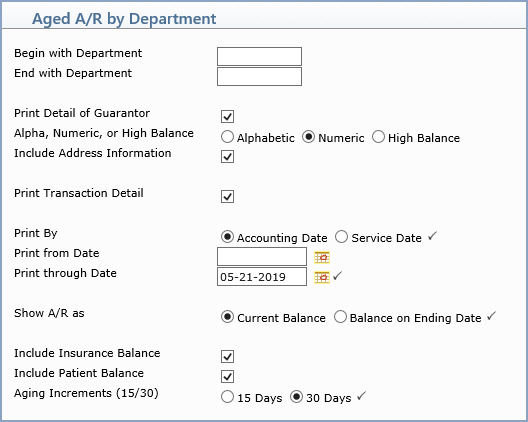
| Begin with Department | Type the code you want to start with or leave the text box blank to start with the first code in the table. | 9 | |
| End with Department | Type the code you want to end with or leave the text box blank to end with the last code in the table. | 9 | |
| Print Detail of Guarantor | If you want to print the individual detail of the guarantors, select this check box. | 1 | |
| Alpha, Numeric, or High Balance | If you selected Print Detail of Guarantor, select the sorting option you want to indicate if you want the accounts sorted alphabetically, numerically, or by the highest balance. | 1 | |
| Include Address Information | If you selected Print Detail of Guarantor and want to print the address information, select this check box. | 1 | |
| Print Transaction Detail | If you selected Print Detail of Guarantor and want to print the transaction detail, select this check box. |  |
1 |
| Print By | Select the type of date you want to use when printing the report. |  |
1 |
| Print from Date | Type the date you want the report to start with or click the calendar icon to select a date or leave the field blank to print every open item up through the selected 'Through Date'. |  |
10 |
| Print through Date | Type the date you want the report to
end with or click the calendar icon to select a date. If you select a date prior to the current date, you should not select to include the insurance or patient balances on the report because those figures cannot be accurately calculated for past dates. If you select a date prior to the current date, the program automatically scans for any deleted patient accounts to ensure the totals provided for that time period are accurate. |
 |
10 |
| Show A/R as | If you want the A/R to print the current
open item balances, select Current Balance. If you want the A/R
to print the open item balances up through the Ending date, select
Balance on Ending Date.
Note: If you select Balance on Ending Date, the balances will not include any payments or adjustments applied after the selected ending date. |
 |
1 |
| Include Insurance Balance | If you want the report to print the insurance balance separately, select this check box. If you selected a date prior to the current date for the 'Print through Date', you should not select to include either the insurance or patient balances on the report because those figures cannot be accurately calculated for past dates. |  |
1 |
| Include Patient Balance | If you want the report to print the patient balance separately, select this check box. If you selected a date prior to the current date for the 'Print through Date', you should not select to include either the insurance or patient balances on the report because those figures cannot be accurately calculated for past dates. |  |
1 |
| Aging Increments (15/30) | Select the aging increment you want to use when printing the aged balances. |  |
2 |

