
| Prompt | Response | Req | Len |
|---|---|---|---|
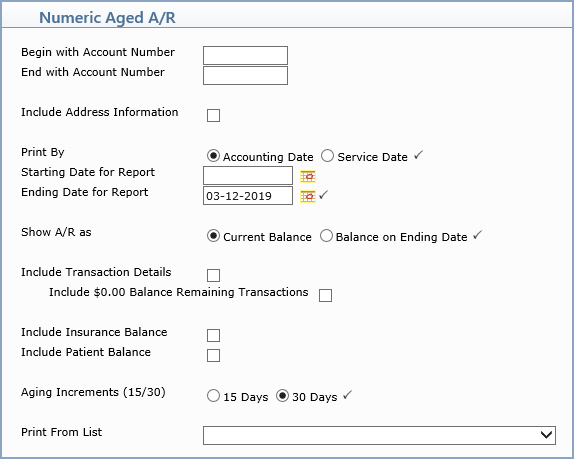
| Begin with Number | Type the first letters of the guarantor's last name (for the alphabetic report) or the account number (for the numeric report) that you want to start with, or leave the field blank to start with the first account with a balance owing. | 9 | |
| End with Number | Type the first letters of the guarantor's last name (for the alphabetic report) or the account number (for the numeric report) that you want to end with, or leave the field blank to end with the last account with a balance owing. | 9 | |
| Include Address Information | If you want to include the guarantor's address on the report, select this check box. | 1 | |
| Print By | Select the type of date you want to use when printing the report. | 1 | |
| Starting Date for Report | Type the date you want the report to start with, click the calendar icon to select a date or leave the field blank to print every open item up through the selected Ending Date. | 10 | |
| Ending Date for Report | Type the date you want the report to
end with or click the calendar icon to select a date. If you select a date prior to the current date, you should not select to include the insurance or patient balances on the report because those figures cannot be accurately calculated for past dates. If you select a date prior to the current date, the program automatically scans for any deleted patient accounts to ensure the totals provided for that time period are accurate. |
 |
10 |
| Show A/R as | If you want the A/R to print the current
open item balances, select Current Balance. If you want the A/R
to print the open item balances up through the Ending date, select
Balance on Ending Date.
Note: If you select Balance on Ending Date, the balances will not include any payments or adjustments applied after the selected ending date. |
 |
1 |
| Include Transaction Details | If you want all the transaction detail to print, select this check box. |  |
1 |
| Include $0.00 Balance Remaining Transactions | If you want all the transactions with a zero balance remaining to print, select this check box. |  |
1 |
| Include Insurance Balance | If you want the report to print the insurance balance separately, select this check box. If you selected a date prior to the current date for the Ending Date for Report, you should not select to include either the insurance or patient balances on the report because those figures cannot be accurately calculated for past dates. |  |
1 |
| Include Patient Balance | If you want the report to print the patient balance separately, select this check box. If you selected a date prior to the current date for the Ending Date for Report, you should not select to include either the insurance or patient balances on the report because those figures cannot be accurately calculated for past dates. |  |
1 |
| Aging Increments (15/30) | Select the aging increment option you want when printing the report. |  |
2 |
| Print From List | If you want to print this report based only on the patients contained in a previously defined DMS List, select the list you want to use. For example, if you want the report to include Medicare patients only, create a list of all the Medicare patients by using the List Processor (Reports, Data Management System) and then in this Print from List field, select the Medicare patient list you just created. | 20 |
