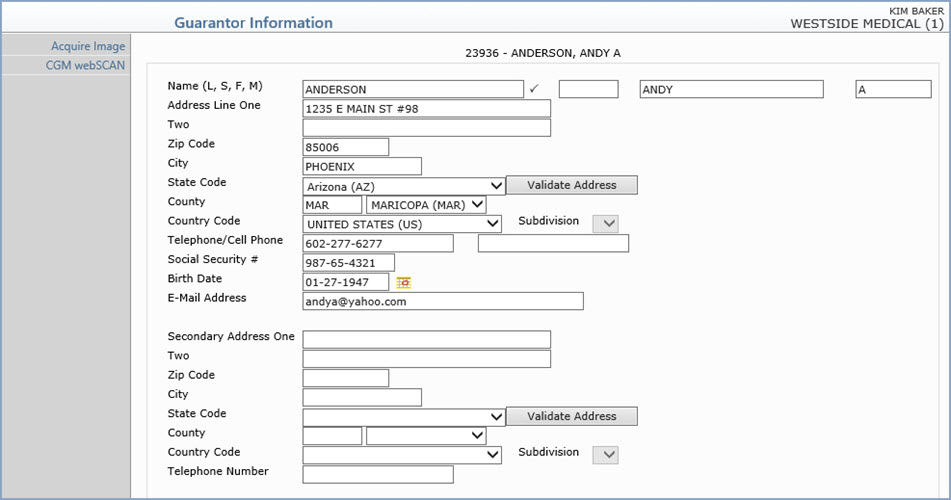
| Prompt | Response | Req | Len |
|---|---|---|---|
| Name (L, S, F, M) | Type the guarantor's Last Name, Suffix, First Name, and Middle Name in the corresponding boxes. The Last Name is required. |  |
60 / 10 / 35 / 25 |
| Address Line One | This address is used for the mailing
address for the patient's statement unless the 'Primary Address'
field in the Billing Information screen is cleared. If you selected '0 - Same' in the 'Rel to Guarantor' field in the Patient Name and Address Information screen, the patient's name, address, social security number, and e-mail address will default in the Guarantor Information fields. You can edit the guarantor's address if it is different from the address displayed. If you selected '0 - Same' in the 'Rel to Guarantor' field in the Patient Name and Address Information screen and if you make changes to any of these fields on the Patient Information screen, the Guarantor Information screen will automatically be updated. If you make changes to any of these fields on the Guarantor Information screen the Patient Information screen will automatically be updated. If you select a relationship other than 0 Same and you make changes to any of these fields in the Patient Information screen, CGM webPRACTICE will ask if the Guarantor information should be updated. If you make changes to any of these fields in the Guarantor Information screen, CGM webPRACTICE will ask if the Patient information should be updated. |
35 | |
| Address Line Two | Type any additional secondary address information. | 35 | |
| Zip Code | Type the five digit zip code or the zip+four. If you type the zip+four, the dash is automatically inserted before the last four digits. | 10 | |
| City | The city automatically populates based on the Zip Code entered, or you can type the name of the city. If you change the city that defaults for the zip code entered, you have the option to save that city as the new default for that zip code. | 15 | |
| State Code | The state automatically populates based
on the Zip Code entered, or you can type the state code or select
from the drop-down list. Click Validate Address to convert the address entered into the standard United States Postal Service format. The Address Line One will be converted; the information in Address Line Two (if standard) moves up to the end of Address Line One; the Zip Code is converted to Zip+4 and the City and State are converted based on the Zip Code. If a standard match cannot be found, messages display to explain. If you disagree with the converted address, you can change it back and save it without the validation changes. These changes will prevent claims from being rejected or added to the Exception report due to an invalid address or state code. |
3 | |
| County | Select the county code from the County list. | 5 | |
| Country Code | Type the country code or select from the Country list. | 2 | |
| Subdivision | 3 | ||
| Telephone/Cell Phone | Type the guarantor's telephone number and cell phone number in the corresponding boxes. | 20 / 20 | |
| Social Security # | Type the guarantor's nine digit social security number with or without dashes. | 11 | |
| Birth Date | Type the guarantor's birth date in a MM-DD-CCYY format or click the calendar icon to select a date. The century will automatically be set to '1900' if only two digits are entered for the year and the year is later than the current year. For example, 06-25-58. | 10 | |
| E-Mail Address | Type the guarantor's e-mail address. | 40 | |
| Secondary Address One | Type any secondary address information. For example if the patient spends six months of the year at his primary residence and six months of the year at a vacation residence, you can type the address of the vacation residence. You would then clear the Primary Address check box on the patient's Billing Information screen and the statements would then go to the patient at this vacation residence address. |
35 | |
| Two | Type any additional address information. | 35 | |
| Zip Code | Type the five digit zip code or the zip+four for the secondary address. If you type the zip+four, the dash is automatically inserted before the last four digits. | 10 | |
| City | The city automatically populates based on the Zip Code entered, or you can type the name of the city for the secondary address. If you change the city that defaults for the zip code entered, you have the option to save that city as the new default for that zip code. | 15 | |
| State Code | The state automatically populates based
on the Zip Code entered, or you can type the state code or select
from the drop-down list for the secondary address. Click Validate Address to convert the address entered into the standard United States Postal Service format. The Address Line One will be converted; the information in Address Line Two (if standard) moves up to the end of Address Line One; the Zip Code is converted to Zip+4 and the City and State are converted based on the Zip Code. If a standard match cannot be found, messages display to explain. You can still choose to override what is converted by Validate Address by typing in any address information you choose. |
3 | |
| County | Select the county code from the County list. | 5 | |
| Country Code | Type the country code or select from the Country list. | 2 | |
| Subdivision | 10 | ||
| Telephone Number | Type the phone number for the secondary address. | 20 |
Copyright and Trademark Notice. Copyright © 2019 CompuGroup Medical, Inc. CGM®, CompuGroup Medical® and the CGM logo are registered trademarks and CGM webPRACTICE™ and CGM webTOOLS™ are trademarks of CompuGroup Medical AG in the United States and/or other countries. Any rights not expressly granted herein are reserved.