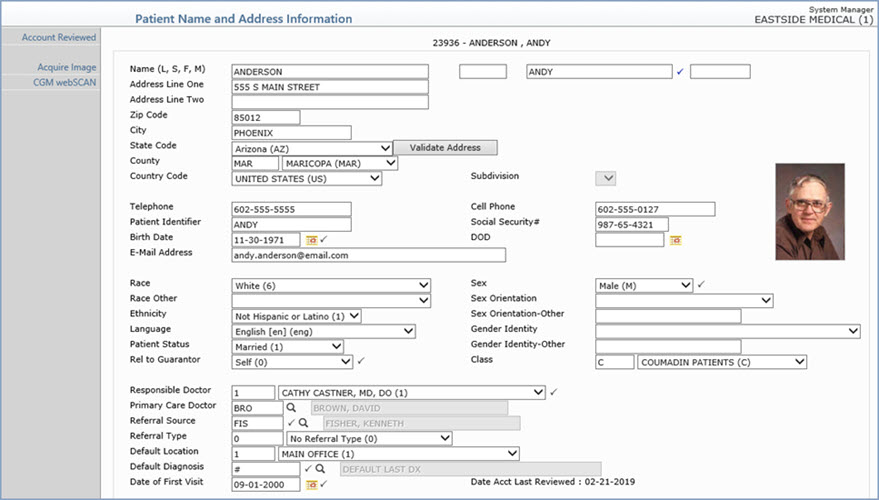
| Prompt | Response | Req | Len |
|---|---|---|---|
| Name (L, S, F, M) | Type the patient's Last Name, Suffix, First Name, and Middle Name in the corresponding boxes. The Last Name and First Name are required. |  |
60 / 10 / 35 / 25 |
| Address Line One | Type the address for the patient. | 35 | |
| Address Line Two | Type any additional address information. | 35 | |
| Zip Code | Type the five digit zip code or the zip+four. If you type the zip+four, the dash is automatically inserted before the last four digits. | 10 | |
| City | The city automatically populates based on the Zip Code entered, or you can type the name of the city. If you change the city that defaults for the zip code entered, you have the option to save that city as the new default for that zip code. | 20 | |
| State Code | The state automatically populates based
on the Zip Code entered, or you can type the state code or select
from the drop-down list. Click Validate Address to convert the address entered into the standard United States Postal Service format. The Address Line One will be converted; the information in Address Line Two (if standard) moves up to the end of Address Line One; the Zip Code is converted to Zip+4 and the City and State are converted based on the Zip Code. If a standard match cannot be found, messages display to explain. If you disagree with the converted address, you can change it back and save it without the validation changes. These changes will prevent claims from being rejected or added to the Exception report due to an invalid address or state code. |
3 | |
| County | Select the county code from the County list. | 5 | |
| Country Code | Type the country code or select from the Country list. | 2 | |
| Subdivision | If you selected a country other than the US, select a subdivision from the list. | 2 | |
| Telephone/Cell Phone | Type the patient's telephone number and cell phone number in the corresponding boxes. | 20 / 20 | |
| Patient Identifier | Type an optional practice-defined identification number or alternate name to search for this patient when using Patient Look-up. For example, a patient's official name on his insurance is William, but the patient only goes by 'Bud'. Type 'Bud' in this field so this patient can be located with Patient Look-up. | 20 | |
| Social Security# | Type the patient's nine digit social
security number with or without dashes. If you enter a Social Security Number that already exists for another patient, a warning message displays. If more than one patient has that number, you will see a warning message for each of the matching patients and their account numbers. |
11 | |
| Birth Date | Type the patient's birth date in a MM-DD-CCYY format or click the calendar icon to select a date. The century will automatically be set to '1900' if only two digits are entered for the year and the year is later than the current year. For example, 06-25-58. | |
10 |
| DOD | Type the patient's date of death in a MM-DD-CCYY format or click the calendar icon to select a date. | 10 | |
| E-Mail Address | Type the patient's e-mail address. | 50 | |
| Race | Select the applicable race from the list. This field is currently used for UDS reporting by Community Health Centers. | 2 | |
| Sex | Select the applicable option to indicate the sex of the patient. | |
1 |
| Race Other | Select an additional race for the patient, if applicable. | 2 | |
| Sex Orientation | Select the applicable option to indicate the sex orientation of the patient. | 3 | |
| Ethnicity | Select the applicable ethnicity from the list. This field is currently used for UDS reporting by CHCs. | 2 | |
| Sex Orientation - Other | If you selected 'Something Else - Please Describe' for the Sex Orientation field, enter the description. | 30 | |
| Language | Type the code you want or select from
the Language list. The available selections in the drop-down list are maintained in the Language Code Table. When a Terminology code exists for the language, it displays in braces { }; the Bibliographic code always displays in parentheses ( ); and when an ISO 639-1 code exists, it displays in brackets [ ] after the Bibliographic code. |
3 | |
| Gender Identity | Select the applicable option to indicate the gender identity of the patient. | 3 | |
| Patient Status | Select the applicable patient status
code from the Status list. If the patient's Status is changed to Deceased, all future appointments and recalls are automatically deleted, and ***Deceased*** will appear in red, bold typeface next to the patient's name throughout the application. |
2 | |
| Gender Identity-Other | If you selected 'Additional Gender Category or Other - Please Specify' for the Gender Identity field, enter an explanation. | 30 | |
| Rel to Guarantor | Select the code for the patient's relationship
to the guarantor from the Relationship list. If you select '0 - Same' for the relationship, the patient's name, address, social security number, and e-mail address will automatically be stored in the Guarantor's information. If you make changes to any of these fields on the Patient Information screen, the Guarantor Information screen will automatically be updated. If you make changes to any of these fields on the Guarantor Information screen the Patient Information screen will automatically be updated. If you select a relationship other than 0 Same and you make changes to any of these fields in the Patient Information screen, you will be asked if the Guarantor information should be updated. If you select a relationship other than 0 Same and you make changes to any of these fields in the Guarantor Information screen, you will be asked if the Patient information should be updated. |
|
2 |
| Class | Type the code you want or select from the Class list. The selection list includes items from the Patient Class Table. | 3 | |
| Responsible Doctor | Type the code you want or click the magnifying glass to search the table. | |
4 |
| Primary Care Doctor | Type the code you want or click the magnifying glass to search the table. | 6 | |
| Referral Source | Type the code you want or click the magnifying glass to search the table. | |
6 |
| Referral Type | Type the code you want or select from the Referral Type list. The selection list includes the referral source codes that have been marked as a Referral Type in the Referral Source Table. | 6 | |
| Default Location | Type the code you want as the patient's default location or select from the Location list. | 6 | |
| Default Diagnosis | Type the code you want as the patient's
primary, chronic diagnosis code or click the magnifying glass
to search the table. If you do not want to store an ongoing primary diagnosis for this patient, type '0' for 'No Diagnosis Recorded'. The diagnosis code stored in this field is used for reporting purposes and defaults in the 'Diag 1' field in the Procedure Entry Function unless you have the 'Default DX's at Chg Entry' check box selected in CGM webPRACTICE Default Values (System, Database Maintenance Menu). If you have this check box selected, then it overrides this 'Default Diagnosis' field and it places the last posted diagnosis code in the 'Diag 1' field in the Procedure Entry Function. |
|
10 |
| Date of First Visit | Type the date you want or click the calendar icon to select a date. This field defaults in the Patient Registration function to the date stored in the Date of First Visit field in CGM webPRACTICE Default Values (System, Database Maintenance Menu). If no date is stored there, then this field defaults in Patient Registration with the current date (the date the patient is pre-registered or registered). In addition, if you schedule any future appointments for the pre-registered patient account (prior to registering the account), the future appointment date overrides any previous default date. | |
10 |
| Date Acct Last Reviewed | Informational only - indicates when you last reviewed the account data with the patient to confirm it is current. The date is automatically updated when you click the Account Reviewed Action Column button. | 10 |
Copyright and Trademark Notice. Copyright © 2019 CompuGroup Medical, Inc. CGM®, CompuGroup Medical® and the CGM logo are registered trademarks and CGM webPRACTICE™ and CGM webTOOLS™ are trademarks of CompuGroup Medical AG in the United States and/or other countries. Any rights not expressly granted herein are reserved.