![]()


| Prompt | Response | Req | Len |
|---|---|---|---|
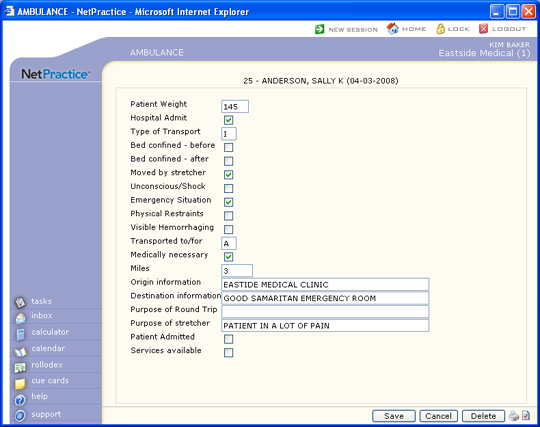
| Ambulance Patient Count | Enter number of patients if more than one was transported. | 1 | |
| Patient Weight (in Pounds) | Type the patient's current weight in pounds. | 10 | |
| Patient Condition 1 | Select Patient Condition. Select all that apply. | 1 | |
| Patient Condition 2 | Select Patient Condition. Select all that apply. | 1 | |
| Patient Condition 3 | Select Patient Condition. Select all that apply. | 1 | |
| Patient Condition 4 | Select Patient Condition. Select all that apply. | 1 | |
| Patient Condition 5 | Select Patient Condition. Select all that apply. | 1 | |
| Patient Condition 6 | Select Patient Condition. Select all that apply. | 1 | |
| Patient Condition 7 | Select Patient Condition. Select all that apply. | 1 | |
| Patient Condition 8 | Select Patient Condition. Select all that apply. | 1 | |
| Admission Date | Type the hospital admit date or click the calendar icon to select a date. | 10 | |
| Purpose of Round Trip | Type the purpose of the round-trip transport. | 80 | |
| Purpose of Stretcher | Type the reason that a stretcher had to be used upon pickup. | 80 | |
| Transport Reason Code | Select the Reason for Transport. | 1 | |
| Origin information (4010) | Type the name and/or address of the place of pickup. | 40 | |
| Destination information (4010) | Type the number of miles traveled during service. | 40 | |
| Pick Up Address Line 1 | Type the address of the origin of transport. | 35 | |
| Address Line 2 | Type any additional address information. | 35 | |
| Zip Code | Type the five digit zip code or the zip+four. If you type the zip+four, the dash is automatically inserted before the last four digits. | 10 | |
| City | The city automatically populates based on the Zip Code entered, or you can type the name of the city. | 20 | |
| State Code | The state automatically populates based
on the Zip Code entered, or you can type the state code or select
from the drop-down list. Click Validate Address to convert the address entered into the standard United States Postal Service format. The Address Line One will be converted; the information in Address Line Two (if standard) moves up to the end of Address Line One; the Zip Code is converted to Zip+4 and the City and State are converted based on the Zip Code. If a standard match cannot be found, messages display to explain. You can still choose to override what is converted by Validate Address by typing in any address information you choose. |
3 | |
| Country Code | Type the country code or select from the Country list. | 2 | |
| Subdivision | 2 | ||
| Drop Off Address Line 1 | Type the address of the destination of transport. | 35 | |
| Address Line 2 | Type any additional address information. | 35 | |
| Zip Code | Type the five digit zip code or the zip+four. If you type the zip+four, the dash is automatically inserted before the last four digits. | 10 | |
| City | The city automatically populates based on the Zip Code entered, or you can type the name of the city. | 20 | |
| State Code | The state automatically populates based
on the Zip Code entered, or you can type the state code or select
from the drop-down list. Click Validate Address to convert the address entered into the standard United States Postal Service format. The Address Line One will be converted; the information in Address Line Two (if standard) moves up to the end of Address Line One; the Zip Code is converted to Zip+4 and the City and State are converted based on the Zip Code. If a standard match cannot be found, messages display to explain. You can still choose to override what is converted by Validate Address by typing in any address information you choose. |
3 | |
| Country | Type the country code or select from the Country list. | 2 | |
| Subdivision | 2 | ||
| Transport Distance (Miles) | Type the number of miles traveled during service. | 15 | |
| Admitted to Second Facility | If this patient was admitted to a second facility, select this check box. | 1 | |
| First Facility Services Provided | If services were performed at the first facility, select this check box. | 1 |

| Prompt | Response | Req | Len |
|---|---|---|---|
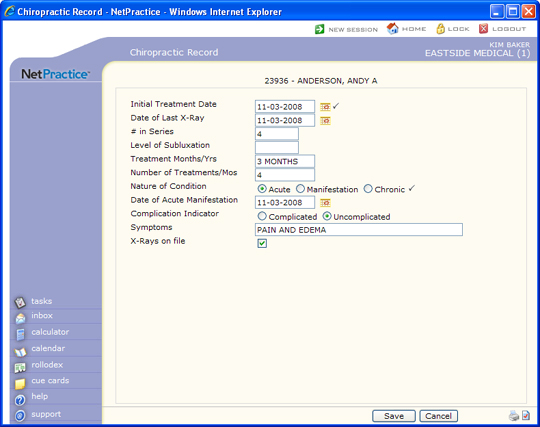
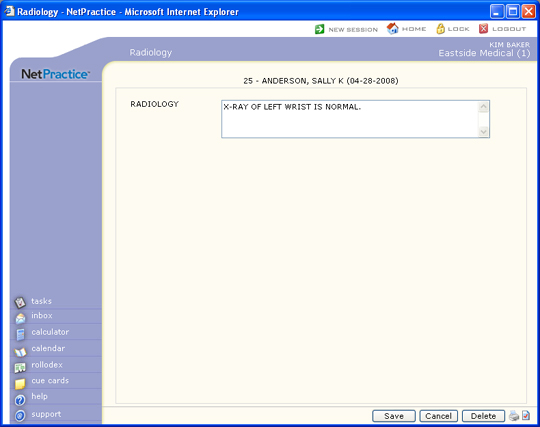
| Initial Treatment Date | Type the date of the patients first treatment for this condition or click the calendar icon to select a date. |  |
10 |
| Date of Last X-Ray | Type the date of the patients last x-ray or click the calendar icon to select a date. | 10 | |
| # in Series | Type a number to indicate this treatments order in the series of treatments. | 7 | |
| Level of Subluxation | Type the level of subluxation. | 7 | |
| Treatment Months/Yrs | Type the length of treatment in months or years. | 10 | |
| Number of Treatments/Mos | Type the number of treatments per month. | 10 | |
| Nature of Condition | Select the option to describe the condition. | |
1 |
| Date of Acute Manifestation | Type the date of acute manifestation or click the calendar icon to select a date. | 10 | |
| Complication Indicator | Select the option to indicate the complication of the condition. | 1 | |
| Symptoms | Type the patients symptoms. | 40 | |
| X-Rays on file | If you have x-rays on file for this patient, select this check box. | 1 | |
| Patient Condition Description 1 | Type patient condition information. | 80 | |
| Patient Condition Description 2 | Type patient condition information. | 80 |
| Prompt | Response | Req | Len |
|---|---|---|---|
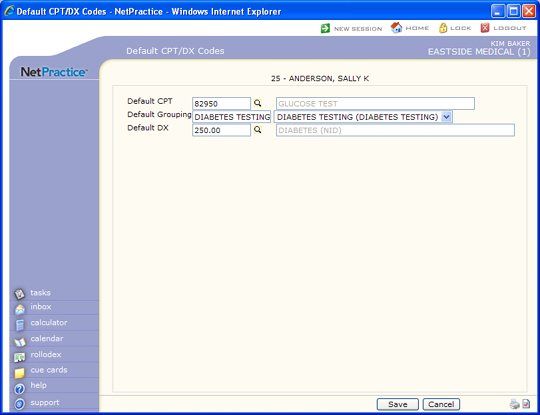
| Default CPT | Type the code you want to default in the Procedure Code field in the Quick-Post function or click the magnifying glass to search the table. | 10 | |
| Default Grouping | Type the code you want or select the group you want to default in the Procedure Group field in the Quick-Post function. | 15 | |
| Default DX | Type the code you want to default in the Primary Diagnosis field in the Quick-Post function or click the magnifying glass to search the table. If this field is left blank and the current date is 9-30-2015 or earlier, the primary and secondary diagnosis codes from the last posted ICD-9 Encounter will default Quick-Post. If the current date is 10-1-2015 or later, the primary and secondary diagnosis codes from the last posted ICD-10 Encounter will default. | 10 |
| Prompt | Response | Req | Len |
|---|---|---|---|
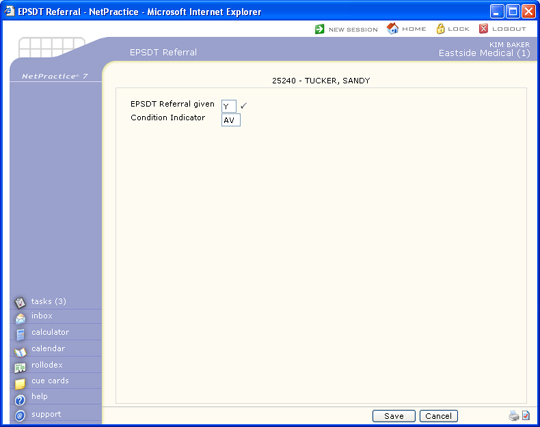
| EPSDT Referral given | Select if an EPSDT Referral was given for this patient. Deselect if no EPSDT Referral was given for this patient. | |
1 |
| Condition Indicator 1 | Select one of the four Child and Teen
Checkups codes. AV = Patient Refused Referral(s) ST = Referral to another provider for diagnostic or corrective treatment, or scheduled for another appointment with a screening provider for diagnostic or corrective treatment for at least one health problem identified during an initial or periodic screening service (does not include dental referrals). S2 = Patient is currently under treatment for referred diagnostic or corrective health problem(s). NU = No referral(s) made. You must use this code if you did not select the EPSDT Referral Given check box. |
2 | |
| Condition Indicator 2 | Select one of the four Child and Teen
Checkups codes. AV = Patient Refused Referral(s) ST = Referral to another provider for diagnostic or corrective treatment, or scheduled for another appointment with a screening provider for diagnostic or corrective treatment for at least one health problem identified during an initial or periodic screening service (does not include dental referrals). S2 = Patient is currently under treatment for referred diagnostic or corrective health problem(s). NU = No referral(s) made. You must use this code if you did not select the EPSDT Referral Given check box. |
2 | |
| Condition Indicator 3 | Select one of the four Child and Teen
Checkups codes. AV = Patient Refused Referral(s) ST = Referral to another provider for diagnostic or corrective treatment, or scheduled for another appointment with a screening provider for diagnostic or corrective treatment for at least one health problem identified during an initial or periodic screening service (does not include dental referrals). S2 = Patient is currently under treatment for referred diagnostic or corrective health problem(s). NU = No referral(s) made. You must use this code if you did not select the EPSDT Referral Given check box. |
2 |
| Prompt | Response | Req | Len |
|---|---|---|---|
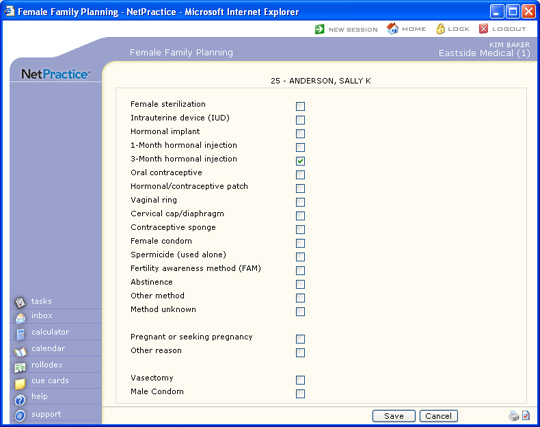
| Female sterilization | If the patient has had sterilization surgery, select this check box. | 1 | |
| Intrauterine device (IUD) | If the patient has an intrauterine device (IUD), select this check box. | 1 | |
| Hormonal implant | If the patient has a hormonal implant, select this check box. | 1 | |
| 1-Month hormonal injection | If the patient receives monthly hormonal injections, select this check box. | 1 | |
| 3-Month hormonal injection | If the patient receives quarterly hormonal injections, select this check box. | 1 | |
| Oral contraceptive | If the patient takes an oral contraceptive, select this check box. | 1 | |
| Hormonal/contraceptive patch | If the patient wears a hormonal/contraceptive patch, select this check box. | 1 | |
| Vaginal ring | If the patient uses a vaginal ring, select this check box. | 1 | |
| Cervical cap/diaphragm | If the patient uses a cervical cap/diaphragm, select this check box. | 1 | |
| Contraceptive sponge | If the patient uses a contraceptive sponge, select this check box. | 1 | |
| Female condom | If the patient uses female condoms, select this check box. | 1 | |
| Spermicide (used alone) | If the patient uses spermicide only, select this check box. | 1 | |
| Fertility awareness method (FAM) | If the patient uses the fertility awareness method (FAM), select this check box. | 1 | |
| Abstinence | If the patient uses abstinence, select this check box. | 1 | |
| Other method | If the patient uses a method not listed here, select this check box. | 1 | |
| Method unknown | If the method is unknown, select this check box. | 1 | |
| Pregnant or seeking pregnancy | If the patient is pregnant or wants to become pregnant, select this check box. | 1 | |
| Other reason | If there is another reason that the patient is seeking family planning services, select this check box. | 1 | |
| Vasectomy | If the patient's partner has had a vasectomy, select this check box. | 1 | |
| Male Condom | If the couple uses male condoms, select this check box. | 1 |
| Prompt | Response | Req | Len |
|---|---|---|---|
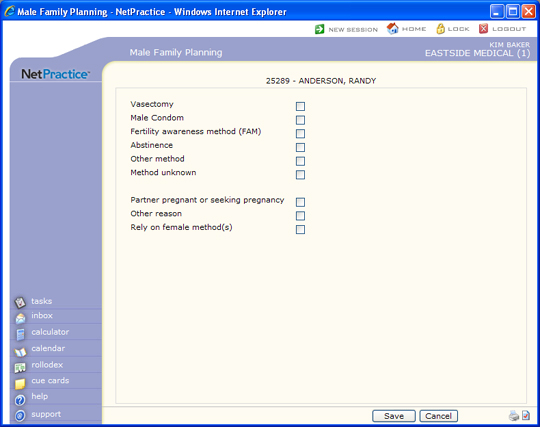
| Vasectomy | If the patient has had a vasectomy, select this check box. | 1 | |
| Male Condom | If the patient uses condoms, select this check box. | 1 | |
| Fertility awareness method (FAM) | If the patient uses the fertility awareness method (FAM), select this check box. | 10 | |
| Abstinence | If the patient uses abstinence, select this check box. | 1 | |
| Other method | If the patient uses a method not listed here, select this check box. | 1 | |
| Method unknown | If the method is unknown, select this check box. | 1 | |
| Partner pregnant or seeking pregnancy | If the patient's partner is pregnant or wants to become pregnant, select this check box. | 1 | |
| Other reason | If there is another reason that the patient is seeking family planning services, select this check box. | 1 | |
| Rely on female method(s) | If the patient relies on female methods of contraception, select this check box. | 1 |
| Prompt | Response | Req | Len |
|---|---|---|---|
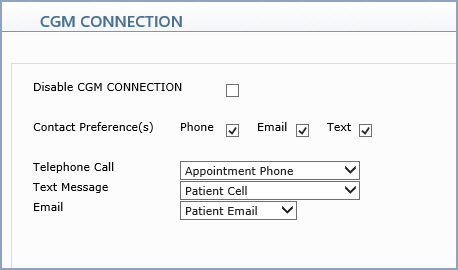
| Disable CGM CONNECTION | If you do not want this patient to receive appointment reminders via CGM CONNECTION, select this check box. | |
1 |
| Contact Preference(s) | Select the contact options to use when contacting the patient. | ||
| Telephone Call | Select the phone number to use for this contact option. | ||
| Text Message | Select the phone number to use for this contact option. | ||
| Select the email to use for this contact option. |


| Prompt | Response | Req | Len |
|---|---|---|---|
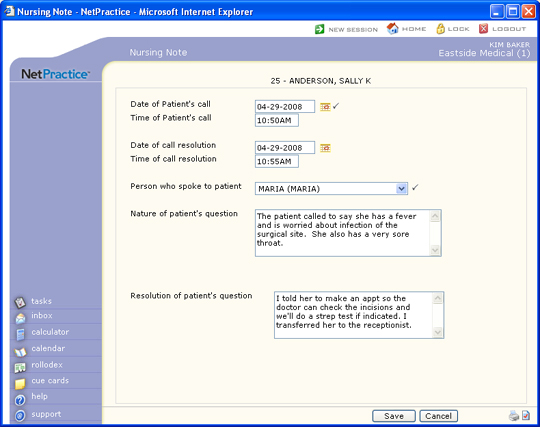
| Date of Patient's call | Type the date of the patient's call or click the calendar icon to select a date. | |
10 |
| Time of Patient's call | Type the time of the patient's call, followed immediately by AM or PM. | 7 | |
| Date of call resolution | Type the date that this call was resolved, or click the calendar icon to select a date. | 10 | |
| Time of call resolution | Type the time that this call was resolved, followed immediately by AM or PM. | 7 | |
| Person who spoke to patient | Select the person who spoke to the patient from the User list. | |
8 |
| Nature of patient's question | Type the nature of the patient's question. | 40*5 | |
| Resolution of patient's question | Type the resolution of the patient's question. | 36*5 |
| Prompt | Response | Req | Len |
|---|---|---|---|
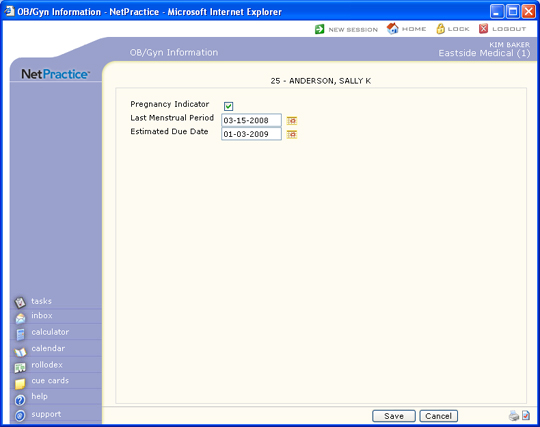
| Pregnancy Indicator | If the patient is pregnant, select this check box. | 1 | |
| Last Menstrual Period | Type the date of the patient's last menstrual period or click the calendar icon to select a date. | 10 | |
| Estimated Due Date | Type the estimated due date or click the calendar icon to select a date. | 10 |

| Prompt | Response | Req | Len |
|---|---|---|---|
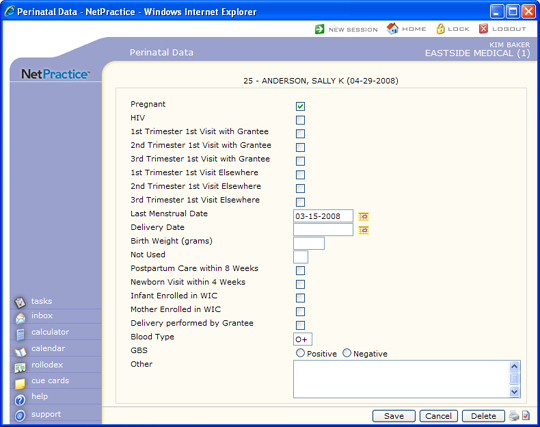
| Pregnant | If the patient is pregnant, select this check box. | 1 | |
| HIV | If the patient is HIV positive, select this check box. | 1 | |
| 1st Trimester 1st Visit with Grantee | This field is for use by Rural or Public Health providers. If the first visit of the first trimester took place with the grantee, select this check box. | 1 | |
| 2nd Trimester 1st Visit with Grantee | This field is for use by Rural or Public Health providers. If the first visit of the second trimester took place with the grantee, select this check box. | 1 | |
| 3rd Trimester 1st Visit with Grantee | This field is for use by Rural or Public Health providers. If the first visit of the third trimester took place with the grantee, select this check box. | 1 | |
| 1st Trimester 1st Visit Elsewhere | This field is for use by Rural or Public Health providers. If the first visit of the first trimester took place with someone other than the grantee, select this check box. | 1 | |
| 2nd Trimester 1st Visit Elsewhere | This field is for use by Rural or Public Health providers. If the first visit of the second trimester took place with someone other than the grantee, select this check box. | 1 | |
| 3rd Trimester 1st Visit Elsewhere | This field is for use by Rural or Public Health providers. If the first visit of the third trimester took place with someone other than the grantee, select this check box. | 1 | |
| Last Menstrual Date | Type the date of the patient's last menstrual period (LMP) or click the calendar icon to select a date. | 10 | |
| Delivery Date | Type the delivery date or click the calendar icon to select a date. | 10 | |
| Birth Weight (grams) | Type the birth weight in grams. | 4 | |
| Not Used | 1 | ||
| Postpartum Care within 8 Weeks | If the patient received postpartum care within eight weeks after delivery, select this check box. | 1 | |
| Newborn Visit within 4 Weeks | If the infant was seen for a newborn visit within four weeks after birth, select this check box. | 1 | |
| Infant Enrolled in WIC | If the infant is enrolled in a Women Infants and Children (WIC) program, select this check box. | 1 | |
| Mother Enrolled in WIC | If the mother is enrolled in a Women Infants and Children (WIC) program, select this check box. | 1 | |
| Delivery performed by Grantee | This field is for Rural/Public Health providers. If the delivery was performed by the grantee, select this check box. | 1 | |
| Blood Type | Type the blood type of the mother. | 2 | |
| GBS | Select the result, either Positive or Negative, of the Group Beta Strep (GBS) test. | 1 | |
| Other | Type any additional information pertaining to the perinatal record. | 50*4 |


| Prompt | Response | Req | Len |
|---|---|---|---|
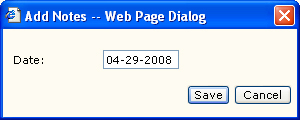
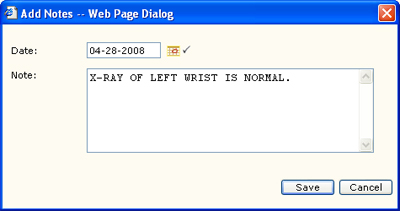
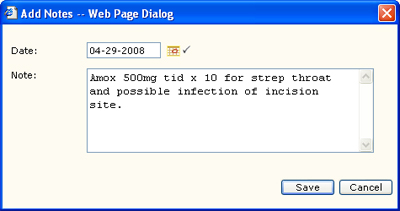
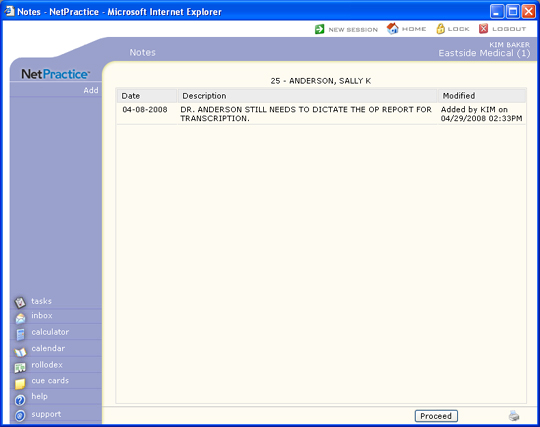
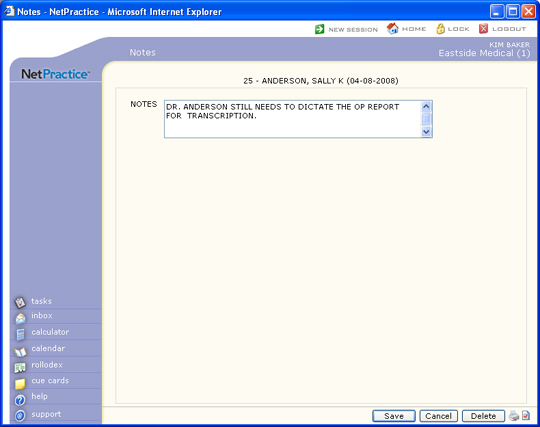
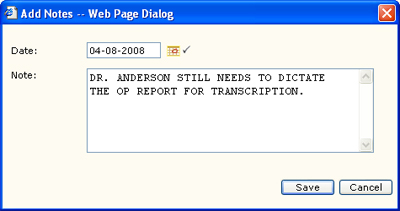
| NOTES | Type the text you want for the note. This field is limited to 240 characters. If you type over 240 characters, the note will be split into multiple notes. | |
60*4 |
| Prompt | Response | Req | Len |
|---|---|---|---|
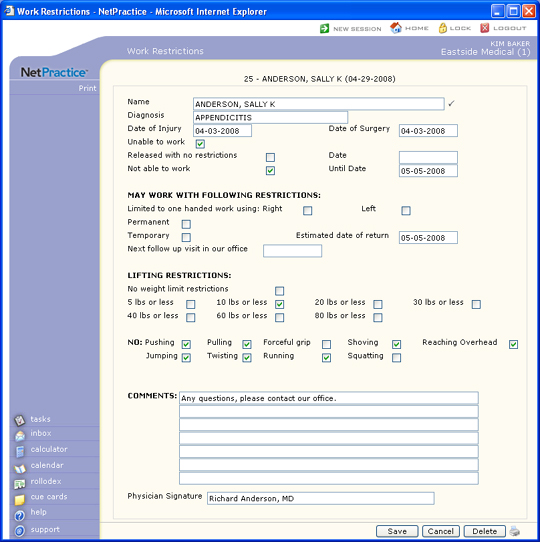
| Diagnosis | Type the patient's diagnosis. | 30 | |
| Date of Injury | Type the patient's date of injury. | 10 | |
| Date of Surgery | Type the patient's date of surgery. | 10 | |
| Unable to work | If the patient is unable to work for an undetermined period of time, select this check box. | 1 | |
| Released with no restrictions | If this patient has been released back to work with no restrictions, select this check box. | 1 | |
| Date | Type the date that the patient was released to work without restrictions. | 10 | |
| Not able to work | If the patient is unable to work through a known date, select this check box. | 2 | |
| Until Date | Type the date that the patient is unable to work until. | 10 | |
| MAY WORK WITH FOLLOWING RESTRICTIONS: | 0 | ||
| Limited to one handed work using: Right | If the client can return to work using only the right hand, select this check box. | 1 | |
| Left | If the client can return to work using only the left hand, select this check box. | 1 | |
| Permanent | If this restriction is permanent, select this check box. | 1 | |
| Temporary | If this restriction is temporary, select this check box. | 1 | |
| Estimated date of return | Type the date that the patient can resume working without this restriction. | 10 | |
| Next follow up visit in our office | Type the date of the next scheduled follow-up visit. | 10 | |
| LIFTING RESTRICTIONS: | 0 | ||
| No weight limit restrictions | If the patient can return to work with no weight lifting limit restrictions, select this check box. | 1 | |
| 5 lbs or less | If the patient is restricted to lifting five pounds or less, select this check box. | 1 | |
| 10 lbs or less | If the patient is restricted to lifting ten pounds or less, select this check box. | 1 | |
| 20 lbs or less | If the patient is restricted to lifting 20 pounds or less, select this check box. | 1 | |
| 30 lbs or less | If the patient is restricted to lifting 30 pounds or less, select this check box. | 1 | |
| 40 lbs or less | If the patient is restricted to lifting 40 pounds or less, select this check box. | 1 | |
| 60 lbs or less | If the patient is restricted to lifting 60 pounds or less, select this check box. | 1 | |
| 80 lbs or less | If the patient is restricted to lifting 80 pounds or less, select this check box. | 1 | |
| NO: Pushing | If this patient is restricted from pushing, select this check box. | 1 | |
| Pulling | If this patient is restricted from pulling, select this check box. | 1 | |
| Forceful grip | If this patient is restricted from using a forceful grip, select this check box. | 1 | |
| Shoving | If this patient is restricted from shoving, select this check box. | 1 | |
| Reaching Overhead | If this patient is restricted from reaching overhead, select this check box. | 1 | |
| Jumping | If this patient is restricted from jumping, select this check box. | 1 | |
| Twisting | If this patient is restricted from twisting, select this check box. | 1 | |
| Running | If this patient is restricted from running, select this check box. | 1 | |
| Squatting | If this patient is restricted from squatting, select this check box. | 1 | |
| COMMENTS: | Type any necessary additional comments. | 60 | |
| 60 | |||
| 60 | |||
| 60 | |||
| 60 | |||
| 60 | |||
| 60 | |||
| Physician Signature | Type the name of the physician. The physician can then sign after the Work Restrictions form is printed. | 45 |

| Prompt | Response | Req | Len |
|---|---|---|---|
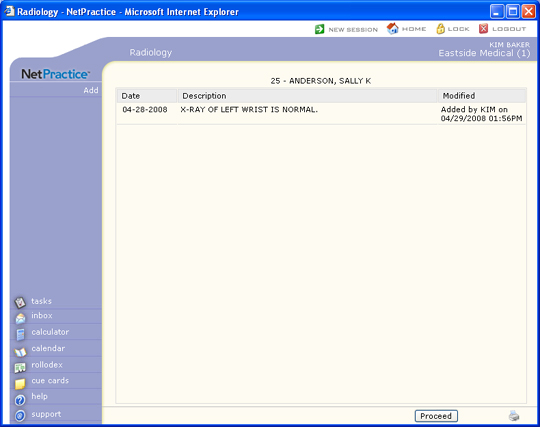
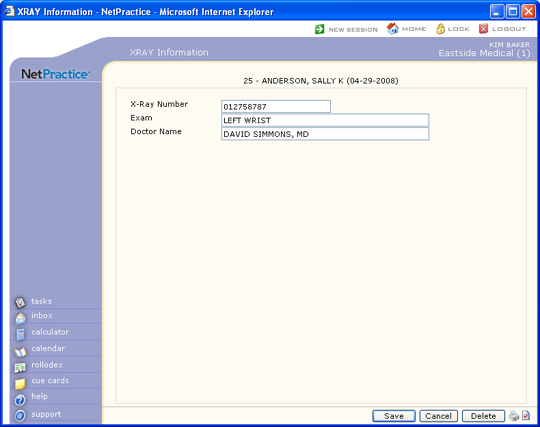
| X-Ray Number | Type the X-Ray number. | 20 | |
| Exam | Type the nature of the exam. | 40 | |
| Doctor Name | Type the name of the doctor or radiologist. This is a free text field, since this provider may not be a part of your Doctor or Referring Doctor tables. | 40 |
Copyright and Trademark Notice. Copyright © 2019 CompuGroup Medical, Inc. CGM®, CompuGroup Medical® and the CGM logo are registered trademarks and CGM webPRACTICE™ and CGM webTOOLS™ are trademarks of CompuGroup Medical AG in the United States and/or other countries. Any rights not expressly granted herein are reserved.
