![]()
| Prompt | Response | Req | Len |
|---|---|---|---|
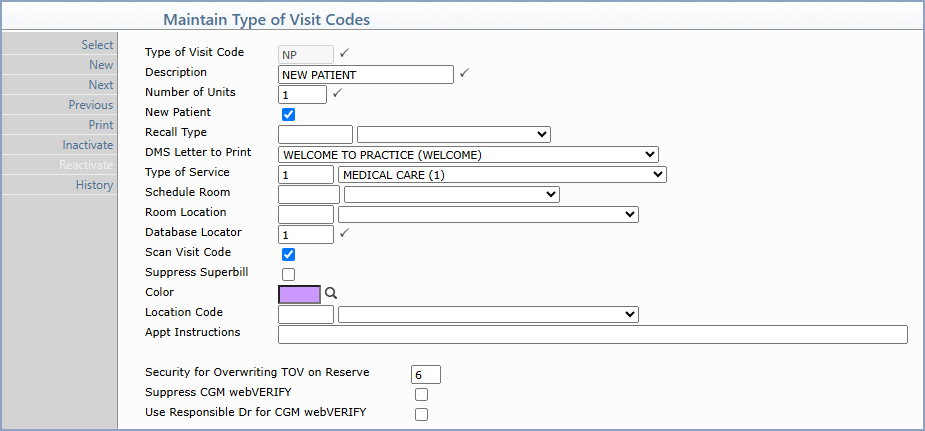
| Type of Visit Code | Type the code you want or click the magnifying glass to search the table. The code cannot include spaces. | 3 | |
| Description | Type a description of the code. |  |
20 |
| Number of Units | Type the number of units typically required for this type of visit. | |
3 |
| New Patient | If this Type of Visit code is for new
patient appointments, select this check box. If you select this
code while scheduling a new appointment, the New
Patient check box in the Appointment screen will be automatically
selected.
Note: When existing appointments are edited and you change the Type of Visit code to one that has this check box selected, the New Patient check box within the Appointment screen will not be changed. You must manually change the field. |
3 | |
| Recall Type | If you use Patient Recall functionality to print the Patient Recall Listing or cards/letters, you should select the Recall Type to be linked to this type of visit. This allows the Patient Recall listing to correctly match patient appointments from the schedule to any recalls on file. | 6 | |
| DMS Letter to Print | Select the DMS Letter to print for this type of visit. When you save an appointment for this type of visit, the Printers dialog box will display so you can choose whether or not to print the document at that time, in preparation for the patient's appointment. | 30 | |
| Type of Service | Type the code you want or select a code
from the Type of Service list. If you link a Type of Service to this Type of Visit, the Missing Charge Report will include all scheduled appointments where the posted procedures do not match the Type of Service linked to the Type of Visit. For example, if you schedule an appointment with a 'Follow-Up' Type of Visit that has the 'Medical Care' Type of Service linked to it but you only posted an x-ray procedure (type of service), then the appointment will show on the Missing Charge Report because it is looking for a procedure that is tied to the 'Medical Care' Type of Service. |
3 | |
| Schedule Room | Type the Room or Resource doctor code you want or select from the Schedule Room list. The list will only display doctor codes that are designated as Resources. You should only select a code if you want to have an appointment automatically scheduled for a Room or Resource when scheduling this type of visit code for a doctor. | 4 | |
| Room Location | If you selected a Schedule Room code, type the Location code for the Room or select from the Room Location list. | 3 | |
| Database Locator | This field defaults to the current database, but if you selected a Schedule Room code and the schedule for the Room resides in a different database than the Doctor's schedule, type the database where the schedule has been created for the Room. | |
2 |
| Scan Visit Code | If you want to include this Type of Visit when using the Scan function to schedule appointments, select this check box. | |
1 |
| Suppress Superbill | If you want to suppress superbills from printing for this Type of Visit code, select this check box. | 1 | |
| Color | Click the magnifying glass to search
the Color table and select the color you want to assign to this
code. If you select a dark color, the font color for the text
displayed in an appointment slot for this type of visit will automatically
switch to display white text instead of black. If you assign colors to your Type of Visit codes and schedule an appointment for multiple units, the schedule will display the color for each time slot containing a unit. |
10 | |
| Location Code | This field is not currently in use. | 3 | |
| Unit Value | A unit value may be assigned to each type of visit to limit the number of appointments. | 3 |
Copyright and Trademark Notice. Copyright © 2019 CompuGroup Medical, Inc. CGM®, CompuGroup Medical® and the CGM logo are registered trademarks and CGM webPRACTICE™ and CGM webTOOLS™ are trademarks of CompuGroup Medical AG in the United States and/or other countries. Any rights not expressly granted herein are reserved.
