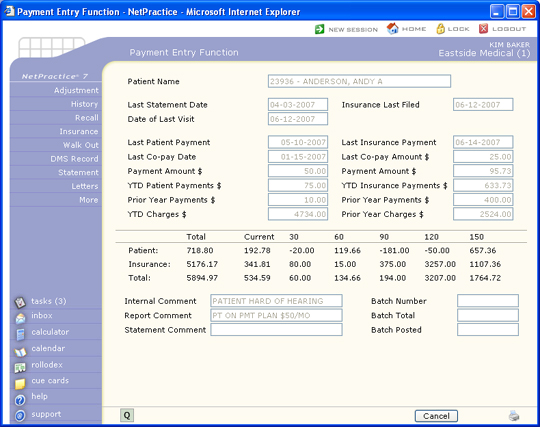
Payment Summary Screen
After the payment has been saved, the patient file, the audit trail,
and all statistical files will be immediately updated with the payment
information. You will be taken to a summary screen that gives you an instant
recap of this patient.
NOTE: Doctors are given credit only for payments that have been
applied to charges or debit adjustments. If payments are left unallocated,
those amounts will not be posted to the statistical files until such time
the payment is allocated. Therefore, your Payment
Analysis Reports will not always match total payments posted.
Your next step may depend on the information displayed here. For example,
if you see a five cent balance in the 120 column, you may opt to write
that balance off at this point.
You have several options to take at this point:
- Adjustment - even though
the payment entry screen also allows for the entry of adjustments,
those are strictly credit adjustments. If you need to make further
adjustments on the account you can select Adjustment. Please refer
to Adjustment Entry
for complete details.
- Refund - this allows you
to post a refund without having to exit the Payment Entry Function.
Only one refund can be posted at a time, but you can use the Refund
button multiple times from this screen.
- History - this takes you
to the patient review transaction history screen. You can choose this
option if you want to review the history to see how the payment you
just posted impacted the account. You may also want to validate the
patient and insurance balances.
- Recall - this allows you
to set or review a recall for the patient so they can be reminded
of a future appointment or follow-up.
- Insurance - this allows
you to print an insurance form on demand right from this screen. If
you had done any files or refiles, you may want to print those forms
immediately. If you are posting a large EOB that is generating secondary
claim forms, it is better to print these secondary forms through the
normal method of Printing
Insurance. That way you can print them in alphabetical order which
makes attaching them to a copy of the EOB easier.
- Walk Out - this allows
you to print a Walk out statement to give to the patient as they are
checking out. This would only be used if you were posting the charges
and payments prior to the patient leaving your office. Please refer
to Print a Walk Out Statement
for details on the Walk out statement.
- DMS Record - this allows
you to update any DMS record that might be applicable to this patient.
For example, you may want to update the HIPAA screen if this patient
gave you any new information. Please refer to Patient Change, DMS
Records for complete information on the DMS screens available.
- Statement - You may generate
a paper statement immediately if you desire. If you are doing electronic
statements, selecting the Statement button here, will not accumulate
your statements in the electronic file.
- Letters - this allows you
to generate a patient letter right from this screen.
- More - this allows you
to go right back into the same patient account you just posted a payment
to. You may want to do some further allocations based on the information
you reviewed on the summary screen. The More button takes you into
the Payment Allocation Screen and not the Lead-In screen.