CGM webMOBILE
CGM webMOBILE is a Windows based mobile device program that allows providers to carry their patient data, hospital lists and appointment schedules with them; in addition to capturing charge data at the point-of-service office, exam room, or the hospital. Intuitive tap and click design means ease of use for the provider. CGM webMOBILE allows access to and exchanges information with CGM webPRACTICE in real time via a secure Internet connection. Data entered within one application is immediately available in the other. This provides seamless sharing of patient data between the providers mobile device and the practice billing office.
CGM webMOBILE's fully bi-directional interface has a one-time setup to tailor it to the security needs of your practice. After that, it is completely operator independent.
The billing component of the interface stores provider-entered encounters as Unposted Procedures in CGM webPRACTICE, eliminating data entry but still allowing the billing office to review charges prior to posting. Providers can also assign follow-up tasks to staff members remotely.
Patient appointment schedules are downloaded directly to the mobile device and practice-specific ICD and CPT codes are automatically maintained.
With CGM webMOBILE you can eliminate lost charges, reduce coding issues, minimize claim denials and increase cash flow.
Features
- Intuitive, easy to use tap and click design
- Practice-wide inpatient census
- Multiple institutions
- Access data over a secure Internet connection
- Fully bi-directional interface with CGM webPRACTICE
- Seamless integration, once set up no user intervention is required
Benefits
- Eliminate lost charges, both at the hospital and in the office
- Carry current patient demographic data with you
- Practice specific ICD and CPT coding
- Referring provider database
- Reduce coding errors
- Minimize claim denials
- Increase cash flow
CGM webMOBILE Application
CGM webMOBILE Setup Process
- Set up the providers in CGM webPRACTICE
- The number of providers that can be set up to use CGM webMOBILE is controlled by the CGM webMOBILE service agreement. Refer to your agreement to verify the number of providers selected.
- Create a CGM webPRACTICE User Name and Password for each provider, if not already created.
- Add the User Name to the Doctor Code Table.

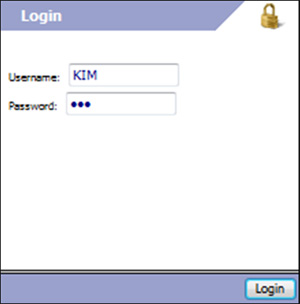
Launching and Logging In to CGM webMOBILE
Type your CGM webPRACTICE Username and Password and tap Login.
Select the Facility (Location).
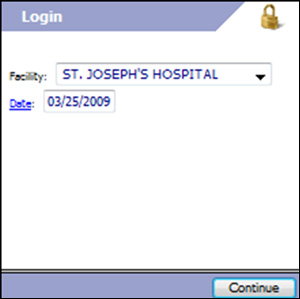
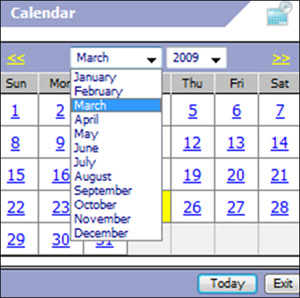
Type the Date of Service or tap Date. Tap the date you want. To change the month or year shown, use the left and right arrows on either side of the Month and Year, or tap the down-arrow of the Month and Year drop-down list box to make your selection.
NOTE: To save time when recording encounters, CGM webMOBILE gathers the Provider (Doctor), Facility (Location), and Date of Service from the Login screens.
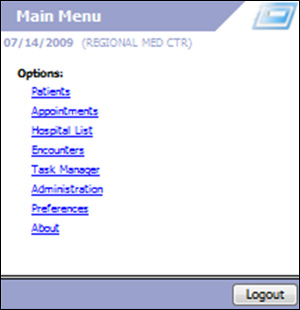
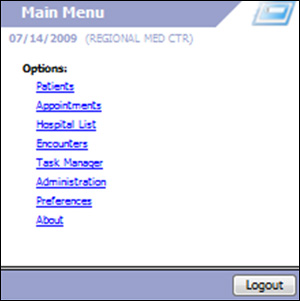
CGM webMOBILE Main Menu
The CGM webMOBILE Main Menu displays after you have successfully logged into CGM webMOBILE, and provides access to all the functions necessary to use CGM webMOBILE. Tap the function name to select a function.
The Logout button logs you off of CGM webMOBILE and prevents patient data from falling into unauthorized hands in the event that your mobile device is lost or stolen.
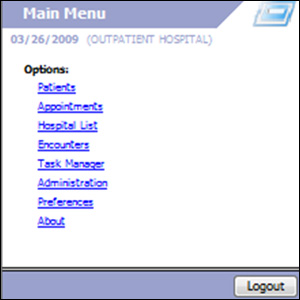
Tapping the About function from the Main Menu displays version information about CGM webMOBILE.
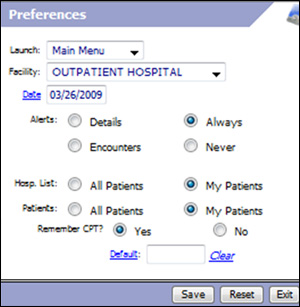
Setting Preferences
With the Preferences option you can customize CGM webMOBILE for your mobile device.
Data Field Information
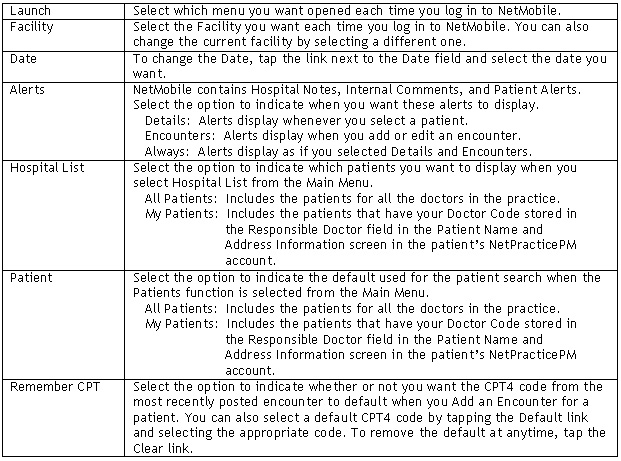
When you have completed making any necessary changes, tap Save to proceed, otherwise tap Exit at any time to exit this function and return to the Main Menu. If you have made changes to the Preferences, but you have not yet saved them, you can tap the Reset button to change all selections back to the defaults set in the last save.
Patient Selection Functions
CGM webMOBILE provides four different options for selecting a patient. Patients contains the master list of all the patients from your CGM webPRACTICE database, from which the Appointments, Hospital List, and Encounters are then extracted, based on the account meeting certain criteria. You can quickly locate the type of patient account you want and proceed to the Patient Details menu from there.
Patients
This function provides access to all the patients in your CGM webPRACTICE database. Tap Patients to access the list of patients. You can control whether you see only your patients or all patients for the practice within the Preferences option.
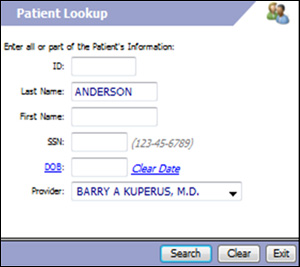
The Patient Lookup screen displays.
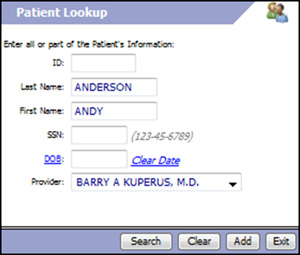
You can Search for an existing patient, Clear the data on the screen, Add a new patient, or Exit this function. To search for an existing patient, type all or part of the patients information in the fields provided and then tap Search.
The Patients Found screen displays.
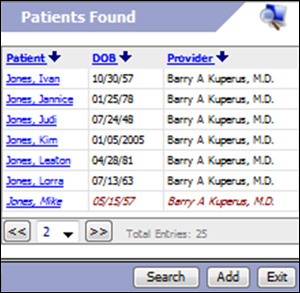
- Tap any column header to re-order the data.
- Click Add to add a new patient. For more information, see the Add a New Patient section within Patient Details for detailed instructions.
- Tap the patients name to select a patient.
- To perform another search, tap Exit and then reselect the Patients option from the Main Menu.
Patients that are not fully registered in CGM webPRACTICE appear with the patient name in italic formatting and the DOB and Provider display in red font.
After you have selected a patient from the Patients Found list, the Patient Details screen displays. Refer to the Patient Details section for detailed instructions.
Appointments
This function displays only the patients entered in your CGM webPRACTICE schedule. You cannot schedule patient appointments from the mobile device.
To view your schedule, tap Appointments on the Main Menu. The Appointments screen displays the appointment Time, patient Name, Type of visit, and Facility for each appointment for the date selected.

- Tap any column header to re-order the data.
- Tap the date link at the top of the screen to select a date.
- To change the Facility, select the facility/location you want from the list.
- Tap the appointment time link next to the patients name to select a patient.
After you have selected a patient from the Appointments list, the Patient Details screen displays. Refer to the Patient Details section for detailed instructions.
Hospital List
This function provides a list of patients currently in the hospital. Patients are populated into this list based on whether they have an active Hospitalization DMS Record in CGM webPRACTICE. An active record contains a Date Admitted without a corresponding Date Discharged.
The Hospital Patients screen displays and contains the patients Name, Facility name, floor and room (F/R) for each patient on the list.
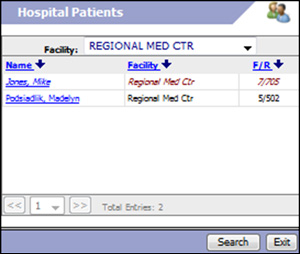
- Tap any column header to re-order the data.
- To change the Facility, select the facility/location you want from the list.
- Tap the patients name to select a patient.
Patients that are not fully registered in CGM webPRACTICE appear with the patient name in italic formatting and the Facility and F/R (Floor/Room) display in red font.
After you have selected a patient from the Hospital list, the Patient Details screen displays. Refer to the Patient Details section for detailed instructions.
Encounters
This function provides a list of the patients that you have entered Encounters on, but have not yet been posted in CGM webPRACTICE. This is helpful in tracking what was entered today and for editing charges before they are posted in CGM webPRACTICE.
To view the patients that have Encounters, tap Encounters on the Main Menu. The Encounter List displays the Patient, DOB (date of birth), and Facility for each patient.
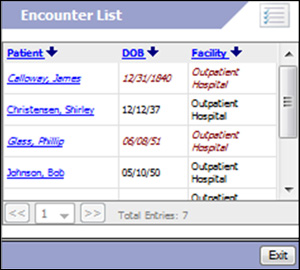
- Tap any column header to re-order the data.
- Tap the patients name to select a patient.
Patients that are not fully registered in CGM webPRACTICE appear with the patient name in italic formatting and the DOB and Facility display in red font.
After you have selected a patient from the Encounter list, the Patient Details screen displays. Refer to the Patient Details section for detailed instructions.
Patient Details
After you select a patient from the Patients, Appointments, Hospital List, or Encounters function, or tapped Add to add a new patient from any of the Patient Lookup screens, the Patient Details screen displays.

From here you can:
- Update Patient Details
- Discharge the Patient
- Create a Task specific to the Patient
- Review, Edit, or Add Encounters
- Review Insurance Information
- Review Alerts
The Patient tab is the default active function every time the Patient Details screen is accessed for an existing patient on the mobile device, unless you have selected to display the Alerts first in Preferences. The active tab displays with a white background; the inactive tabs display with a gray background.
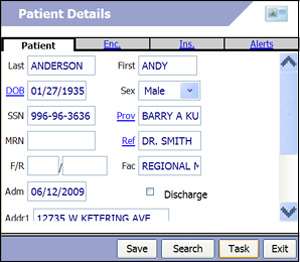
Update Patient Details
The Patient tab provides basic information about the patient.
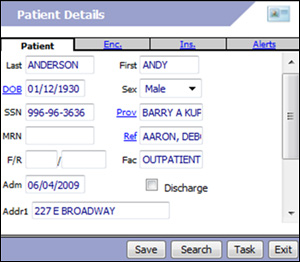
This data includes:
- Last Name
- First Name
- Date of Birth (DOB)
- Sex
- Social Security Number (SSN)
- Responsible Doctor (Prov)
- Hospital Medical Record Number (MRN)
- Referring Provider (Ref)
- Floor/Room (F/R)
- Admit Date (Adm) for Hospital Patients
- Hospital (Fac) or Default Location for the patient
- Patient Address and Phone Number
To change the data, tap the field or link you want and type or select the new data.
Click Task to add a task. Refer to Add a Task in the Task Manager section for more information.
Add a New Patient
If you tap Add from any of the patient search screens, the New Patient screen displays.
While it is important to gather as much information as possible, only Last and First name, BD (Birth Date) and Sex are required fields. The Prov (Responsible Dr) and Facility default with the information entered when you logged in to CGM webMOBILE.
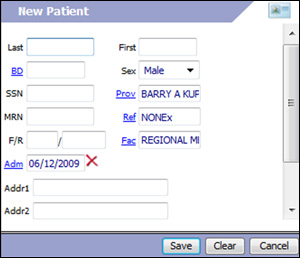
All of the information entered for a New Patient is sent to CGM webPRACTICE and can be accessed through the New Patients Action Column function in Unposted Procedures. Refer to the New Patients section under CGM webMOBILE and CGM webPRACTICE for detailed instructions.
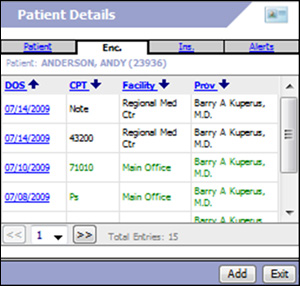
Encounters
The Enc (Encounters) tab provides a summary of the recent Encounters (procedures) on the patients account. All encounters that are still unposted in CGM webPRACTICE display in black font. Encounters that have been posted in CGM webPRACTICE display in green font. The number of posted encounters displayed depends on the quantity indicated for # of Encounters to Display, in the CGM webMOBILE Integration. The encounters may be from the office, hospital or a combination of the two.
The encounter summary includes the DOS (Date of Service), CPT (Procedure Code) Facility, and Provider in ascending order by Date of Service. You can re-order the encounters by tapping the header of any column.
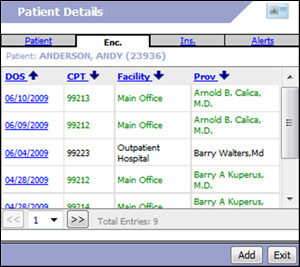
- Review an Encounter
To select an encounter, tap the date link on the row that contains the Encounter.
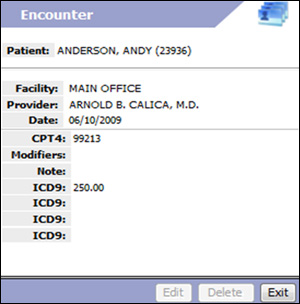
The Encounter details screen displays the detail about the encounter. You cannot change any of the data on encounters that have been posted in CGM webPRACTICE. The Edit and Delete buttons are disabled. Any necessary changes need to be made in CGM webPRACTICE.
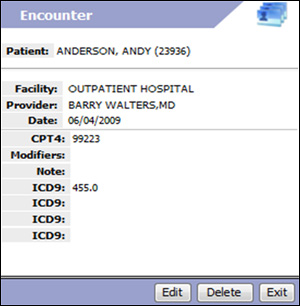
- Edit an Encounter
If the encounter is still unposted in CGM webPRACTICE, the Encounter details screen displays and the Edit and Delete buttons are enabled, so you can make changes if necessary.
If you want to remove this unposted encounter, tap Delete. If you want to make changes to this encounter, tap Edit.
- Add an Encounter
To add an encounter, tap Add.

To edit a field tap the link next to the field.
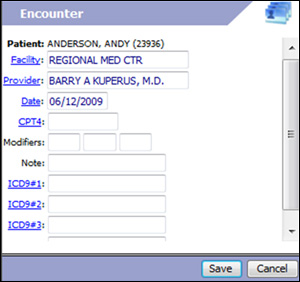
- Patient: The selected patient name and account number displays.
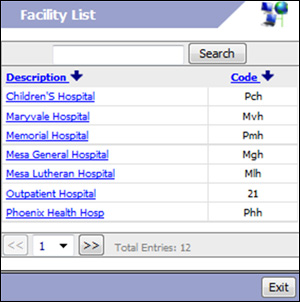
- Facility: This field defaults with the information selected when you logged in to CGM webMOBILE. You can change the default data using the Preferences function on the Main Menu. To change the facility, tap the Facility link. The Facility List screen displays the facilities selected in the Facilities Action Column function in the CGM webMOBILE Integration. Select the facility you want by tapping the link containing the facility description. If your list of facilities is extensive or is not selected in the CGM webMOBILE Integration, use the Search function to locate the code you want. Write or type the characters into the Search field and tap Search. This narrows the list to just those facilities that contain the data you typed. If you want to go back to viewing all of the facility codes selected in the CGM webMOBILE Integration, delete any text in the Search field and tap Search.
After you select a facility, the Encounter details screen displays.
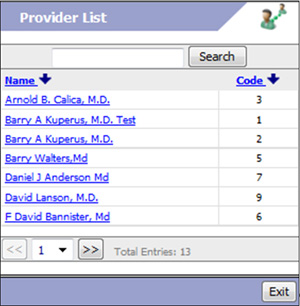
- Provider: This field defaults with the information selected when you logged in to CGM webMOBILE. You can change the default data using the Preferences function on the Main Menu. To change the provider, tap the Provider link. The Provider List screen displays the providers selected in the Providers Action Column function in the CGM webMOBILE Integration. Select the provider you want by tapping the link containing the provider name. If your list of providers is extensive or is not selected in the CGM webMOBILE Integration, use the Search function to locate the code you want. Write or type the characters into the Search field and tap Search. This narrows the list to just those providers that contain the data you typed. If you want to go back to viewing all of the provider codes selected in the CGM webMOBILE Integration, delete any text in the Search field and tap Search.
After you select a provider, the Encounter details screen displays.
- Date: This field defaults with the information selected when you logged in to CGM webMOBILE. You can change the default data using the Preferences function on the Main Menu. Tap the Date link to change the date.
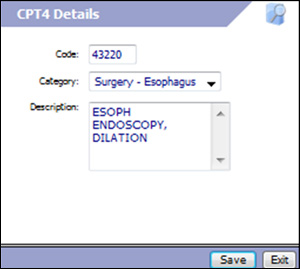
- CPT4: The CPT4 field is blank unless you selected Remember CPT in the Preferences function and an encounter has been previously entered on the patients account, or if you have set up a Default CPT in Preferences. To select or change the CPT4 code, tap the CPT4 link. The CPT4 screen displays the CPT codes selected in the CPT Categories Action Column function in the CGM webMOBILE Integration. To expand the Category and view the codes within it, tap the Plus (+) sign to the left of the Category. To contract the list, tap the Minus (-) sign to the left of the Category. Select the CPT4 you want by tapping the link containing the CPT4 code.
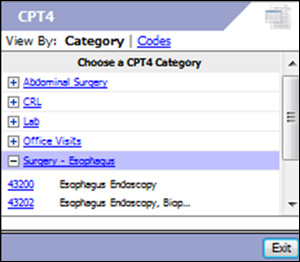
If your list of CPT4 codes is extensive or the code you want is not in your pre-defined categories, use the Search function to locate the code you want. Tap the Codes link, and type the characters into the Search field and tap Search. This narrows the list to just those codes that contain the data you typed. You can tap any of the column headers to re-sort the list by that heading.
After you select a CPT4 code, the Encounters detail screen displays.
- Modifiers: If the encounter requires any Modifiers, you can type up to three of them in the fields provided.
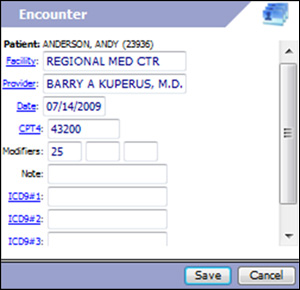
- Note: If the encounter requires a note, type the text in the Note field. The note posts to the patients account with a NOTE Special Procedure Code and is included on the insurance claim.
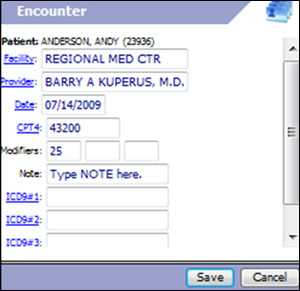
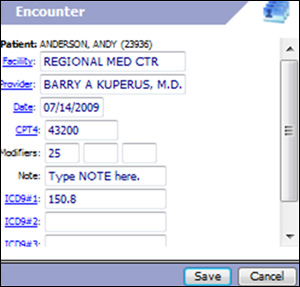
- ICD9: To select or change an ICD9 code, tap the ICD9 button you want. The ICD9 List screen displays the ICD9 Categories and codes selected in the ICD9 Categories Action Column function in the CGM webMOBILE Integration. To expand the Category and view the codes within it, tap the Plus (+) sign to the left of the Category. To contract the list, tap the Minus (-) sign to the left of the Category. Select the ICD9 you want by tapping the link for the ICD9 code.
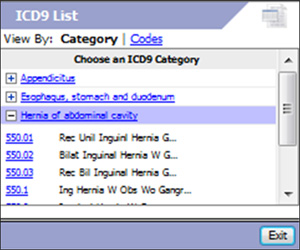
If your list of ICD9 codes is extensive or the code you want is not in your pre-defined categories, use the Search function to locate the code you want. Tap the Codes option and type the characters into the Search field and tap Search. This narrows the list to just those codes that contain the data you typed. Tap any of the column headers to re-sort the list by that heading.
After you select an ICD9 code, the Encounter details screen displays.
After you have completed all of the fields, tap Save.
After saving, the list of encounters for the current patient displays. The newly added encounter displays at the top of the list.
You can edit or delete this encounter at any time prior to posting it in CGM webPRACTICE by coming back to this patient and tapping the encounter.
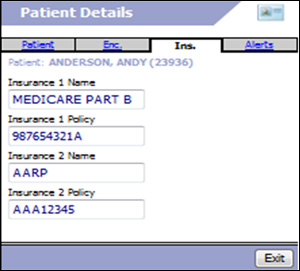
Insurance Information
To review the patients insurance information tap the Ins. tab at the top of the Patient Details screen.
The insurance information is provided for review purposes only and contains the patients first primary and first secondary insurance policies.
This information can only be entered or edited through CGM webPRACTICE due to the detailed coding requirements for storing insurance policies on a patients account.
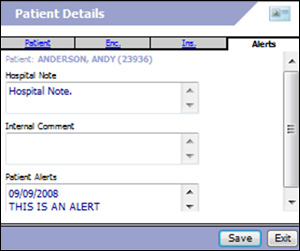
Alerts
To review Alerts for the patient, tap the Alerts tab at the top of the Patient Details screen. There are three types of alerts:
- Hospital Note: You can type any applicable hospital note pertaining to this hospital stay. This note displays in the Hospitalization DMS record screen on the patients account in CGM webPRACTICE.
- Internal Comment: This is the comment entered in the patients Billing Information screen in CGM webPRACTICE.
- Patient Alerts: This contains the Alerts DMS records on the patients account in CGM webPRACTICE.
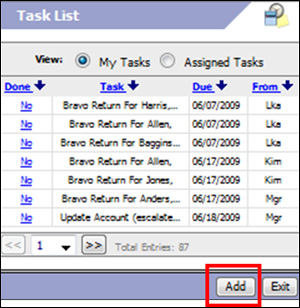
Task Manager
The Task Manager option allows you to review and assign tasks. Task Manager in CGM webMOBILE is completely integrated with the Task Management functionality in CGM webPRACTICE. Tasks can be sent from CGM webMOBILE directly to CGM webPRACTICE users. Tasks generated in CGM webPRACTICE and assigned to CGM webMOBILE users are accessible in CGM webMOBILE.
Tap Task Manager from the Main Menu.
Using Task Manager, you can view all the Assigned Tasks or just a list of My Tasks. To select the view you want, select the appropriate View option. You can sort the data by tapping any of the column headers.
My Tasks displays a list of all tasks assigned to the user currently logged in to CGM webMOBILE.

Assigned Tasks displays a list of tasks you have assigned to yourself or other users that have not yet been completed.
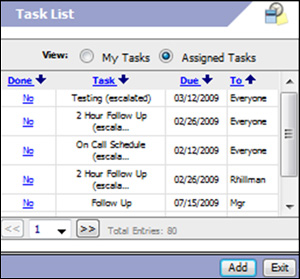
You can review the details of a task by tapping the link in the Done column for the appropriate task. To mark a task as complete, tap the Completed check box and tap Save.
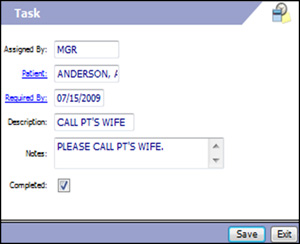
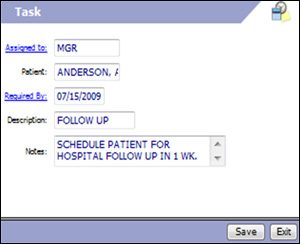
Add a Task
You can add a task directly from the Task List screen by tapping the Add button.
From the Task screen, add the details of the new task.
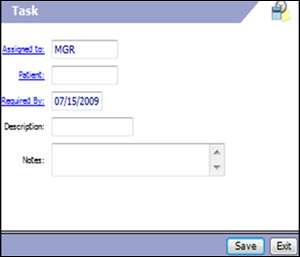
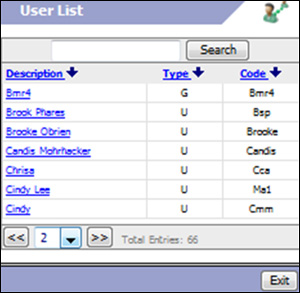
- Assigned to: Tasks can be assigned to yourself, another CGM webPRACTICE user, or a Group of users. Tap the Assigned to link and the User List displays. Select the user you want by tapping the link in the Description column. The selected User code displays in the Assigned to: field. You can also search for a user by typing the characters into the search field and tapping Search. In the Type column, the G represents a group of users and the U represents an individual user.
- Patient: You can attach a patient to the task by tapping the Patient link, to search for and select the patient.
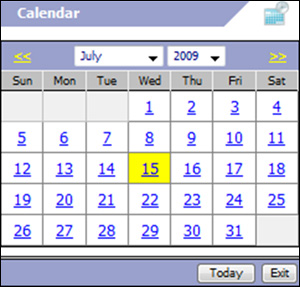
- Required By: This field defaults with the current date. Tap the Required By: link to select the date when the task should be completed.
- Description: Type a description of the task.
- Notes: Type a detailed note for the task, if necessary.
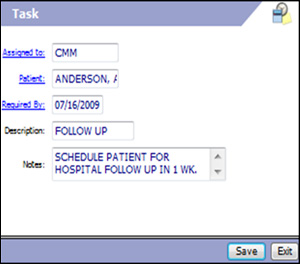
You can also add a patient-specific task from within the Patient Details screen after selecting a patient by tapping the Task button.
After you have completed all the task details tap Save.
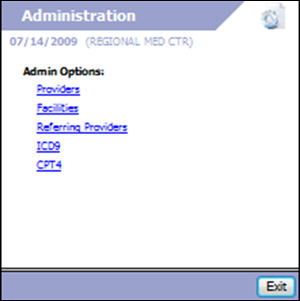
Administration
The Administration function allows you to review and maintain the tables on your mobile device.
Select this function by tapping Administration.
The Administration screen displays. The Admin Options include Providers, Facilities, Referring Providers, ICD9 and CPT4 tables.
These tables are automatically maintained by the interface between CGM webMOBILE and CGM webPRACTICE.
Administration - Providers
Select the Providers option and the Provider List displays containing all providers currently selected in the Providers Action Column function in the CGM webMOBILE Integration.
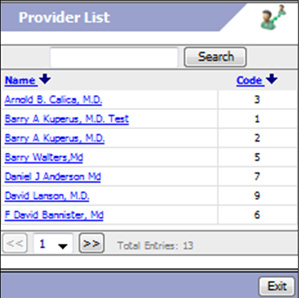
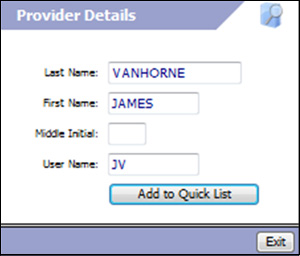
You can search for a provider by typing the characters in the search field and tapping Search. You can select a provider to review by tapping the provider's name in the Name column.
You can add a provider to the CGM webMOBILE Provider List by tapping the Add to Quick List button.
Administration - Facilities
Select the Facilities option and the Facility List displays containing all facilities currently selected in the Facilities Action Column function in the CGM webMOBILE Integration.
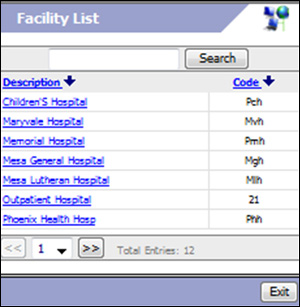
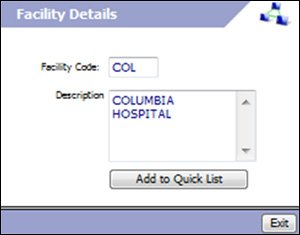
You can search for a facility by typing the characters in the search field and tapping Search. You can select a facility to review by tapping the facility name in the Description column. You can add a facility to the CGM webMOBILE Facility List by tapping the Add to Quick List button.
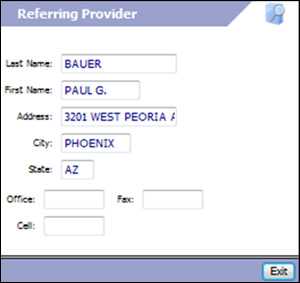
Administration - Referring Providers
Select the Referring Providers option and the Referring Providers list displays a list of the most common referring providers.
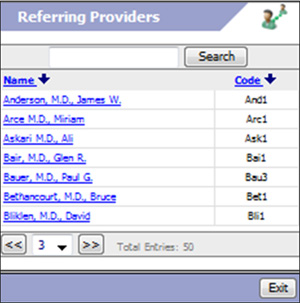
You can search for any referring provider in your CGM webPRACTICE table, by typing the characters in the search field and tapping Search. You can select a referring provider to review by tapping the provider's name in the Name column. This table is maintained in CGM webPRACTICE and you cannot add or edit entries in this table from CGM webMOBILE.
Administration - ICD-9
Select the ICD9 option and the ICD-9 List screen displays containing the ICD9 Categories and codes selected in the ICD9 Categories Action Column function in the CGM webMOBILE Integration. To expand the Category and view the codes within it, tap the Plus (+) sign to the left of the Category. To contract the list, tap the Minus (-) sign to the left of the Category.
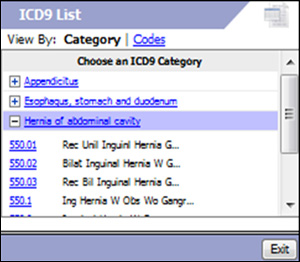
If your list of ICD-9 codes is extensive or the code you want is not in your pre-defined categories, use the Search function to locate the code you want. Tap the Codes option and type the characters into the Search field and tap Search. This narrows the list to just those codes that contain the data you typed. You can select a code to review by tapping the appropriate link the Code column. You can add a code to an existing category or move a code to a different category by selecting the appropriate category from the Category list.

Administration - CPT4
Select the CPT4 option and the CPT4 screen displays containing the CPT4 Categories and codes selected in the CPT Categories Action Column function in the CGM webMOBILE Integration. To expand the Category and view the codes within it, tap the Plus (+) sign to the left of the Category. To contract the list, tap the Minus (-) sign to the left of the Category.
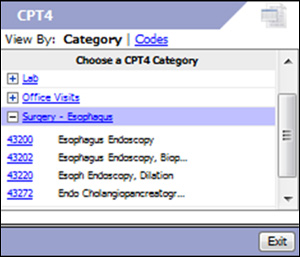
If your list of CPT4 codes is extensive or the code you want is not in your pre-defined categories, use the Search function to locate the code you want. Tap the Codes option and type the characters into the Search field and tap Search. This narrows the list to just those codes that contain the data you typed. You can select a code to review by tapping the appropriate link the Code column. You can add a code to an existing category or move a code to a different category by selecting the appropriate category from the Category list.
CGM webMOBILE and CGM webPRACTICE
Unposted Procedures
All encounters entered in CGM webMOBILE for patients already registered in CGM webPRACTICE immediately populate into Unposted Procedures in CGM webPRACTICE. The Source column displays CGM webMOBILE for these procedures. From here the charge can be selected and posted to the patients account.
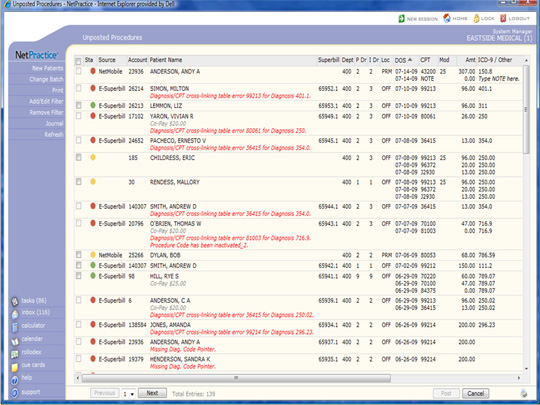
- New Patients
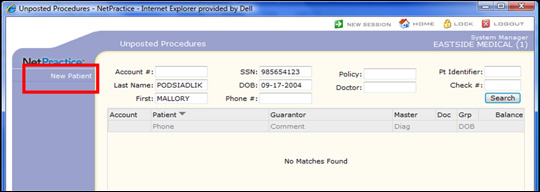
New patients added through CGM webMOBILE can be accessed by selecting New Patients in the Action Column from the Unposted Procedures summary screen. A list displays of all new patients not yet registered in CGM webPRACTICE.

Select the patient you want to register. The Un-Registered Patients dialog box displays. Select Update to complete the registration for this patient or select Delete to remove this record from the Un-Registered Patients listing.

If you select Update, the Unposted Procedures Patient Look-up screen displays. If no matches are found for this patient, select New Patient from the Action Column. Complete the normal CGM webPRACTICE patient registration process.
After the patient is registered, any encounters entered for this patient in CGM webMOBILE populate into the Unposted Procedures list.
