![]()
| Prompt | Response | Req | Len |
|---|---|---|---|
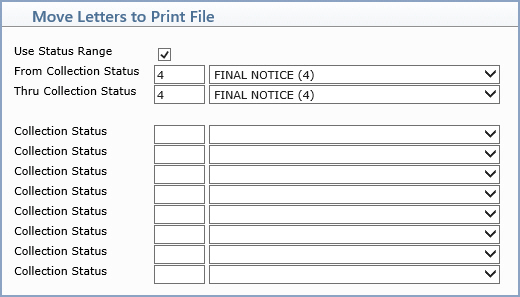
| Use Status Range | If you want to select a range of codes, select this check box. If you do select to use a Range of Codes, complete only the From and Thru Collection Status fields and leave the individual Collection Status fields blank. |  |
1 |
| From Collection Status | If you selected to use a Status Range, type the code to start with or select from the Status Code list. | 3 | |
| Thru Collection Status | If you selected to use a Status Range, type the code to end with or select from the Status Code list. | 3 | |
| Collection Status | If you did not select to use a Status Range, type the code you want or select from the Status Code list. | 3 | |
| Collection Status | If you did not select to use a Status Range, type the code you want or select from the Status Code list. | 3 | |
| Collection Status | If you did not select to use a Status Range, type the code you want or select from the Status Code list. | 3 | |
| Collection Status | If you did not select to use a Status Range, type the code you want or select from the Status Code list. | 3 | |
| Collection Status | If you did not select to use a Status Range, type the code you want or select from the Status Code list. | 3 | |
| Collection Status | If you did not select to use a Status Range, type the code you want or select from the Status Code list. | 3 | |
| Collection Status | If you did not select to use a Status Range, type the code you want or select from the Status Code list. | 3 | |
| Collection Status | If you did not select to use a Status Range, type the code you want or select from the Status Code list. | 3 |
Copyright and Trademark Notice. Copyright © 2019 CompuGroup Medical, Inc. CGM®, CompuGroup Medical® and the CGM logo are registered trademarks and CGM webPRACTICE™ and CGM webTOOLS™ are trademarks of CompuGroup Medical AG in the United States and/or other countries. Any rights not expressly granted herein are reserved.
