![]()
| Prompt | Response | Req | Len |
|---|---|---|---|
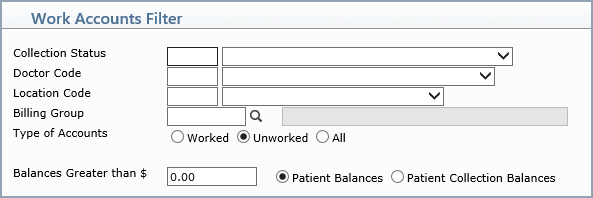
| Collection Status | Type the collection status code you want, select from the Collection Status list, or leave the field blank to view accounts for every code in the table. | 3 | |
| Doctor Code | Type the doctor code you want, select from the Doctor Code list, or leave the field blank to include accounts for every code in the table. This refers to the Responsible Doctor on the Patient Name and Address Information screen. | 3 | |
| Location Code | Type the location code you want, select from the Location Code list, or leave the field blank to include accounts for every code in the table. This refers to the Default Location on the Patient Name and Address Information screen. | 3 | |
| Billing Group | Type the code you want, click the magnifying glass to search the table or leave the field blank to include accounts for every code in the table. This refers to the Billing Group on the patient's Billing Information screen. | 3 | |
| Type of Accounts | Select the option to indicate which accounts you want to work. | 1 | |
| Balances Greater than $ | Type the amount to indicate which accounts you want to work based on minimum balance. | 10 |
| Prompt | Response | Req | Len |
|---|---|---|---|
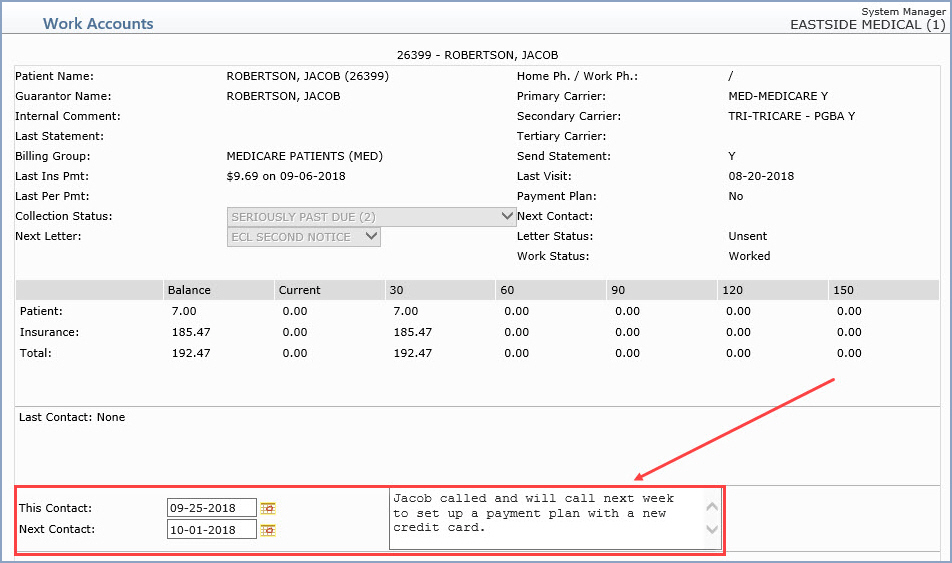
This Contact |
Enter the date you want or click the calendar icon to select a date. This date defaults to the current date. | 10 | |
Next Contact |
Enter the date of the next expected
contact or click the calendar icon to select a date.
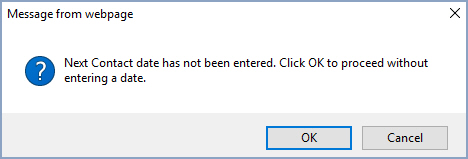
Note: This date will override the standard migration path determined by the Collection Statuses. For example, a patient calls and says they will make a payment in five days, but their collection status is set to migrate to the next status tomorrow. You would make a note regarding the promised payment and set the next contact date as five days from today. This would prevent this account from migrating on to the next status when you populate the collection roster tomorrow. If the patient fails to make that payment in the five days as promised, the account will stay in the current status and will migrate as normal with the next populate. |
10 | |
Note Field |
Enter the text for this note. | 240 |
Data Field Information
| Prompt | Response | Req | Len |
|---|---|---|---|
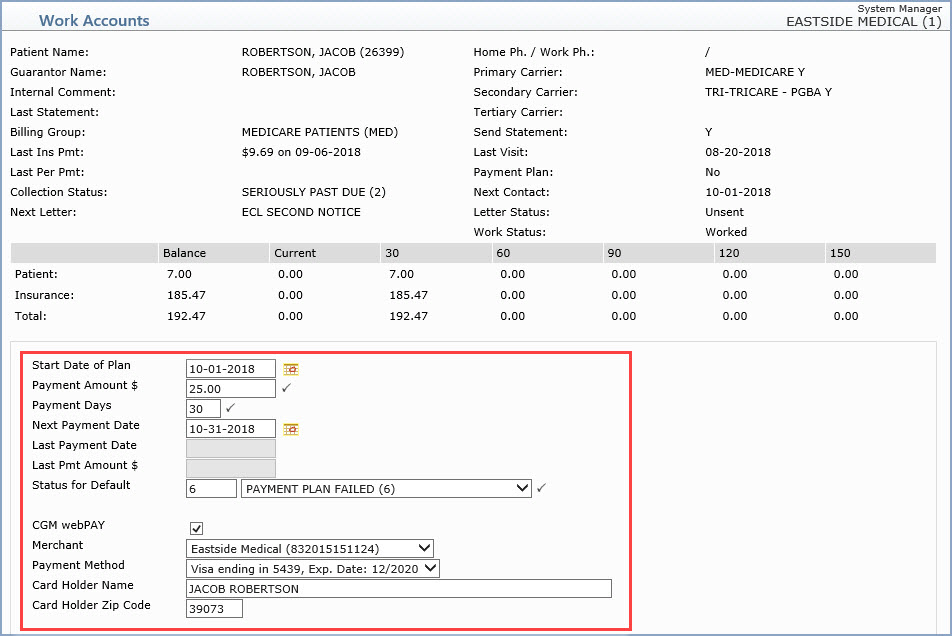
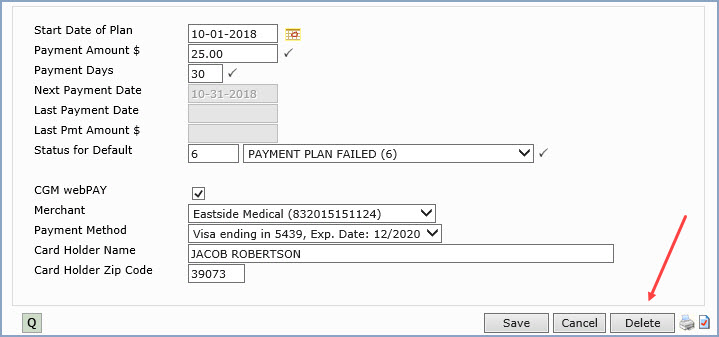
| Start Date of Plan | Enter the date that the payment plan should start or click the calendar icon to select a date. | 10 | |
| Payment Amount | Enter the amount that the patient has agreed to pay. This amount is expected as frequently as the interval set in the Payment Days field. If the patient pays an amount less than this amount, the patient is considered to have failed (defaulted on) the payment plan and the account will move into the status set in the Status for Default field with the next 'populate'. |  |
10 |
| Payment Days | Enter the number of day indicating the agreed frequency of the payment. This field is used in conjunction with the Next Payment Date field to determine when the next payment is due. | |
2 |
| Next Payment Date | This date field is automatically calculated
based on the Start Date of Plan and Payment Days fields. If the
patient does not make a payment by this date, the patient is considered
to have failed (defaulted on) the payment plan and the account
will move into the status set in the Status for Default field
with the next 'populate'.
You can override this field if needed. Type the date you want or click the calendar icon to select a date. For example, a patient agrees to pay $10.00 a week starting on the first of the next month; or, a patient informs you that they will be missing a payment; you can type the next agreed-upon date. |
10 | |
| Last Payment Date | This field is information only and reflects the date of the last payment posted on the account. | 10 |
|
| Last Payment Amount $ | This field is information only and reflects the amount of the last patient payment posted on the account. | 10 |
|
| Status for Default | Select a Collection Status to be assigned
to the account in the event that the patient defaults on the payment
plan; meaning they miss a payment or pay less than the agreed
amount.
The default response is held in the Collection Payment Plan Failed field of the Patient Collections Integration screen. Note: If you select a status other than 'Payment Plan Failed', it is treated as a 'payment plan failed' status. Meaning, the 'Days to Remain in Status' and the 'Transfer to Next Status Code' fields for this other status, are ignored and the account remains in the status code specified until you manually change it. |
|
3 |
| CGM PAY | If the payments for this payment plan will be automatically collected using CGM PAY, select this check box. | 1 | |
Submitter # |
Select a Submitter # from the list. This is required for CGM PAY payment plans. | |
1 |
Payment Method |
Select a Payment Method from the list. This is required for CGM PAY payment plans. | |
10 |
Card Holder Name |
Type the Card Holder's full name. | ||
Card Holder Zip Code |
Type the Card Holder's five-digit zip code. |
Copyright and Trademark Notice. Copyright © 2019 CompuGroup Medical, Inc. CGM®, CompuGroup Medical® and the CGM logo are registered trademarks and CGM webPRACTICE™ and CGM webTOOLS™ are trademarks of CompuGroup Medical AG in the United States and/or other countries. Any rights not expressly granted herein are reserved.
