![]()

|
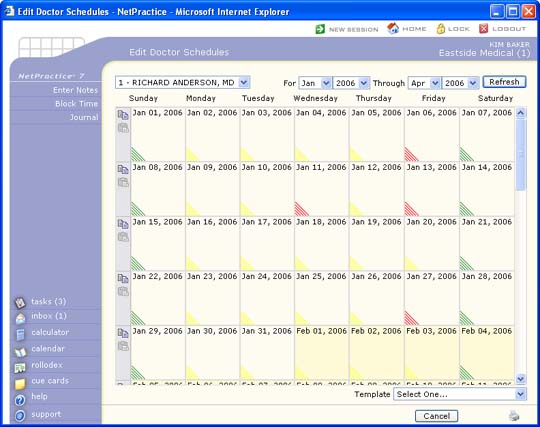
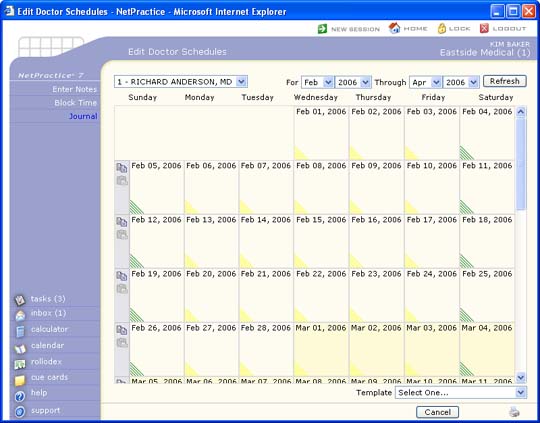
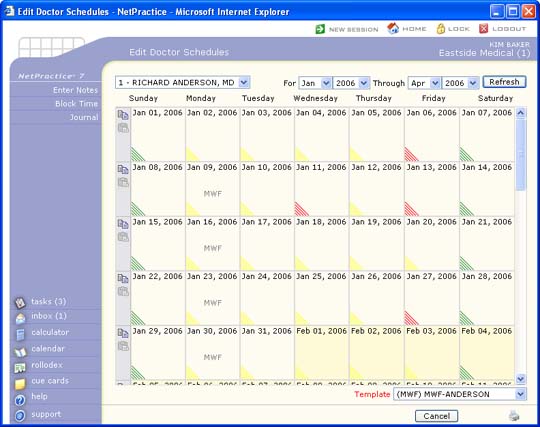
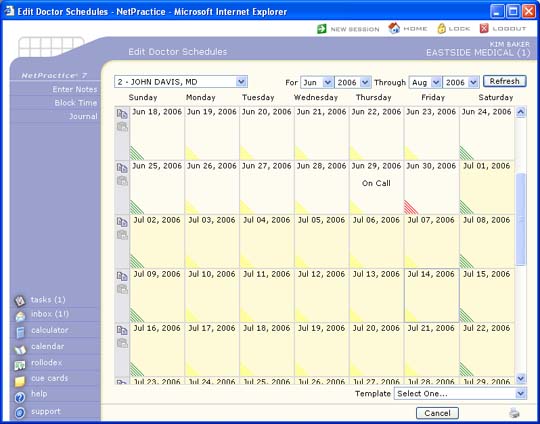
- No schedule has been created for this day. |
|
- A schedule exists but no patient appointments scheduled for this day. |
|
- A schedule exists and patient appointments have been scheduled for this day. |
| Prompt | Response | Req | Len |
|---|---|---|---|
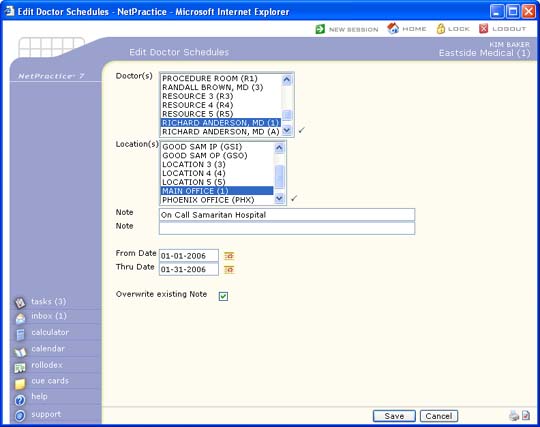
| Doctor(s) | Select the Doctor(s) you want from the Doctor list. If you want to select multiple non-contiguous doctor codes, hold down the CTRL key while clicking each doctor, then release CTRL. If you want to select a range of doctor codes, click on the first code to select it, scroll down to the last code in the range, hold down the SHIFT key and click on the last code. |  |
5 |
| Location(s) | Select the Location(s) you want from the Location list. If you want to select multiple non-contiguous location codes, hold down the CTRL key while clicking each location, then release CTRL. If you want to select a range of location codes, click on the first code to select it, scroll down to the last code in the range, hold down the SHIFT key and click on the last code. | |
8 |
| Note | Type the text for the Note. | 50 | |
| Note | Type additional text for the Note if needed. | 50 | |
| From Date | Type the date you want to start entering Notes in the schedule or click the calendar icon to select a date. | 10 | |
| Thru Date | Type the date you want to stop entering Notes in the schedule or click the calendar icon to select a date. | 10 | |
| Overwrite existing Note | If you want to overwrite any existing Notes, select this check box. | |
1 |
| Prompt | Response | Req | Len |
|---|---|---|---|
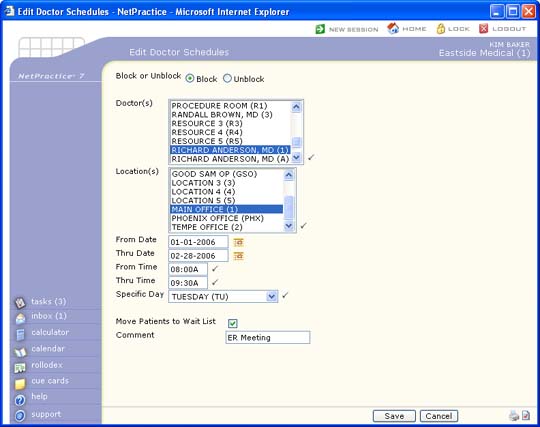
| Block or Unblock | Select the option you want to either block or unblock timeslots on the schedule. | 1 | |
| Doctor(s) | Select the Doctor(s) you want from the Doctor list. If you want to select multiple non-adjacent doctor codes, press and hold the CTRL key and click each code you want to include. If you want to select a range of doctor codes, click the first code in the range, scroll down to the last code in the range, press and hold the SHIFT key and click the last code in the range. To select all codes, click the first code in the list, scroll down to the last code, press and hold the SHIFT key and click the last code in the list. | |
8 |
| Location(s) | Select the Location(s) you want from the Location list. If you want to select multiple non-adjacent doctor codes, press and hold the CTRL key and click each code you want to include. If you want to select a range of location codes, click the first code in the range, scroll down to the last code in the range, press and hold the SHIFT key and click the last code in the range. To select all codes, click the first code in the list, scroll down to the last code, press and hold the SHIFT key and click the last code in the list. | |
8 |
| From Date | Type the date you want to start blocking/unblocking time in the schedule or click the calendar icon to select a date. | 10 | |
| Thru Date | Type the date you want to stop blocking/unblocking time in the schedule or click the calendar icon to select a date. | 10 | |
| From Time | Type the time you want to start blocking/unblocking time in the schedule. | |
6 |
| Thru Time | Type the time you want to stop blocking/unblocking time in the schedule. | |
6 |
| Specific Day | Select the day you want from the Day list. | |
2 |
| Move Patients to Wait List | If you want to remove appointments and place them in the Wait List, select this check box, otherwise the appointments will remain in the schedule. | |
1 |
| Comment | Type any text needed explaining the reason for Blocking or Unblocking time. For example, 'ER Mtg'. This text will display as a Note in the first appointment time slot that is Blocked. | 40 |
|
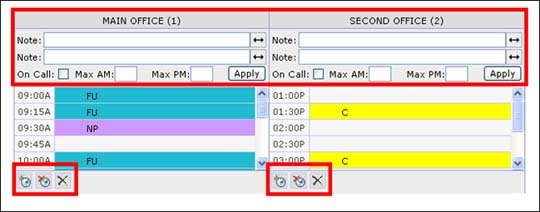
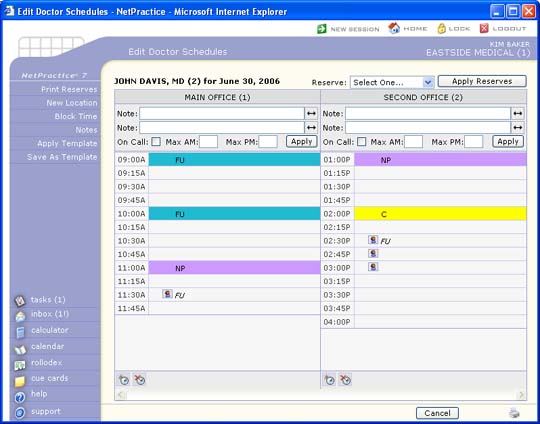
- Copy icon |
|
- Paste icon |
| Prompt | Response | Req | Len |
|---|---|---|---|
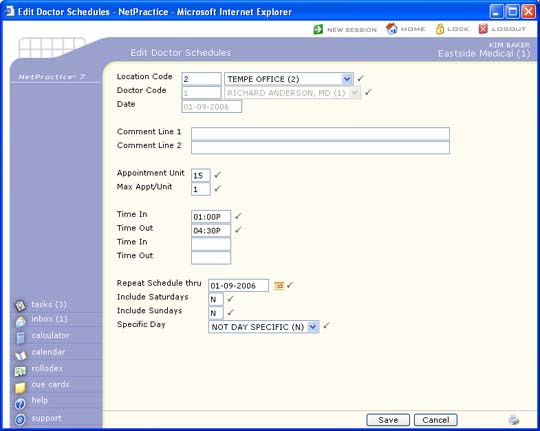
| Location Code | Type the location code you want or select from the Location list. | |
5 |
| Doctor Code | This field is for informational purposes only. The Doctor you selected in the Monthly Scheduling Edit screen will display. | |
5 |
| Date | This field is for informational purposes only. The Date you selected in the Monthly Scheduling Edit screen will display. | |
10 |
| Comment Line 1 | Type the text for the Note, if needed. | 50 | |
| Comment Line 2 | Type the text for any additional Note, if needed. | 50 | |
| Appointment Unit | Type the number of minutes you want to be allocated for each appointment unit in the schedule. This value will automatically default from the Appointment Unit field in the Scheduling System Integration function and can be changed as needed. | |
2 |
| Max Appt/Unit | Type the maximum number of appointments (units) that can be scheduled in a time slot. This value will automatically default from the Max Appt/Unit field in the Scheduling System Integration function and can be changed as needed. This field is used to determine when a time slot is being overbooked and controls the number of Reserves (up to a maximum of four) that can be applied to one time slot in the Edit Doctor Schedule function. | |
2 |
| Time In | Type the Time you want the schedule to start with followed by 'A' for A.M. or 'P' for P.M. For example, 08:00A. If you do not type the 'A' or 'P' after the time, CGM webPRACTICE will automatically default to one of them based on the 'most common usage' for the time selected. | |
6 |
| Time Out | Type the Time you want the schedule to stop followed by 'A' for A.M. or 'P' for P.M. For example, 11:30A. If you do not type the 'A' or 'P' after the time, CGM webPRACTICE will automatically default to one of them based on the 'most common usage' for the time selected. | |
6 |
| Time In | If you are allowing for a break in the schedule, type the Time you want the schedule to start back up followed by 'A' for A.M. or 'P' for P.M. For example, 12:00P. If you do not type the 'A' or 'P' after the time, CGM webPRACTICE will automatically default to one of them based on the 'most common usage' for the time selected. | 6 | |
| Time Out | If you allowed for a break in the schedule and have specified a second Start time, type the Time you want the second section of the schedule to end at followed by 'A' for A.M. or 'P' for P.M. For example, 05:00P. If you do not type the 'A' or 'P' after the time, CGM webPRACTICE will automatically default to one of them based on the 'most common usage' for the time selected. | 6 | |
| Repeat Schedule thru | Type the date you want to create schedules through or click the calendar icon to select a date. | |
10 |
| Include Saturdays | If you want to include Saturdays when creating the schedule, select this check box. | |
1 |
| Include Sundays | If you want to include Sundays when creating the schedule, select this check box. | |
1 |
| Specific Day | Select the Specific Day option you want this new schedule created for, otherwise if you want it created for every weekday, select Not Specific Day from the list. | |
2 |
|
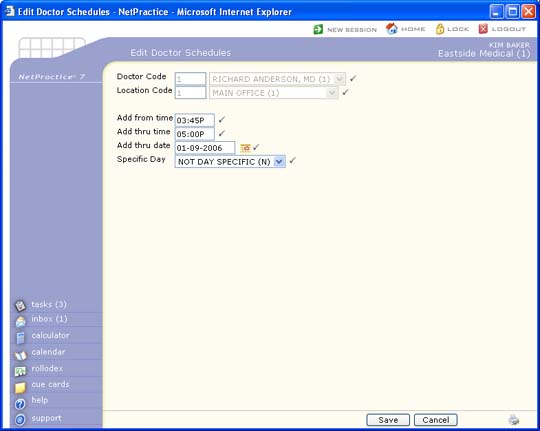
- Click the Add Time icon located in the lower-left section of the location's schedule to access this function. |
| Prompt | Response | Req | Len |
|---|---|---|---|
| Doctor Code | This field is for informational purposes only. The Doctor you selected will display. | |
3 |
| Location Code | This field is for informational purposes only. The Location you selected will display. | |
3 |
| Add from Time | Type the Time you want to start adding to the schedule followed by 'A' for A.M. or 'P' for P.M. For example, 08:00A. If you do not type the 'A' or 'P' after the time, CGM webPRACTICE will automatically default to one of them based on the 'most common usage' for the time selected. | |
6 |
| Add thru Time | Type the Time you want to stop adding to the schedule followed by 'A' for A.M. or 'P' for P.M. For example, 05:00P. If you do not type the 'A' or 'P' after the time, CGM webPRACTICE will automatically default to one of them based on the 'most common usage' for the time selected. | |
6 |
| Add thru Date | Type the date of the schedule you want to add times through or click the calendar icon to select a date. | |
10 |
| Specific Day | Select the Specific Day option you want the new times added for, otherwise if you want them added for every weekday, select Not Specific Day from the list. | |
2 |
|
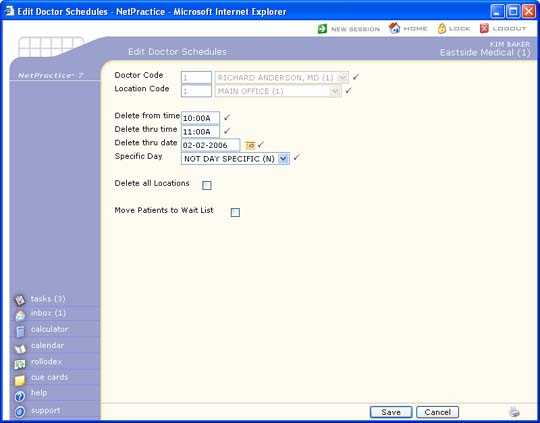
- Click the Delete Time icon located in the lower-left section of the location's schedule to access this function. |
| Prompt | Response | Req | Len |
|---|---|---|---|
| Doctor Code | This field is for informational purposes only. The Doctor you selected will display. | |
4 |
| Location Code | This field is for informational purposes only. The Location you selected will display. | |
3 |
| Delete from Time | Type the Time you want to start deleting from the schedule followed by 'A' for A.M. or 'P' for P.M. For example, 08:00A. If you do not type the 'A' or 'P' after the time, CGM webPRACTICE will automatically default to one of them based on the 'most common usage' for the time selected. | |
6 |
| Delete thru Time | Type the Time you want to stop deleting from the schedule followed by 'A' for A.M. or 'P' for P.M. For example, 05:00P. If you do not type the 'A' or 'P' after the time, CGM webPRACTICE will automatically default to one of them based on the 'most common usage' for the time selected. | |
6 |
| Delete thru Date | Type the date of the schedule you want to delete times through or click the calendar icon to select a date. | |
10 |
| Specific Day | Select the Specific Day option you want the times deleted for, otherwise if you want them deleted for every weekday, select Not Specific Day from the list. | |
2 |
| Delete all Locations | If you want the selected times deleted for every location for the selected dates, select this check box. | |
1 |
| Move Patients to Wait List | If you want to move any deleted patient appointments to the Wait List, select this check box. If you select this function, the patient appointment information will also be moved into the Wait List. The only appointments that will not automatically be moved to the wait list are patient appointments that have Other selected for the New Patient Status field in the appointment information, since those types of appointments are generally used for meetings and other non-patient related appointments. | |
1 |
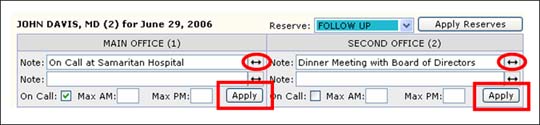
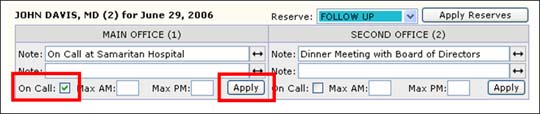
|
- Saves the notes for this specific location, for the selected date and doctor. |
|
- Save the notes for All locations for the selected date and doctor. |
|
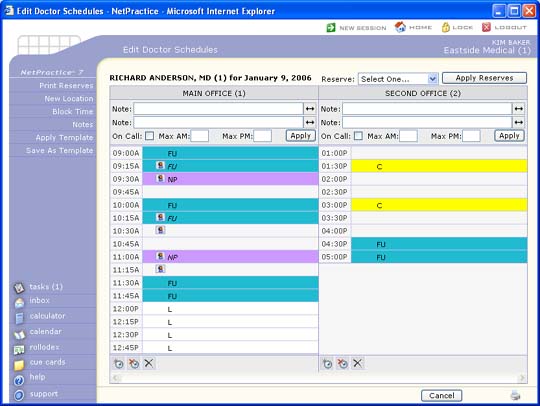
If you no longer need this specific date reserve schedule for the date displayed in the detailed scheduling edit screen, click the Delete Reserves icon located in the lower-left section of the location's schedule and the specific date reserve schedule will be removed. CGM webPRACTICE will display a message stating 'Reserves for this specific date have been deleted'. The screen will refresh and if a specific day reserve schedule exists, it will be displayed, otherwise any non-specific reserve schedule will be displayed. If no other reserve schedules apply, no reserve appointments will be displayed. |
| Prompt | Response | Req | Len |
|---|---|---|---|
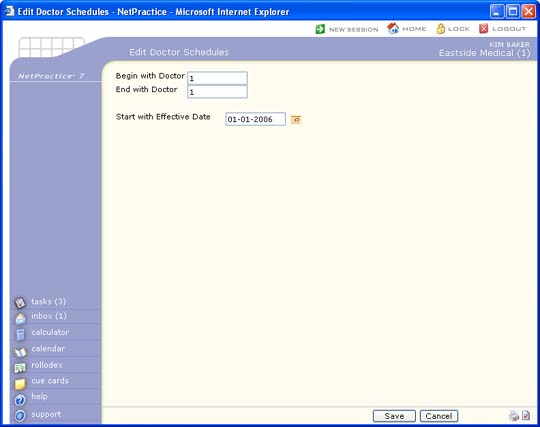
| Begin with Doctor | Type the doctor code you want the report to start with or leave the field blank to start with the first code in the table. | 10 | |
| End with Doctor | Type the doctor code you want the report to end with or leave the field blank to end with the last code in the table. | 10 | |
| Start with Effective Date | Type the date you want the report to start with or click the calendar icon to select a date. | 10 |

| Prompt | Response | Req | Len |
|---|---|---|---|
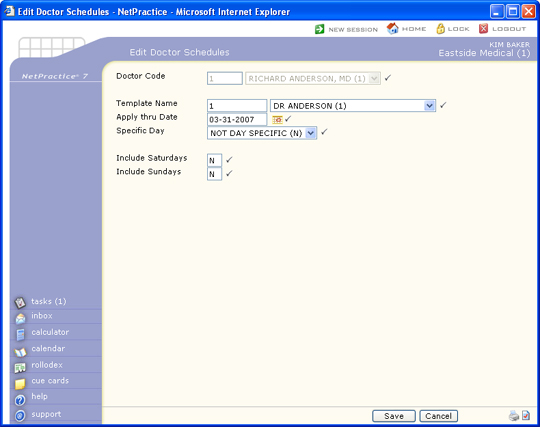
| Doctor Code | This field is for informational purposes only. The Doctor you selected will display. | |
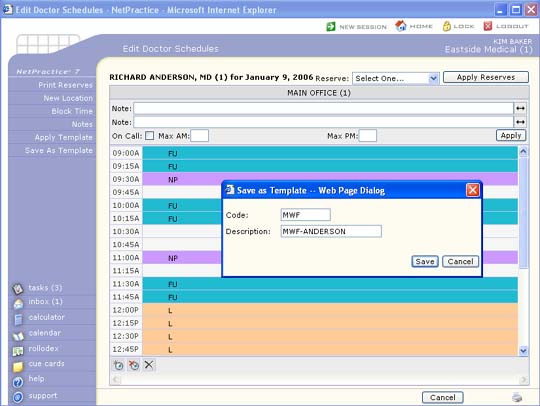
4 |
| Template Name | Type the template code you want or select from the Template list. | |
10 |
| Apply thru Date | Type the date you want to apply the template through or click the calendar icon to select a date. | |
10 |
| Specific Day | Select the Specific Day option you want this template applied for, otherwise if you want it applied for every weekday, select Not Specific Day from the list. | |
2 |
| Include Saturdays | If you want to include Saturdays when you apply this template, select this check box. | |
1 |
| Include Sundays | If you want to include Sundays when you apply this template, select this check box. | |
1 |
Copyright and Trademark Notice. Copyright © 2019 CompuGroup Medical, Inc. CGM®, CompuGroup Medical® and the CGM logo are registered trademarks and CGM webPRACTICE™ and CGM webTOOLS™ are trademarks of CompuGroup Medical AG in the United States and/or other countries. Any rights not expressly granted herein are reserved.


