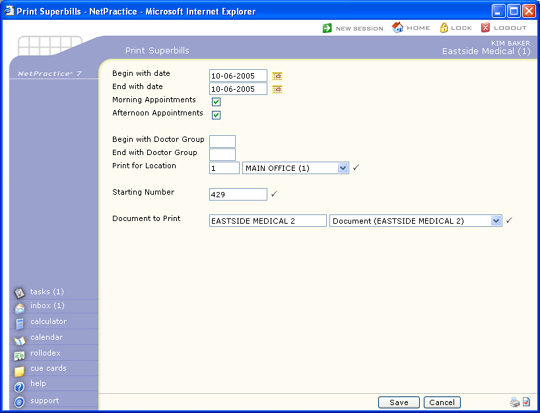
Print Superbills

With the Print Superbills function, you can print superbills (see sample superbill) for the patient appointments entered in the Doctor schedules. Superbill documents can be created using the Superbill Wizard function. Prior to the release of the Superbill Wizard, superbills could also be created using the following functions:
When you print superbills through Scheduling each superbill is assigned a number, which allows CGM webPRACTICE to track missing superbills and automatically post 'No-Show' procedures to patient accounts. When you enter charges through Procedure Entry you also enter the superbill number. Any superbill numbers that have not been entered will display on the Missing Superbill Report. After reviewing the report, locating any missing superbills and posting them, you can use the Post No-Show Appointments function to post a 'No-Show' procedure to all the remaining accounts.

You can use multiple superbill documents within one database. For example: if you use a general superbill for office procedures but require a special superbill for lab work, you can create two separate superbill documents.

This function has been designed to only 'print' each superbill one time. If you add patients to the schedule after printing the initial batch of superbills, you can perform this function again. You can continue to add appointments to the schedule and then perform this function as often as needed to print any new superbills. CGM webPRACTICE will not reprint any superbill that has already been printed - but it will pick up patients that have been added to the appointment schedule since the last time superbills were printed.

Data Field Information
Prompt Response Req Len
Begin with date Type the date of the schedule you want to start with or click the calendar icon to select a date.   10
End with date Type the date of the schedule you want to end with or click the calendar icon to select a date.   10
Morning Appointments If you want to include the morning appointments, select this check box.   1
Afternoon Appointments If you want to include the afternoon appointments, select this check box.   1
Begin with Doctor Code Type the code you want to end with or leave the text box blank to end with the last code in the table.   4
End with Doctor Code Type the code you want to end with or leave the text box blank to end with the last code in the table.   4
Begin with Doctor Group Type the code you want to start with, or leave the text box blank to start with the first code in the table.   4
End with Doctor Group Type the code you want to end with or leave the text box blank to end with the last code in the table.   4
Print for Location In the Print for Location text box, type the location code you want or select from the Location list. The ability to set a default location has been disabled because it prevents the next superbill number from automatically populating. 3
Starting Number Type the superbill number you want to start printing with or accept the default number. 10
Document to Print Select the superbill document you want to print. If you are using a superbill created using the Superbill Wizard, you must have 'NP' stored in the Superbill Document field in the Scheduling System Integration for the name of the Superbills to display. 25

NOTE: If your superbill was created as a Rich Text document, it cannot be printed directly to a legacy printer (a printer that was manually set up in Cache). You would need to select Print Here in the Printers dialog box to print them to the screen first before selecting the printer. To bypass this, you can set up the printer as an Enhanced Printer.

In the Superbill Wizard, you can tie a superbill to specific Types of Visits. This will affect how your superbills are printed and reprinted, as follows: