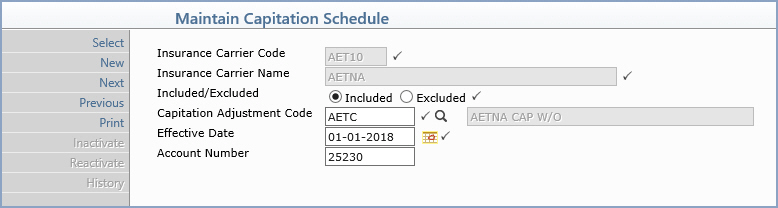
Maintain Capitation Schedule

With the Maintain Capitation Schedule function you can review information for a specific schedule, add a new schedule into the table, change the information for existing schedules, print the table, and inactivate or reactivate a schedule. The Capitation Schedule controls the effect of the Create Capitated Write-Offs function.

The Capitation Schedule defines a collection of procedures that are either included or excluded from a capitated plan. If the procedures are included, then only those procedures in the capitation schedule are considered capitated and written off. If the procedures are excluded, then all procedures NOT contained in the Capitation Schedule are considered capitated and written off.

After the Capitation Schedule has been created, you need to define which procedure codes the capitation schedule contains using the Enter Capitated Procedure Codes function.

Upon accessing this function, the Maintain Capitation Schedule screen displays containing blank data fields.

Data Field Information
Prompt Response Req Len
Insurance Carrier Code Type the code you want or click the magnifying glass to search the table.   5
Insurance Carrier Name This field is informational only and reflects the name of the selected insurance carrier. 40
Included/Excluded Select the plan type option applicable to this capitation schedule. Included if the procedures entered in this capitation schedule ARE to be written off, otherwise select Excluded if all procedures NOT contained in this capitation schedule are to be written off. 1
Capitation Adjustment Code Type the code you want to use when performing capitated write-offs or click the magnifying glass to search the table. 10
Effective Date Type the effective date of the schedule or click the calendar icon to select a date. 10
Account Number Type the patient account number you will use to post all the capitated payments for this capitation schedule.   10

After you Save the code, the information refreshes on the screen.

Inactive Codes - If you select a code that has been inactivated, CGM webPRACTICE displays the existing information for the code but the data fields will be unavailable and you cannot make any changes. Reactivate will be the only active function in the Action Column. You must reactivate the code before you can change any of the data stored for the code.

If you are the System Manager for CGM webPRACTICE, you should limit access to the Maintain function to select staff members. You should also provide guidelines (customized to your practice) to these staff members for entering table data in a consistent manner. This should protect the integrity of your table information.

Use the Action Column functions to edit or create codes. To create new codes or edit existing codes in the table, a user must have the Allow Table Update check box selected in Maintain Users under System, User Management, and be given the appropriate security level. For additional information about security levels, see the Function Security Menu under System, User Management. For setting up user codes, see Maintain Users. If the Maintain function is accessed and the user is not authorized to 'Allow Table Update', the New, Inactivate, Reactivate, and Save functions in the Action Column will be unavailable. These functions will appear dimmed on the screen and the user will only be allowed to Review codes.

Action Column Functions
The Action Column functions are provided so you can perform multiple functions quickly and efficiently from within the Maintain function.

Select - Displays a new screen with blank data fields so you can select another code.

New - Displays a new screen with blank data fields so you can enter the information for a new code.

Next - Displays the next code in the table. If you are viewing the last code in the table and click Next, CGM webPRACTICE returns to the main Tables menu. If you make changes to the table and click Next, the changes will not be saved. You must click Save to save the changes before proceeding to the next table item.

Previous - Displays the previous code in the table. If you are viewing the first code in the table and click Previous, CGM webPRACTICE returns to the main Tables menu. If you make changes to the table and click Previous, the changes will not be saved. You must click Save to save the changes before proceeding to the previous table item.

Print - You can print all or part of the contents of the capitation schedules. For additional information on printing, see Print Capitation Schedules.

Inactivate - Immediately inactivates any active code currently displayed on the screen. When you inactivate a code in the table, it is not actually removed from the table but is assigned an inactive status. CGM webPRACTICE needs to retain information about the inactivated code for any data that was previously entered with that code. After a code has been inactivated you cannot use it for any data entry operation. An entry will be logged in the Changes to Table category in the System Log under System, File Maintenance, Look-Up Functions.

Reactivate - Immediately reactivates any inactive code currently displayed on the screen and allows it to be used in data entry again.