Procedure Entry Screen-Bottom Section
After completing the top section, when you press tab, your pointer stops
at the Service Date (Serv Date) field, which reflects the date
the procedure was actually performed. This is the date that is printed
on statements and insurance forms. Remember that it is the Accounting
Date that is used for aging the procedures and accumulating the statistical
information. The default response displayed for the service date for
the first procedure is the Accounting Date that was entered. Any subsequent
procedures default to the service date entered for the previous procedure.
You may enter up to 400 procedures per encounter.
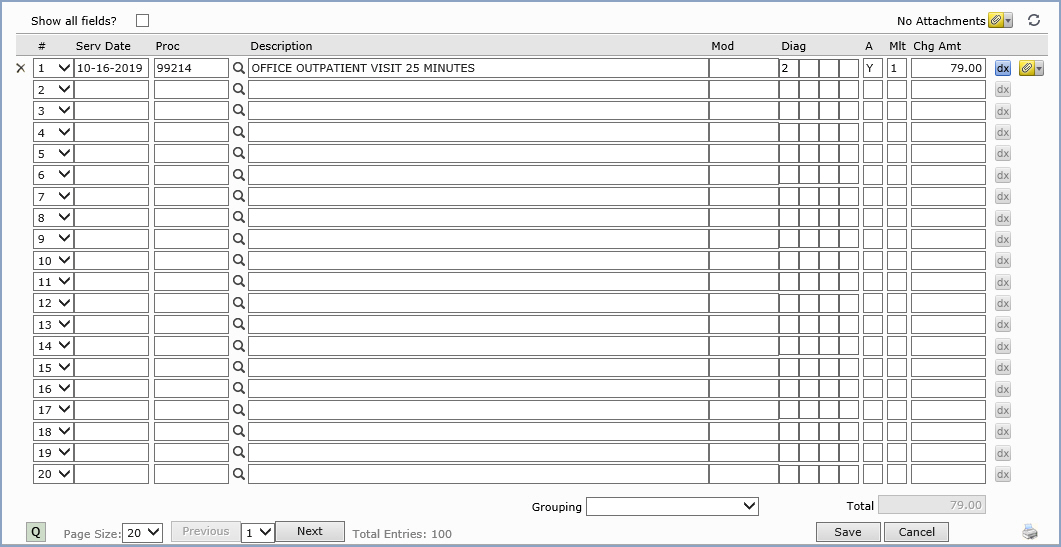
The next field is for the Procedure or CPT code. Your response
to this field must be any valid procedure code from the Procedure Code
Table, or you may click the magnifying glass icon to search for a code
or add a new procedure code to the table. When you press tab to accept
the procedure code entered, where the pointer stops next depends on
how you have your tab stops set up in the Procedure
Entry Integration function. If you don't have any tab stops set
up, the remaining fields automatically fill in using: no modifier, the
diagnosis codes entered in the top section, a multiplier of 1, and the
charge amount based on the values stored for the procedure code in the
procedure code table. If you do have tab stops set up, your pointer
stops at the selected field and allows you to modify the entry.
Procedure Grouping — On the bottom portion of the screen
you notice a drop-down box labeled Grouping. This list box contains
all the Procedure
Grouping codes created for your practice. Click the arrow on the
list box to display the available grouping codes.
If you select a grouping, all procedures contained in that grouping automatically
display on your screen. This is extremely helpful when codes have to
be bundled or for combinations of codes that are often billed out together.
If the Check for Duplicate Transactions field is selected in the
Procedure
Entry Integration function, CGM webPRACTICE checks to see if the
procedure you just entered has already been posted to the patient's
account within the last 90 days. If it has, you receive a warning message.
The Description field displays the complete description of the
procedure selected as defined in the Procedure Code Table. You may type
your own description for more detail. Forty characters are allowed for
your description. Anything typed into the description field overrides
the Procedure Code Table description. This description prints on patient
statements and is displayed when reviewing the patient's transaction
history. When you advance to the next field, the brief description from
the table automatically replaces the full description (if the table
description was accepted). If you typed in your own description, the
characters entered are shortened to twenty. Your entire entry is maintained
within CGM webPRACTICE, but needs to be shortened at this time to allow
room for the additional responses.
There are certain special procedure codes that require you to type data
in the description field. After you type the procedure code, the pointer
automatically focuses on the description field and requires you to type
the applicable data. Some of the codes included are: AUTH (authorization
numbers), NOTE (notes), TIME (anesthesia time), PS (purchased services).
For detailed instructions, see the Special
Procedure Codes section.
The Modifier is an optional field that you can use to enter any
procedure code modifiers necessary for insurance submission. You may
type up to three two-digit modifier codes. The codes should not be separated
by dashes or commas when typed. For example, to type the three modifiers
'22', '51', and '80' they should be typed as '225180'. To force electronic
claims to the paper file, type 'PP' as the modifier. Those claims are
listed on the Exception
Report with the reason of 'Paper Submission Due to Modifiers'. You
can type the 'PP' by itself or in addition to other modifiers.
In the four Diagnosis Pointer fields on each line item, you can
reference the specific diagnosis codes (entered in the top portion of
the screen) that apply to this procedure. Only one diagnosis pointer
(1-12) should be entered per field. The first pointer entered should
reference the primary diagnosis for the procedure. You can change the
order of reference for each procedure, if necessary, which could affect
your reimbursement from the insurance carrier.
You can crosscheck procedure codes against diagnosis codes using the
CPT®/DX
Cross Linking Table. If you link a diagnosis code to a procedure
code in the CPT®/DX Cross Linking Table and in Procedure
Entry you enter a procedure code without having entered one of its
linked diagnosis codes, a message appears. This is a warning only and
you can continue entering the procedure. When this message displays,
the dx icon on the line item is activated. Click the dx
icon to view a list of all the valid diagnosis codes that are linked
to the procedure code. You can then select a code from the list by clicking
it and then clicking Save, or by double-clicking the code. The
selected diagnosis code is inserted in the top portion of the screen
and the appropriate diagnosis pointer is inserted for the procedure
line item.
The defaulted diagnosis pointers represent all of the diagnosis codes
entered in the top portion of the screen, in the same order (up to four),
unless the procedure code is linked to one of the diagnosis codes in
the CPT®/DX Cross Linking Table or you selected a linked
diagnosis code, or if the procedure code has a Default Diagnosis
entered in the Procedure
Code Table. If you enter a Default Diagnosis code on a procedure
in the Procedure Code Table, that code defaults when that procedure
code is entered. At least one diagnosis pointer is required on each
procedure line item to Save the encounter. If no pointers exist,
a message displays informing you which procedure line item requires
a pointer.
Hierarchy for Diagnosis Pointer field population:
The following are listed in the order of priority. As soon as a match
is found the pointers are inserted and no further match checking is
performed.
- If there is a diagnosis code(s) in the CPT®/DX Linking Table
that exists for the procedure code entered and the diagnosis code(s)
has been entered in the top portion of the screen, the diagnosis pointer(s)
for the diagnosis code(s) is inserted.
- If the procedure code has a Default Diagnosis entered in the
Procedure Code Table, the diagnosis code is inserted in the top
portion of the screen and the appropriate diagnosis pointer is inserted
for the procedure line item.
- If diagnosis codes have been entered in the top portion of the screen,
up to four diagnosis pointers are inserted for the procedure line item,
in the same order they were entered in the top portion of the screen.
The A column contains the accept assignment indicator. A default
response exists, but you can change it. The Y (Yes) or N
(No) response that defaults in this field is based on a number of fields
throughout CGM webPRACTICE. For more information, see Accept
Assignment Protocol.
The multiplier field is used to indicate the number of times the
procedure was performed. The default response displayed is '1'. If any
other number is entered at this prompt, the charge amount for the procedure
automatically multiplies by the number entered. For correct reimbursement
from the insurance, it is very important to enter the correct multiplier
or number of units here rather than inflating the price.
The last item filled in is the charge amount. This field indicates
the amount to be charged for the procedure. You may either accept the
default charge amount displayed, or you may override the default with
any other amount. There are several different places the default amount
displayed could be coming from. Examples of each are explained below:
- In the simplest form, each procedure code has a Normal Price defined
in the Procedure
Code Table. If no other circumstances affect the Normal Price in
the Procedure Code Table, that is the amount defaulted in the Charge
field.
- The Procedure Code Table also allows up to five other "normal" rates
to be entered. These other rates (referred to as Rate Schedules in the
Procedure Code Table) must be used if more than one doctor exists in
the practice but each doctor does not charge the same amount for each
procedure. If that is the case, each doctor would be assigned to a specific
Rate Schedule. It is through the Rate Schedule in the Procedure Code
Table that each doctor's normal price for each procedure is defined.
If the performing doctor is assigned to a Rate Schedule, and no other
circumstances affect the normal price for that doctor, that is the amount
shown in the Charge field. If no amount exists in that doctor's Rate
Schedule for the procedure performed, the amount defaulted is the Normal
Price for that procedure.
- For various reasons the need may exist to bill certain groups of
patients with amounts other than the normal fees (for example, Medicare
patients, industrial patients, etc.). CGM webPRACTICE allows you to
maintain separate sets of fees for billing these certain groups of patients.
These fees are referred to as alternate fees and they are maintained
in the Fee
Schedule Tables. If the patient currently being billed is assigned
to one of these Fee Schedules, the alternate fee amount contained in
that Fee Schedule for that procedure defaults in the Charge field. If
no alternate fee existed in the Fee Schedule for that procedure, the
amount defaulted in the Charge field is the amount contained in the
Procedure Code Table. In addition to having a normal alternate fee in
the Fee Schedules you may also have alternate fees for the doctor's
different Rate Schedules (if they also differ). If a patient is assigned
to a Fee Schedule and the performing doctor is assigned to a Rate Schedule,
the alternate fee contained in the Fee Schedule for that doctor's Rate
Schedule is the amount defaulted. If the doctor does not have an alternate
fee defined in the Fee Schedule for the procedure performed, the amount
defaulted during procedure entry is the amount defined as the normal
alternate fee for that procedure. If a normal alternate fee is also
not defined, the Rate Schedule amount from the Procedure Code Table
is the default in the Charge field.
If you have your tab stop set at the amount field, once you tab off of
the amount field, the DX button is again activated. Pressing tab once
more brings you back to the next Service Date prompt. You continue the
process until you have all charges entered for this patient.
The quickest method to delete all the fields for a procedure is to position
the pointer on the field you want to delete and click. When the procedure
code is highlighted, press the Delete key and then Tab.
Note: If you change the CPT or the multiplier field, the amount
also changes accordingly.
Click Save after you have completed entering all the procedures.
The procedures you just entered are immediately posted to the patient's
transaction history, the statistical records, and the aging records.