![]()
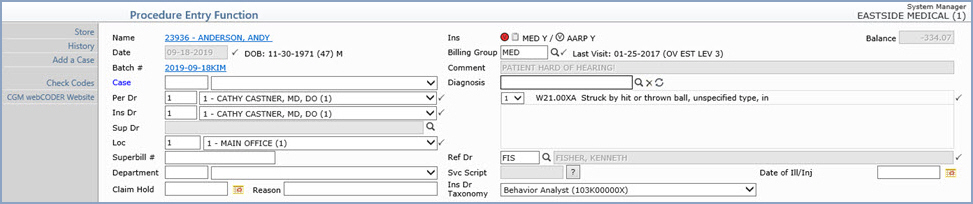
After you have completed the applicable procedure entry lead-in screens, the main procedure entry screen will display.
| Prompt | Response | Req | Len |
|---|---|---|---|
| Name | Displays the Account # and Patient Name as a hyperlink. You can click the link to access the patient’s account from within this function. This will open the Change Patient Data function and all screens accessed from the hyperlink display ***from Procedure Entry*** at the top of the screen. This allows you to review and change any or all patient information while in the Procedure Entry Function, if necessary. If you do not have security access for Change Patient Data, the link will take you to Review Patient Information instead. | ||
| Date | Type the Accounting date or click the
calendar icon to select a date. Future dates are not permitted.
If you are using Batch numbers, this field will be the date stored for the Batch and you will not be allowed to change it. You can create a batch for a future date when creating a batch, but you will not be able to post procedures to the batch number until the accounting date becomes current. If you are not using a batch, the default date will be the current system date, which may be changed if necessary. If you change the date, this field will default with that same date when you access the next patient account, for as long as you stay in the Procedure Entry Function or until you change the date again. The accounting date determines the aging of the procedures and which month's productivity statistics will be affected. As you are posting procedures you will also be able to indicate the actual dates of service, which could be different from the accounting date. This can be helpful if, for example, a procedure does not get entered until a later date (such as, hospital visits). You could use the date it was entered as the accounting date, which would determine the aging for the procedure. |

|
10 |
| DOB (Age) Sex | Displays the patient's date of birth, calculated age and sex. | ||
| Batch | If you entered a batch number in the procedure entry lead-in screen, the batch number you entered is a hyperlink that you can click to access the Batch Inquiry screen for that batch. The Batch Inquiry screen displays ***from Procedure Entry*** at the top of the screen. | ||
| Case | If these charges are applicable to a
certain case, type the Case code you want or select a code from
the Case list. You can click Add
a Case in the Action Column if you need to add a new case.
The case will default if you post using Superbill Numbers and a Case was selected for the appointment. If the patient has any active cases, the word ‘Case’ will be colored blue to alert you. If you select a case and click the Authorization Attachment, only the authorizations assigned to that case will display. If you leave the Case field blank and click the Authorization Attachment, only the authorizations not assigned to a case will display. If you select a case, the diagnosis codes will default based on the following criteria in the order listed:
|
5 | |
| Per Dr | This field indicates which doctor actually
performed the procedure(s). Type the code you want or select a
code from the list.
The following criteria is used to determine the default doctor:
If you select a case:
|
|
6 |
| Ins Dr | This field indicates which doctor will
be submitted on the insurance claim. Type the code you want or
select a code from the list.
The following criteria is used to determine the default doctor:
If you select a case:
|
|
6 |
| Sup Dr | This field defaults with the Default
Sup Doctor stored in the Doctor
Code Table for the Per
Dr. Click the magnifying glass to add or change the doctor
in this field. Click the X
icon to the right of the field to remove a doctor from this field.
This field pulls from a combination of the Doctor Code Table and the Referral Source Table. This is indicated in the Source column in the Table Search window. Note that not all insurance carriers require this field and some may reject claims if this information is included on electronic claims. You should be aware of the carrier’s requirements before including this information on the claim. |
6 |
|
| Loc | This field indicates where the services
were performed. The default displayed will be either the default
location contained in the Patient Name record or if you are posting
from superbill numbers, the location the patient was scheduled
at. To change the location,
type the code you want or select a code from the list.
If you enter a location code that has one of the following inpatient Place of Service Codes tied to it in Maintain Location Codes, when you click Save after entering charges, a new screen opens so you can enter the Admit Date and Discharge Date. (21 =lnpatient Hospital, 31 =Skilled Nursing Facility, 51 =lnpatient Psychiatric, 61 Comprehensive Inpatient Rehab, 62=Comprehensive Outpatient Rehab) |
|
6 |
| Superbill # | If your practice has selected to post from superbill numbers, this number will be defaulted from the previous screen. The superbill number must be numeric, if entered, and may not contain leading zeros. This unique superbill number may not be used again. This entry is used to track superbill numbers. | 10 | |
| Department # | This field will automatically default to the department code entered in the doctor code table for the Performing Doctor but you can change it as needed. Type the department code you want or select from the Department list. | 3 | |
| Claim Hold | You can specify when you want to hold
the filing of transactions until a future date.
When you type a date in this field to hold the claim from filing:
|
10 |
|
| Reason | Type the reason for the claim hold. | 50 |
| Prompt | Response | Req | Len |
|---|---|---|---|
| Ins | Displays the CGM webVERIFY Status icons
(if your practice subscribes to CGM webVERIFY), Eligibility History
icon, primary and secondary insurance carrier codes and the accept
assignment flag for each carrier. If the patient has more
than one primary or secondary policy, the code of the first primary
policy will be the one displayed. CGM webVERIFY Eligibility Status icons: (CGM webVERIFY clients only)
The status icon reflects the status of the specific result being viewed, not the current eligibility status for the policy. You can click the Status icon to re-check eligibility for the insurance carrier.  CGM webVERIFY Eligibility
History icon: You can click the icon to display the eligibility
results history. CGM webVERIFY Eligibility
History icon: You can click the icon to display the eligibility
results history.
Note: In order to verify eligibility from within the Procedure Entry Function, you must have security access to Change Patient Data. In order to view eligibility history from within the Procedure Entry Function, you must have security access to Change Patient Data or Review Patient Data. |
5 | |
| Balance | Informational only - Displays the current account balance (including insurance and patient balances) | 5 | |
| Billing Group | This field will automatically default to the Billing Group stored for the patient on the Billing Information screen. To change the billing group for this encounter, type the code or click the magnifying glass to search for the code you want. |
|
8 |
| Last Visit | Informational only - Displays the Last Visit date and Brief Description of the first procedure code posted for that date of service. | 10 |
|
| Comment | Informational only - Displays any internal comment contained in the Billing screen for the patient. This field is limited to display only forty characters because any comments greater than that can cause display issues in the screen. | 40 |
|
| Diagnosis | When you access the function, if the Allow Entry of ICD-9 Codes check box is selected in the Procedure Entry Integration function, separate tabs for the ICD-9 and ICD-10 codes will display. You can toggle between the two tabs as needed. If the Allow Entry of ICD-9 Codes check box is not selected, you will only be allowed to enter ICD-10 codes.
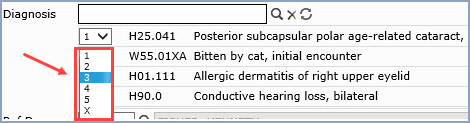
The diagnosis search field is the top field in the diagnosis section. You can search by code, partial code, keyword, and multiple keywords can also be chained together (ex: cat bitten). When you start typing in the field, the diagnosis results will auto-fill in a window beneath the diagnosis search field. You can use the arrow keys to move up and down within the results list or you can use the pointer to select a code in the list. After selecting the code you want, press Enter or TAB to add the code to the Encounter screen.
You can quickly add, change or delete diagnosis codes and update their associated pointers with the Delete and Sync icons located to the right of the magnifying glass icon.
You can enter up to 12 diagnosis codes for the encounter and link up to four diagnosis codes to an individual procedure code. All diagnosis codes entered here are referred to as Encounter DX’s. Each code can be reordered by selecting a new order from the drop-down list next to the code. You can remove a code from the list by clicking the drop-down list next to the code and clicking the X icon.
There are specific logical steps that determine if any code(s) should be defaulted. As soon as one of the conditions is satisfied, the process is completed and the code(s) will display, otherwise the process will continue until it is determined which code(s) to default.
The code stored in the Default Diagnosis field in the Patient Name and Address screen will default.
If the Default Diagnosis field in the Patient Name and Address screen contains a '#', the diagnosis codes from the previously posted procedures will default.
|
|
10 |
| Ref Dr | This field indicates which doctor referred
the patient for the procedure(s). Type the code you want or click
the magnifying glass to search the table and select a doctor.
The following criteria is used to determine the default doctor:
|
|
6 |
| Svc Script | If your practice uses Service Scripts,
type the Service Script date you want to tie to the encounter
or click the '?' icon to list the available service scripts entered
for the patient and select one.
If you post using superbill numbers and if there is a Service Script tied to the appointment, that service script date will default. |
10 |
|
| Date of Ill/Inj | This field is used to store the date
of illness or injury when the insurance carrier only requires a date be provided
on the insurance claim. When the insurance carrier requires a
date and
the additional case information fields, you will need to tie a
Case to the encounter.
If the service date is prior to the Date of Ill/Inj a warning message will display when you click Save. The Date of Ill/Inj must occur on or before at least one of the service dates in the encounter.
Note: If you receive the warning message and the Date of Ill/Inj was automatically populated from a Case record:
|
10 |
|
| Ins Dr Taxonomy | The taxonomy code stored for the Ins
Dr defaults in the field. To change the Ins Dr Taxonomy select
from the list.
This field defaults with the Primary taxonomy code stored in the Taxonomy Code field in Maintain Doctor Codes for the Ins Dr selected here. If there are multiple taxonomy codes stored for the doctor, they are available from the drop down list. If you change the Ins Dr, this field updates accordingly. If the Individual check box is selected in the Doctor Code Table for the Ins Dr, this taxonomy code will not be sent on claims. If the Individual check box is not selected, the taxonomy code will be sent on electronic claims. |
20 |
If the Display Post-Op Message in Procedure Entry check box is selected in the CGM webPRACTICE Integration Options and the patient has had surgery within the number of days specified in the Post-Op Care parameters, the 'Patient in Post-Op Care' message will display. The message includes the Procedure Code and Post-Op Care End Date (based on the Service Date of the procedure).
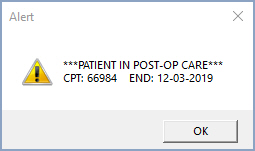
The message displays the seven most recent global periods whether tied to a case or not. If you then select a case, the message will re-display containing only the global periods tied to that case. This message is informational only and will not prevent you from entering and posting procedures.
Setting up Post-Op Care Parameters
The following functions are used to set up the Post-Op Care Parameters:
Maintain Post-Op Days (Tables > Procedure Code Table > Post-Op Days Table)
Maintain Procedure Codes (Tables > Procedure Code Table)
CGM webPRACTICE Integration Options (System > Database Maintenance Menu > Integrations)
Maintain Type of Service Codes (Tables > Type of Service Table)
The Post-Op Care message displays based on the following priority order:
1) The number of days stored in the Maintain Post-Op Days function
2) The number of days in the Post-Op Days field in Maintain Procedure Codes
3) The number of days in the Number of Days for Post-Op field in the CGM webPRACTICE Integration Options
4) If the Surgery Type of Service Code is selected for any Type of Service codes and no value is stored in the Number of Days for Post-Op field, 90 days will be the default
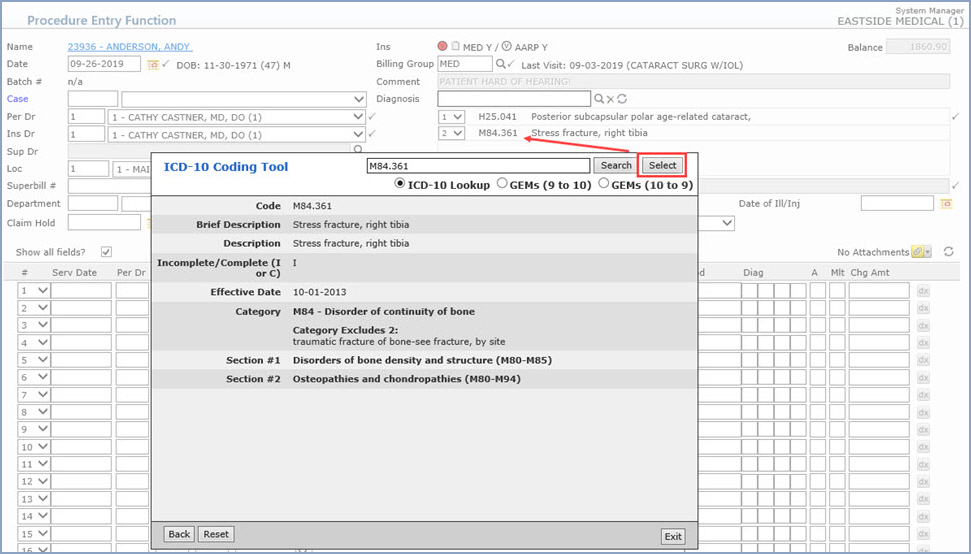
| Field Name | Description |
|---|---|
| Code | ICD-10 code |
| Tabular order number | 5 digit numbers assigned to the code according to where the code occurs in the coding system. This number will likely change with each update |
| Brief Description | Short CMS Description |
| Description | Long CMS Description |
| Incomplete/Complete (I or C) | I = Incomplete and C = Complete – this indicates whether or not the code is considered “complete” or “incomplete”. An incomplete code is one where further characters are possible. |
| Effective Date | The date the code became effective |
| Deleted Date | The date the code was deleted |
| Inclusion Terms | Specific to the code |
| Includes | Specific to the code |
| Excludes1 | Specific to the code |
| Excludes2 | Specific to the code |
| Use Additional Code | Specific to the code |
| Code First | Specific to the code |
| Code Also | Specific to the code |
| Code Notes | Notes specific to the code |
| Category | A category refers to the first three characters of an ICD-10 code (before the decimal point). Information related to a category relates to all codes with same three first characters. |
| Category Inclusion Terms | Specific to the category |
| Category Includes | Specific to the category |
| Category Excludes1 | Specific to the category |
| Category Excludes2 | Specific to the category |
| Category Use Additional Code | Specific to the category |
| Category Code First | Specific to the category |
| Category Code Also | Specific to the category |
| Category Notes | Notes specific to the category |
| Section | A section refers to a range of codes within multiple categories. Information related to a section relates to all codes within the range of categories listed. While a code may only be included in one category, a code may be included in more than one section. Multiple sections are separated by tilde <~> marks, and the data in columns 21 through 26 is respectively positioned in the same tilde-separated position as the section to which it is related. |
| Section Inclusion Terms | Specific to the section range listed |
| Section Includes | Specific to the section range listed |
| Section Excludes1 | Specific to the section range listed |
| Section Excludes2 | Specific to the section range listed |
| Section Use Additional Code | Specific to the section range listed |
| Section Notes | Notes specific to the section range listed |
Inclusion Terms - These are other commonly used terms that are associated with the diagnosis code
Includes - The word 'Includes' appears immediately under certain categories to further define, or give examples of, the content of the category.
Excludes Notes - The ICD-10-CM has two types of excludes notes. Each note has a different definition for use but they are both similar in that they indicate that codes excluded from each other are independent of each other.
Excludes1 - A type 1 Excludes note is a pure excludes. It means 'NOT CODED HERE!' An Excludes1 note indicates that the code excluded should never be used at the same time as the code above the Excludes1 note. An Excludes1 is used when two conditions cannot occur together, such as a congenital form versus an acquired form of the same condition.
Excludes2 - A type 2 excludes note represents 'Not included here'. An excludes2 note indicates that the condition excluded is not part of the condition it is excluded from but a patient may have both conditions at the same time. When an Excludes2 note appears under a code it is acceptable to use both the code and the excluded code together.
First/Use Additional Code notes (etiology/manifestation paired codes) - Certain conditions have both an underlying etiology and multiple body system manifestations due to the underlying etiology. For such conditions the ICD-10-CM has a coding convention that requires the underlying condition be sequenced first followed by the manifestation. Wherever such a combination exists, there is a 'use additional code' note at the etiology code, and a 'code first' note at the manifestation code. These instructional notes indicate the proper sequencing order of the codes, etiology followed by manifestation.
In most cases the manifestation codes will have in the code title 'in diseases classified elsewhere’. Codes with this title are a component of the etiology/manifestation convention. The code title indicates that it is a manifestation code. 'In diseases classified elsewhere' codes are never permitted to be used as first listed or principal diagnosis codes. They must be used in conjunction with an underlying condition code and they must be listed following the underlying condition.
Code Also - A “code also” note instructs that 2 codes may be required to fully describe a condition but the sequencing of the two codes is discretionary, depending on the severity of the conditions and the reason for the encounter.
7th characters and placeholder X - For codes less than 6 characters that require a 7th character, a placeholder X should be assigned for all characters less than 6. The 7th character must always be the 7th character of a code.
Copyright and Trademark Notice. Copyright © 2019 CompuGroup Medical, Inc. CGM®, CompuGroup Medical® and the CGM logo are registered trademarks and CGM webPRACTICE™ and CGM webTOOLS™ are trademarks of CompuGroup Medical AG in the United States and/or other countries. Any rights not expressly granted herein are reserved.

 Verification Failed - Red
  Verification Passed - Green
 Verification Outdated - Grey
 Verification Partial - Yellow
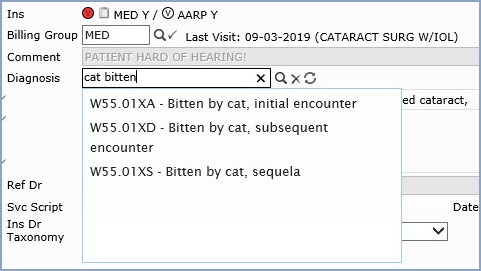
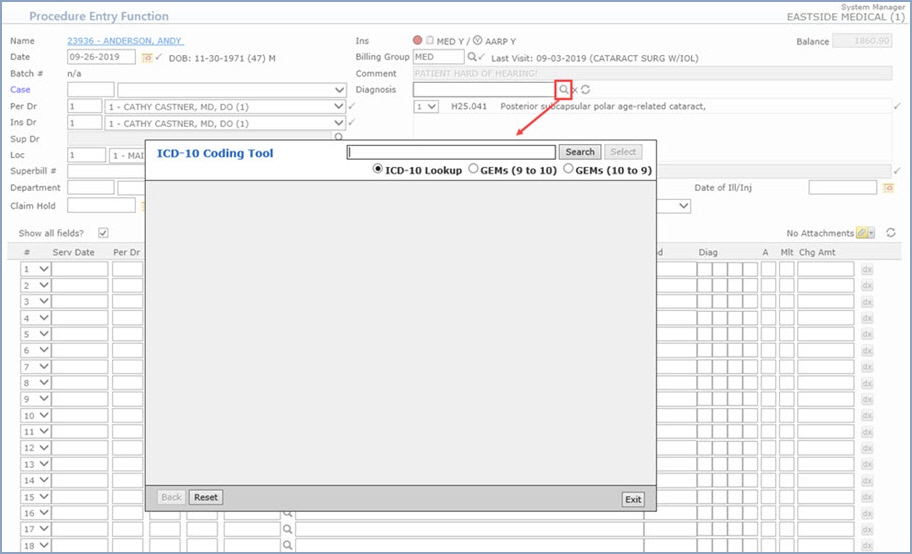
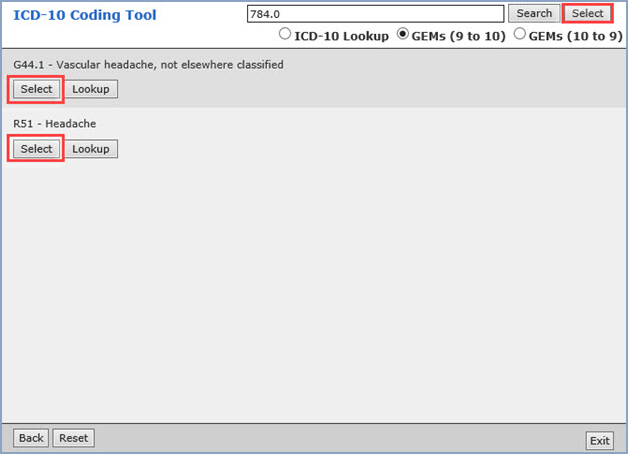
 - The magnifying glass icon will access the ICD-10
Coding Tool so you can search for the diagnosis code(s) you want.
- The magnifying glass icon will access the ICD-10
Coding Tool so you can search for the diagnosis code(s) you want. - The Delete icon will delete all currently selected diagnosis
codes and their associated pointers on each procedure line item.
- The Delete icon will delete all currently selected diagnosis
codes and their associated pointers on each procedure line item.