Procedure Entry Summary Screen
After clicking Save, the procedure entry summary screen displays.
This screen shows financial information about the account as well as any
internal comments and, if using batches, an updated batch status. If an
unapplied payment exists on the account, a message displays so that you
can immediately apply that payment if you would like. From here there
are several functions available.
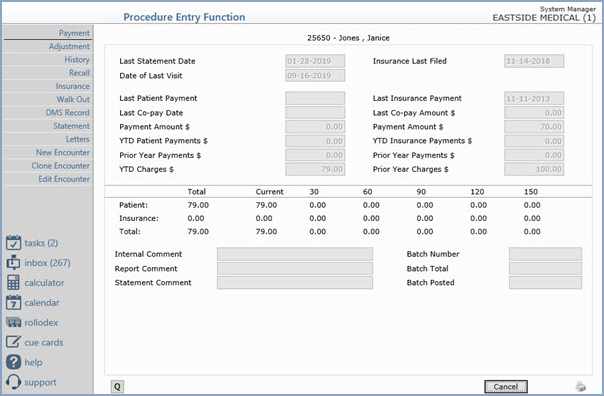
- Payment — Post a payment (see Payment
Entry). The ability to post a payment immediately after entering
a charge works well when posting from superbills that have corresponding
copayments attached. After you post the payment, you are returned
to this screen for additional options.
- Adjustment — Post an adjustment (see Adjustment
Entry).
- History — Open the patient's transaction
history in a variety of formats so you can review past activity
without leaving the summary screen.
- Recall — Enter a patient recall record (see Adding
Recalls). If the doctor makes a notation on the superbill that
he wants to see the patient in six months, for example, you can immediately
enter that as a recall.
- Insurance — Print an Insurance form. This function immediately
prints an insurance form or puts the transactions into the electronic
submission file. If you want the balances moved immediately into the
insurance balance, this works well. (See Print
Insurance Forms for details.)
- Walk Out — Print a walk-out statement (or receipt) for the
patient, for the charges just entered. This works well if you are
posting the charges as the patient is checking out. (See Print
Walk-out Statement.)
- DMS Record — Enter a DMS record (see Patient Change, DMS
Records). This is useful for certain specialties that have specific
specialty screens that hold additional information needed for electronic
filing, or as a means to update the HIPAA information screen.
- Statement — Print or preview a patient statement for the
account directly from the summary screen.
- Letters — Open the Letter Writer for the patient so you
can generate letters from the summary screen.
- New Encounter — This allows you to enter more procedures
for the same patient that were possibly performed by a different doctor
in the practice or at a different location (therefore requiring a
change to the information entered in the top section of the screen).
After you click New Encounter, the top level of the screen re-displays
with the original data that you entered. You can then edit the applicable
fields, add additional procedure codes, and save the new encounter.
- Clone Encounter — Duplicate the encounter just posted as
a starting point for a new encounter on the same patient. The new
encounter pre-fills with the same header information and procedure
lines so you can adjust dates or specific values without re-entering
everything. For example: say you posted an Encounter that contained
many procedure line items for surgical charges and you need to post
those same charges for the assistant surgeon. Instead of having to
perform the time consuming task of re-entering all of surgical charges
to add the assistant surgeon modifier, now you can make a clone of
the surgical charges Encounter, simply add the modifier and save it
as a new Encounter.
- Edit Encounter — Open the encounter just posted in the Edit an Encounter
function so you can correct or refine the entry before moving on.
After accessing any of the Action Column functions, you are returned to
the summary screen. If you click Cancel at this point, you are
returned to the Patient Look-up screen ready to enter charges for another
patient.