Payment Entry Function
The Payment Entry Function provides the following functions/sections for posting payments and performing payment related functions on patient accounts:
Upon accessing this function, the batch number field will be displayed if your practice has selected to use batch numbers for payments. This field will be required if the Always use a batch option is selected in the Batch Control Integration function. For information about the available batch integration options, see Batch Integration.
Next, you will need to select a patient account using the standard Patient Look-up function.
Unposted Payments
If there are any unposted payments stored for the selected patient, they will be displayed in the Unposted Payments window. Unposted payments are only stored in the unposted payment file and have not been posted to a patient's account yet. To post an unposted payment, you will first need to select which payment you want. To select an unposted payment, click anywhere in row containing the payment information.
If you do not want to post any of the unposted payments, click New Payment in the Action Column. The unposted payments will remain in the unposted payment file and the next time the patient is accessed through Payment Entry, any unposted payments will once again be displayed.
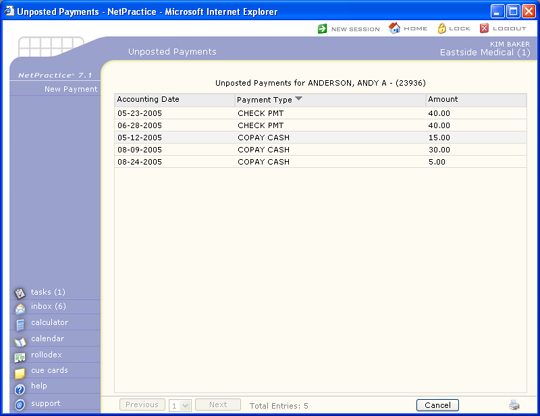
Payments entered within the Patient Check In/Out function are stored as unposted payments and included on the Unposted Payment Journal. If your practice is utilizing the Patient Check In/Out function in Scheduling, payments received over-the-counter can be entered using that function. For detailed instructions on entering over-the-counter payments, see the Patient Check In/Out section. It is possible for one patient to have multiple unposted payments.
Note: if you need to void an unposted payment, you must only do so from within the Patient Check In/Out function.
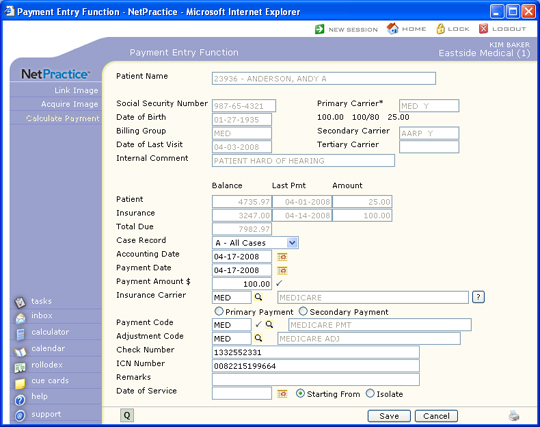
Payment Entry Lead-in Screen
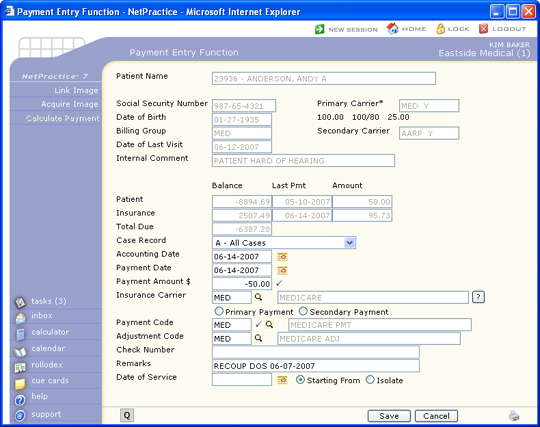
After you have selected the patient account, selected an unposted payment or clicked New Payment in the Action Column, the Payment Entry Lead-in Screen will display. This screen contains limited patient account information that can be helpful when posting payments in addition to the payment data fields.
If you selected an unposted payment, the stored data from the unposted payment will display in the applicable fields.
Data Field Information
Note: following the insurance code is a 'Y' or 'N' to indicate if you are accepting assignment for this carrier. If there are asterisks (*) next to either of the carriers, that denotes there are multiple carriers on the account.
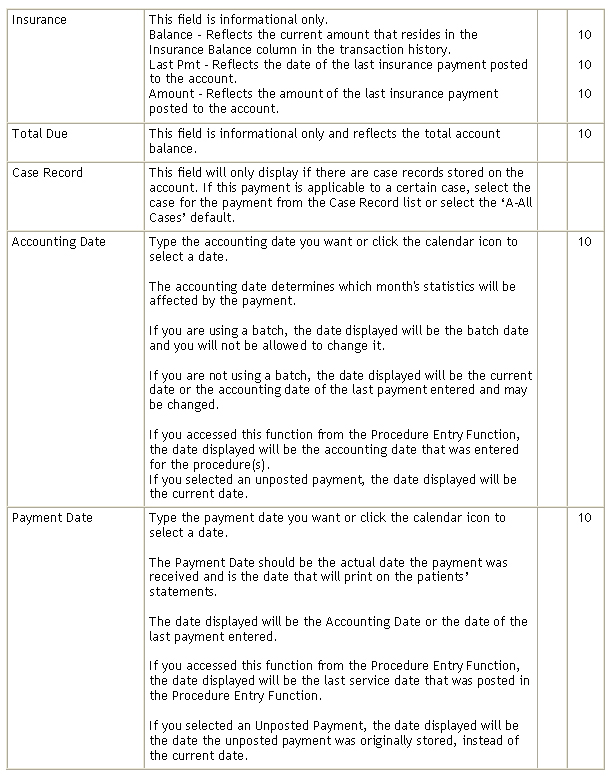
The Accounting Date determines which month's payment statistics will be affected by the payment allocation. If you are using batches, the accounting date will be the accounting date specified for the batch and you will not be allowed to change it. If you are not using a batch, the default date displayed will be the current system date or the accounting date of the last payment entered, which may be changed if necessary. If this function was accessed from the Procedure Entry Function, the default date displayed will be the accounting date that was entered for the procedure(s). If you selected an unposted payment, the default date displayed will be the current system date.
The Payment Date should reflect the actual date the payment was received. This is the date that will print on the patient's statement. The default date displayed will be the date entered as the Accounting Date or the date of the last payment entered, which may also be changed if necessary. Please refer to the Introduction section for detailed instructions on Entering Dates. If this function was accessed from the Procedure Entry Function the default date displayed would be the last Service Date that was entered on the procedure entry screen.
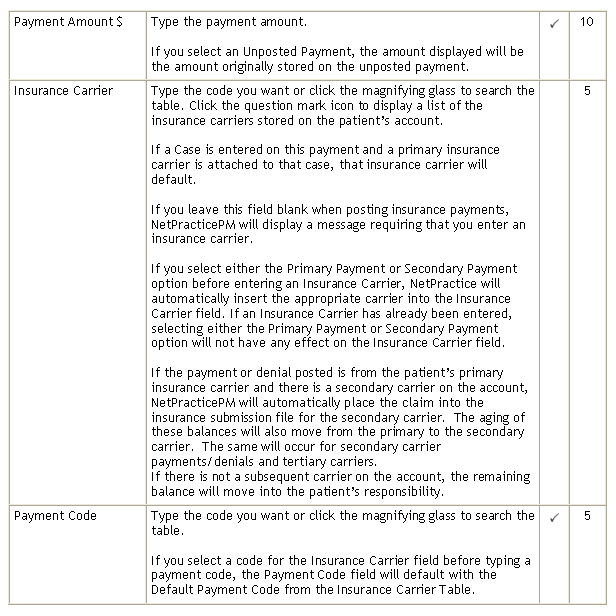
The Payment Amount will only have a default response if you had selected an unposted payment. This response reflects the amount of the payment made. If this function is being used to allocate an open payment, you will be entering a zero for the amount.
The Payment Code indicates the type of payment being made. It determines whether the payment is a personal payment from the patient, a copayment, or an insurance payment. When the payment code is entered into the tables (Maintaining Payment Codes ) menu, you must indicate what type of payment each code represents. If you enter a copayment or insurance payment, then an insurance carrier code is required so CGM webPRACTICE can update insurance statistics for the payment.
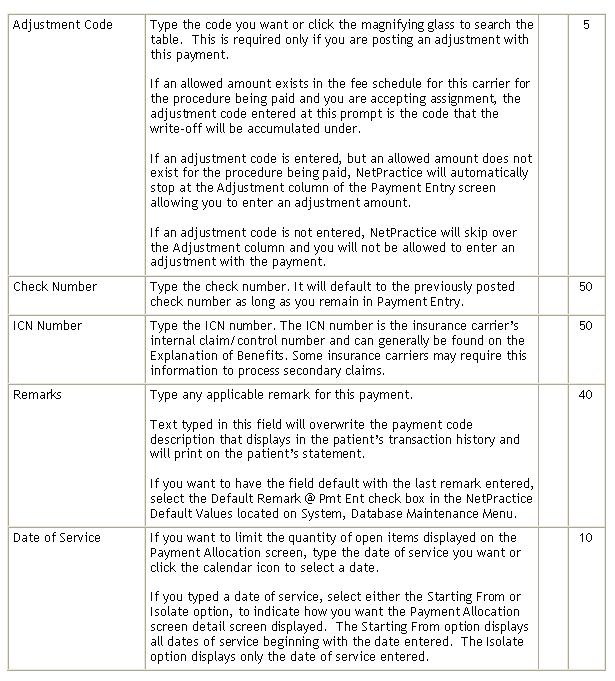
The Adjustment Code is required only if you would like to enter an adjustment on this account while posting the payment. If a default response is displayed it will be the adjustment code contained in the Payment Code Table.
If an allowed amount exists for the procedure being paid and you are accepting assignment, the adjustment code entered at this prompt is the code that the write-off will be accumulated under.
If an adjustment code is entered, but an allowed amount does not exist for the procedure being paid, CGM webPRACTICE will automatically stop at the Adjustment column of the Payment Entry screen allowing you to enter an adjustment amount.
If an adjustment code is not entered, CGM webPRACTICE will skip over the Adjustment column and you will not be allowed to enter an adjustment with the payment.
The Remarks prompt is used to enter additional information regarding the payment (i.e., dates of service, etc.). The user may optionally decide to have this prompt default to the last remark entered. To activate the default see, Payment Entry Integration. Any information entered in this field will override the description contained in the Payment Code Table when reviewing the patient's transaction history. This remark is stored in the patient's history and WILL print on the patient's statement.
The Insurance Carrier is not required if the Payment Code entered does not reflect an insurance payment or co-payment. If the payment code does reflect an insurance payment or co-payment, it is necessary to indicate the code of the insurance carrier making the payment or for which the co-payment was collected. The patient's primary and secondary insurance carrier codes are displayed in the upper right corner of the screen. You can click on the '?' to view the carrier information set up for this patient, or you can click the magnifying glass icon to search for the desired code. The search will bring up all insurance carriers.
If this patient has only one insurance carrier, the code of that carrier will be displayed as the default response. If either the primary carrier code or the secondary carrier code matches the payment code input, the code of that carrier will be displayed as the default response.
IT IS VERY IMPORTANT TO ENTER THE CORRECT INSURANCE CARRIER CODE AT THIS PROMPT SINCE THIS RESPONSE INDICATES THE INSURANCE CARRIER BALANCE AND STATISTICS THAT NEED TO BE AFFECTED BY THIS PAYMENT. A message will be displayed if the insurance code entered at this prompt is not contained in this patient's Insurance Record.
If the payment or denial posted is from the patient's primary insurance carrier and you are also billing and tracking the patient's secondary insurance, this response from the primary carrier will automatically trigger CGM webPRACTICE to place all procedures the payment is applied against into the insurance submission file for the secondary carrier. CGM webPRACTICE will then also move the procedure balances from the aging from the primary carrier to the aging of the secondary carrier.
If the patient does not have a secondary insurance, the payment or denial by the primary carrier will automatically move the balance for those procedures into the patient responsibility.
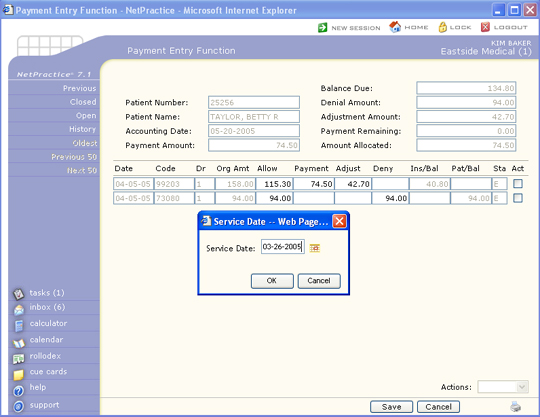
The Date of Service prompt is optional. If entered, you have two options of how you want the detail screen displayed. The first option and defaulted radio button, is Begins with. If this option is selected all dates of service starting with the date entered, will be displayed. If you clicked on the radio button for Isolate, only that date of service will be displayed on the detail screen.
The final prompt is Check number. This is an optional field and can contain the check number if posting a large EOB. The check number will automatically default from the previous entry.
Link Image
Prior to using this function, you will need to perform the steps for Linking an EOB Image in the Link Images function located on the System, Image Management menu.
Acquire Image
For detailed instructions on Acquiring Images, see Image Scanning.
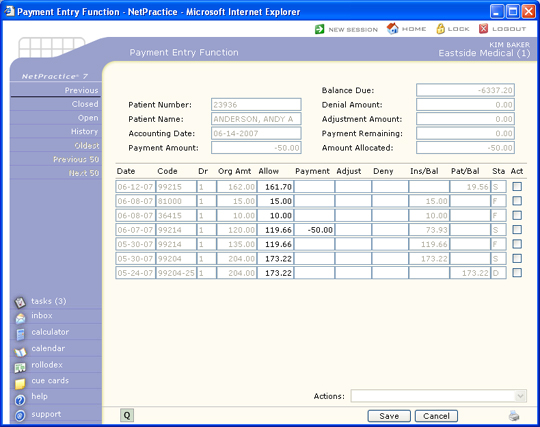
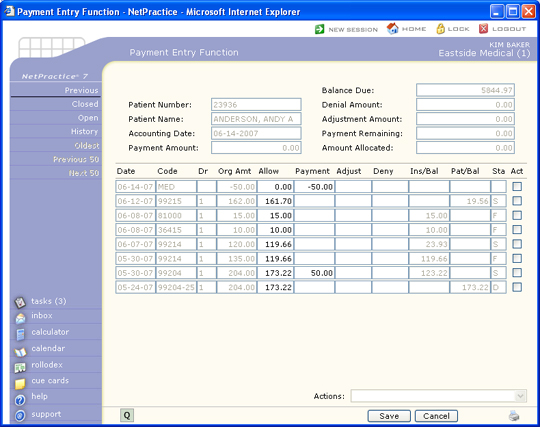
Payment Allocation Screen
If the date of service option was selected in the Lead-In screen, and the Inclusive was selected, the Payment Allocation Screen will only display transactions for that date of service. If Begins With was selected, the display will begin listing transactions from that date of service. If you did not type a date of service, then all the open transactions will be displayed starting with the most recent date first.

The second to the last column is a Status column displaying the last insurance activity type. The different activity types codes are:
- F - Primary Filed to paper
- E - Primary Filed electronically
- * - Refiled (could be primary or secondary)
- S - Secondary filed (could be electronic or paper)
- D - Denied (could be primary or secondary)
- P - Pended (could be primary or secondary)
- C - In Collections (patient balances only)
The activity type is the last activity that has taken place on that line item. To get a complete listing of all activity that has taken place on the line item, click Review. This will take you to Review Transaction History and you can review all aspects of the history.
If the insurance carrier code entered does not have a Fee Schedule link, or if the payment code entered reflects a personal payment, the Allowed Amount column on this screen will reflect the full amount of the charge and will be inactive.
To start the allocation process, position the pointer on the line item you want to pay. The payment amounts will automatically be highlighted as you work your way through the allocation process, allowing you to quickly type a new amount if needed without having to select and delete the defaulted text.
The Action Column contains functions for Previous, Closed, Open, Review, Oldest, Previous 50, and Next 50.
Previous
The Previous button will return you to the Lead-In Screen. You will be allowed to edit any of the information except the amount. If you entered an incorrect amount, you must click on Cancel and start the payment process over for this patient. The most common usage of this action is to change the remarks field.
Closed
The Closed button will display charges that have already been paid. You will be asked to enter a specific date of service. When the Service Date dialog box pops up, type in the Service date of the closed charge(s) and then click on OK. The Service date must be in the format of MMDDYYYY or click on the Calendar icon to select a date. Only charges with the date of service that match the date entered will be displayed. If there are no transactions for that date of service to display, an alert box will inform you of this. By requesting dates of service that have been paid, allows you to overpay charges. For example, if a patient has paid a date of service and then the insurance carrier pays that same date of service, you can create an overpayment on that line item.
Open
The Open button will take you back to the original display prior to clicking on the Closed button. You can toggle back and forth between Open and Closed as often as needed.
Review
The Review button takes you into the patient's transaction history review screen. If you need to find certain dates of service, or find out why a particular line item isn't being displayed, or why there is a credit on a line item, etc., you can do so without leaving the payment entry function.
Oldest
The Oldest button will only be activated if you are making a personal payment. This action will automatically apply your total payment amount entered in the Payment Lead-In screen toward the oldest balance. This eliminates the need for selecting each line-item and entering the payments - it is all done automatically. Once you click on this button, the screen will refresh and all line items that were paid will have the payment amounts in the Paid column and the balances reduced appropriately. You still have the option to edit at this point if you want to change any line items.
Previous 50/Next 50
The Previous 50 and Next 50 will only be activated if there are more than 50 line items to be displayed. If there are more than 50 line items, the Previous 50 button will be inactive and the Next 50 will be active. Once you click on the Next 50 button, the Previous button will be active allowing you to go back to your original 50.
Personal Payments
If, in the Payment Entry Lead-in screen, you typed a payment code that is not assigned as either an Insurance Payment or a Co-Payment, it is considered a Personal Payment. All personal payments are deducted from the patient balance.
You can review how your payment codes are set up in Review a Payment Code or edit them in Maintain Payment Codes.
If you are posting a personal payment, then you can pay based on the oldest transaction on the account by clicking Oldest in the Action Column. This is helpful if a patient is making payments on their account and you want to apply the payment toward the oldest balance. The screen will be redisplayed with applied amounts in the Paid column and the payment amounts subtracted from the patient balances. It will apply as much of the payment it can. It will skip any transactions that have negative balances.
If you want to apply the personal payment to a particular line item, position your cursor in the Paid column of the line item you wish to pay. Enter the amount of the payment and press tab. Since CGM webPRACTICE knows this is a personal payment, the adjustment column and denial column will be skipped and the cursor will drop to the Paid column of the next charge. The patient balance remaining will be reduced by the amount of the payment.
If you do not allocate the entire payment entered, you will receive a warning message and asked to confirm if you want to post the payment.
Co-payments
CGM webPRACTICE handles payment codes assigned as co-payments differently than personal payments or insurance payments.
You can review how your payment codes are set up in Review a Payment Code or edit them in Maintain Payment Codes.
A Co-payment differs from a personal payment and an insurance payment in the following ways:
- A co-payment is the portion of the visit that the patient is obligated to pay, depending on the insurance companys requirements.
- A co-payment is not handled like a personal payment, which is deducted from the patient balance, because a co-payment is typically posted before a claim is sent to the insurance company. If CGM webPRACTICE deducted the co-payment from the patient balance, then there would be a credit in the patient balance on that transaction. Therefore, the co-payment is deducted from the insurance balance since the insurance is not liable for the co-payment portion.
- A co-payment is not handled like an insurance payment in that you cannot access the Allow, Adjust or Deny columns when posting a co-payment.
- Also, a co-payment does not have any affect on the filing status of a claim. Insurance payments either cause a claim to go to the subsequent insurance, or force the balance to the patient. A co-payment will not affect the claim or the balance in these ways.
You can also enter co-payments through the Patient Check In/Out function. These are stored as Unposted Payments.
On the Payment Allocation screen, the co-payment amount automatically defaults to the co-payment amount entered in the patients insurance record. After you hit the TAB key to accept the default or enter another amount, the insurance balance will be reduced by the amount of the co-payment.
If you do not allocate the entire co-payment, you will receive a message stating 'The amount of $ 0.00 will remain unallocated. Do you want to post this payment?' Click Cancel if you want to continue allocating the payment or click OK to save this payment.
Insurance Payments
If, in the Payment Entry Lead-in screen, you typed a payment code that is assigned as an Insurance Payment, all payments posted with this code are deducted from the insurance balance.
You can review how your payment codes are set up in Review Payment Codes or edit them in Maintain Payment Codes.
You do not have the option to apply payments on an oldest charge basis if the payment code you selected is for an insurance payment. In the lead-in screen, you have the option to display all open items, one particular date of service, or display all charges starting from a particular date of service. To start allocating the insurance payment, you must click in the Allowed Amount column of the line item you want to pay. If the payment is an insurance payment from the primary carrier and that carrier has a Fee Schedule, the allowed amount contained in the Fee Schedule for the procedure selected will be displayed, or the field will contain the full amount of the charge. If the allowed amount is correct, you may accept the response by pressing TAB, otherwise type the correct amount and press TAB.
You may also update the allowed amount in the Fee Schedule linked to the primary carrier, by typing the correct amount immediately followed by an "*". For example, 45.72*. Doing so will immediately store the corrected allowed amount for that procedure in the appropriate Fee Schedule, even if you were to click Cancel and abandon payment entry.
The pointer will move to the Payment column next. The default payment amount takes into consideration the allowed amount and the amount stored in the Insurance Liability field contained in the patient's Insurance Information Note: Medicare payments for laboratory fees will default to 100 percent of the allowed amount regardless of the insurance liability. You may press Tab to accept the default amount displayed or type the correct payment amount and press TAB.
After the payment amount has been accepted, the pointer will advance to either the Adjust or Deny column. If an adjustment code was selected in the Payment Entry lead-in screen, the pointer will move to the Adjust field, otherwise it will move to the Deny field.
If you have a fee schedule tied to the patient's insurance carrier and the procedure allowed amount is less than the original charge amount and you are accepting assignment on the individual charge, a default amount will be displayed in the Adjust field. This amount will be the difference between the original charge and the allowed amount. You may press TAB to accept the default amount displayed or type the correct adjustment amount. After the adjustment amount has been accepted, the pointer will advance to the Deny field.
If an amount is entered in the Deny field, the Deny dialog box displays so you can select a practice denial reason from the Practice Denial Code Table and an insurance denial reason from the Insurance Denial Code Table. If you click Cancel, the amount in the Deny field clears so you can either type a new amount or move to the next line item.
If a denial is entered, the final display on this screen may look a little peculiar and/or inaccurate. The display on this screen simply reacts to the information that is entered with no consideration to what the actual circumstances of the procedure may be (i.e., patient has primary and secondary insurance and the primary denies the claim, this screen display will immediately move the denial amount from the insurance balance column into the patient balance column without accounting for the existence of the secondary insurance.
When the payment is actually saved CGM webPRACTICE does all of the routine checks to determine what the patient and insurance balances should be. Only until this time can you be sure that the insurance and patient balances are correct. Generally, if an insurance payment or denial is entered, the balance on that line item will move from insurance liability to patient responsibility. However, if the insurance payment is from the patient's primary insurance carrier, or a denial was entered from the primary carrier, and the patient has a secondary carrier, the balance on that line item will be moved back to the insurance balance. If the liability entered for the patient's secondary carrier is set to zero (See Patient Change, Insurance), then the balance owing will remain in patient responsibility.
There are times, however, where you might want to override CGM webPRACTICE's automatic shift of balances. You may, for example, receive a partial payment from the patient's primary insurance and not want a secondary claim generated until you receive the entire payment. Or, you may want to force the balance to the patient''s responsibility for a line item even though they have a secondary carrier. In these instances, by entering special codes in the denial column, you can force the balances where you want them. To force the balance to remain in insurance balance, you would type a slash followed by a capital I (/I). To force the balance to patient responsibility, you would type a slash followed by a capital P (/P). To suppress a secondary from generating and leaving the amount owing in the insurance balance column, you would type a slash followed by IS (/IS). These special functions will make a notation in the insurance ledger that a transfer took place. For this reason they should only be used when CGM webPRACTICE would not normally transfer the balances.
Each time an amount is entered on a transaction line, the appropriate totals are immediately updated in the top section of the screen. For example, the paid amount updates the balance due, payment remaining and amount allocated. The adjust amount updates the balance due and adjustment amount total and the deny amount updates the denial amount total.
The pointer will continue to drop down to the next transaction line until the Payment Remaining field contains zero (0.00), or until you click Save. If you do not allocate the entire payment entered, a message box will pop up that informs you that you have left part or all of the payment unallocated and asks Do you want to post this payment? You can click Cancel if you do not want to leave part of this payment unallocated and want to continue applying the payment, or you can click OK to save this payment.
NOTE - Secondary claims sent electronically: When the payment for the primary insurance carrier is posted, if the allowed amount is not entered or is bypassed and entered with the same amount as the billed amount, the program will automatically calculate the allowed amount to be included on the secondary claim. This change should prevent the secondary insurance carrier from overpaying the claim and compensate for when the allowed amount is not entered correctly.
Negative Payments
The entry of negative payments and adjustments can also be accomplished through payment entry. Negative payments can be used to process insurance recoupments, correct posting errors or to deallocate payments. You cannot mix regular payments and negative payments. To let CGM webPRACTICE know you want to do a negative payment, you must enter a negative payment amount in the lead-in screen. This will indicate to CGM webPRACTICE exactly what you are trying to accomplish.
Processing Insurance Recoupments
When an insurance company issues a payment for one patient and at the same time deducts a portion of that payment to cover a refund owed for a different patient, it is called a recoupment. The insurance company has recouped a refund owed to them by deducting it from your payment. This allows the insurance company to get their money more quickly from you by not having to issue a refund request to your office. When they do a recoupment it does force you to take a few extra steps to properly post the payment and recoupment.
You will need to review the patient account the refund is being recouped for prior to posting the recoupment. You will need to make a note of the payment, doctor, and location codes used, and if any contractual adjustment was made when the payment was originally posted.
Select the patient account the refund is being recouped from and then complete the payment fields as shown.
- Use the current accounting date that was used for the EOB.
- Enter the payment amount as a negative amount (-50.00)
- Use the same payment code that was posted on the original payment
- In the Remarks field we suggest using 'recoup dos =XX-XX-200X'
- Select the insurance carrier code
- Enter the Date of Service if known
Click Save once you have completed these fields to proceed to the Payment Allocation screen, otherwise click Cancel to exit this function. If the original charge line item does not show up, click the Closed button, type in the Date of Service and click OK. Any line items for that date of service should now be displayed.
If there are multiple line items, select the correct one and type in the negative payment amount to be applied in the Payment column. You can only apply a negative payment towards a charge. If there is a corresponding contractual adjustment, enter the adjustment portion as a negative amount as well. You will notice the balance shows up in the Insurance Balance column since the insurance payment is being taken off of the account. Click Save once the negative payment has been allocated.
Posting Negative Adjustments during Payment Entry
This option is only available within Payment Entry and not the Adjustment Entry function. A negative adjustment is only used when you need to negate or recoup a credit adjustment.
It is offered through the payment entry function because when you process an insurance recoupment with a negative payment, you typically need to recoup the adjustment as well. This is what makes the circumstance slightly different than posting a regular debit adjustment. When you enter the dollar amount of the adjustment, type a negative sign in front of the dollar amount. This is the only differentiating factor between a regular adjustment and a negative adjustment. The negative adjustment can only be posted against a charge item. The reason for this is because internally, a negative adjustment really acts like a debit adjustment. All debit adjustments need to be assigned a doctor and location. The negative adjustment will utilize the doctor and location codes posted on the original charge item to update the statistical files.
Deallocating a Payment
When a payment has been applied incorrectly on a patient account, applied to the wrong account, or you need to deallocate a payment, you can use a negative payment to correct the account. This comes in really handy when your billing period has already been closed and the payment was posted prior to the closing date. Complete the Payment Lead-In screen as follows:
- Use the current accounting date
- Enter the payment amount as a negative amount
- Use the same payment code that the original payment was posted with
- In the Remarks field we suggest using 'correcting a posting error'
- Enter the insurance carrier code
- Enter the Date of Service if known
Click Save once you have completed these fields to proceed to the Payment allocation screen, otherwise click Cancel to exit this function.
If there are multiple line items, select the correct one and type in the negative payment amount to be applied in the Payment column. Click Save once the negative payment has been allocated.
Now you can re-post the payment correctly using the current accounting date. Select the patient account and then post the payment following normal procedures. The negative payment and reposted payment will both show up on the Bank Deposit report and cancel each other out.
Whether you allocate the re-posted payment or not depends on each individual scenario. If you are going to refund the insurance carrier or research the account, you should leave the payment unallocated so you will be able to apply the refund to it at a later time.
Posting Error
If you are correcting a posting error and end up re-posting the payment on a different account, you should enter a Remark that provides an audit trail (i.e. Pmt transferred from #9999 for MM-DD-YY).
Allocate Open Credit Payments
There are times when you leave payments unallocated or unapplied. You may be posting a payment to an account and the charge that you want to apply the payment to, is not yet posted. Or you may have gotten an insurance payment but you don't have the dates of service on record for the patient. Whatever the reason, when you have the information necessary or the posting completed needed for the payment, you can then apply that previously left unallocated payment.
To apply an open credit you need to complete the Payment Lead-In screen as follows:
- Use the current accounting date. Even if the payment that was left unallocated is in a prior month, you still use a current accounting date to apply open credits.
- Enter the payment amount as a zero.
- Use the same payment code that the original payment that was left unallocated had.
- In the Remarks field we suggest using something descriptive that lets you know in the future when reviewing the account, what you did.
- Enter the insurance carrier code if it is an insurance or copayment.
- Enter the date of service if known.
Click Save once you have completed the lead-in screen, otherwise click Cancel to exit this function.
You will notice that on the top portion of the screen, payment amount, amount allocated, and payment remaining are all zeros. In order to apply an open credit, you must first pick up the credit you want to apply. Position your cursor in the Paid column and enter the amount of the credit you want to apply. You will enter this as a negative amount. If the original payment that was left unallocated was an insurance payment, then to reapply the payment you must also use an insurance payment. The same will hold true if it is a copayment or a personal payment. If you try and pick up a line item that has a different payment type, a dialogue box will pop up to let you know the payment type differs. Click OK to acknowledge the message.
Once you press Tab you will notice that your payment amount on the top of your screen now has the amount you just entered as a postive amount. Now you have money to work with and you can start applying as if you were entering a payment from the beginning.
You can pick up multiple open payments in one session. You can utilize the action items while applying open credits as well.
Once your application is complete, click Save, otherwise click Cancel to exit this function.
When this payment is posted, the amount of the line items paid in the course of the payment allocation, will now be reflected in the payment analysis. The doctor on each line item paid will now get credit for the payment that had been previously left unallocated.
Action Payment Functions
In the bottom lower part of your screen you will notice a drop down box with the word Action: next to it. There are six action functions that can be performed while in Payment Entry Function. These functions are performed by clicking the box in the Action (Act) column for each procedure(s). Once you have clicked on a line item, the action drop down box will become active and you may select the desired action. You can only do one type of action at a time, but may click on several line items for that action. Each of these functions will occur even if the payment is not saved. NOTE: These functions will not display if there has never been an insurance carrier on the account.
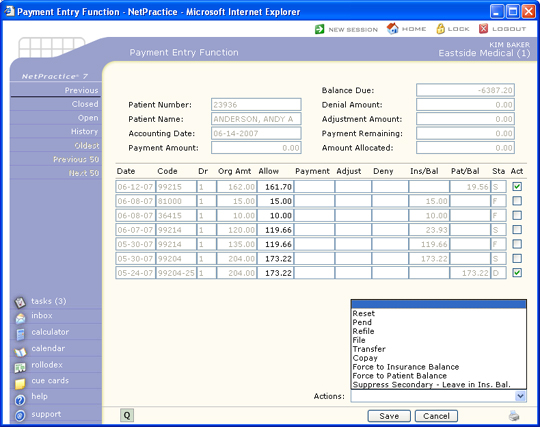
Refile. You can refile to the patient's insurance carrier by clicking on the line items you want refiled and then clicking on the action arrow on the bottom right hand corner of your screen and selecting Refile. A dialogue box will be displayed that will have the carrier you selected in the Lead-in screen defaulted. A drop down box will list all other carriers this patient has on file in case you want to select a different carrier. A reason box will also be displayed. This is a free text explanation on why you are refiling this charge(s). A 'Refiled' code (*) will be placed in the insurance status field and the transaction will be immediately placed into the insurance submission file. All line items checked will be processed for the refile.
File You can file to the patient's insurance carrier by clicking on the line items you want filed and then clicking on the action arrow on the bottom right hand corner of your screen and selecting File. A dialogue box will be displayed that will have the carrier you selected in the Lead-in screen defaulted. A drop down box will list all other carriers this patient has on file in case you want to select a different carrier. A reason box will also be displayed. This is a free text explanation on why you are filing this charge(s). If the charge passes the edits for filing, either an 'E' for the electronic file, or an 'F' for paper submission will be placed in the insurance status field and the transaction will be immediately placed into either the insurance electronic or paper file. All line items checked will be processed for the file.
Pend You can pend a charge(s) by clicking on the line items you want pended and then clicking on the action arrow on the bottom right hand corner of your screen and selecting Pend. A dialogue box will be displayed that will have the carrier you selected in the Lead-in screen defaulted. A drop down box will list all other carriers this patient has on file in case you want to select a different carrier. A reason box will also be displayed. This is a free text explanation on why you are pending this charge(s). Once a charge is 'Pended' it will continue to show up on insurance aging reports until further action by the insurance carrier is taken (i.e., payment or denial). You may want to pend a procedure if insurance has requested additional information. When you run Create Delinquent Insurance, (located in Billing, Insurance Billing Functions, Delinquent Insurance Menu) you can opt to have charges that are pended suppressed from creating a delinquent claim. You can also run a report of all charges that are currently in a pend status. Please refer to Pend Reports, located in Billing, Insurance Billing Functions, Insurance Management Reports.
Co-pay This action will cause the co-payment amount to remain in the Patient Balance column when the insurance is billed. This action is normally done when the patient didn't make his copayment. Click on the line item you would have normally applied the copayment to and then click on the action arrow on the bottom right hand corner of your screen and select Copay. This enables CGM webPRACTICE to generate a statement for a co-payment not paid. A dialogue box will be displayed that will have the carrier you selected in the Lead-in screen defaulted. A drop down box will list all other carriers this patient has on file in case you want to select a different carrier. An amount box will also be displayed. The default amount will be the co-payment amount that is contained in the patient's primary insurance record. You may accept the amount displayed by pressing Tab, type in the corrected co-payment amount, or type in the corrected amount followed by an asterisk (*) to post a different co-payment amount and also update the co-payment amount in the patient's Insurance Information (e.g. 10.00*).
Transfer You can transfer a charge(s) by clicking on the line items you want transferred and then clicking on the action arrow on the bottom right hand corner of your screen and selecting Transfer. A dialogue box will be displayed that will have the carrier you selected in the Lead-in screen defaulted. A drop down box will list all other carriers this patient has on file in case you want to select a different carrier. A reason box will also be displayed. This is a free text explanation on why you are transferring this charge(s).
If you have selected multiple line items, you will have to select whether or not you want the balances transferred to patient responsibility or to insurance liability. You can select the desired outcome by clicking the appropriate radio button next to your selection. All balances will be transferred to the column you selected whether they are credits, debits, charges, payments, or adjustments. If you select only one line item, you must enter the amount you would like to remain in patient balance. If you enter an amount that is less than the amount owing on the line item, then the remainder will be put in the insurance balance.
You must be aware that when a patient balance is transferred to insurance CGM webPRACTICE does not automatically bill the insurance carrier. In order to bill the insurance you must file the procedures either through the re-file or file function on this screen, or through the insurance on demand. This function can be helpful in correcting insurance billing errors (i.e., the insurance carrier has only made a partial payment on a claim and you want to re-submit the claim--entering a transfer after posting the payment will keep the amount in the insurance balance).
Reset The last action item is the Reset. This is used to reset or clear a line item that you mistakenly applied a payment, adjustment, or denial towards. You can reset a line item by clicking on the line item(s) you want to reset and then clicking on the action arrow on the bottom right hand corner of your screen and selecting Reset. Your screen will be refreshed and when it redisplays, any line items checked, will have any payment, adjustment, or denial amounts removed. The balances at the top of the screen will be adjusted accordingly.
Payment Summary Screen
Once the payment has been saved, the patient file, the audit trail, and all statistical files will be immediately updated with the payment information. You will be taken to a summary screen that gives you an instant recap of this patient.
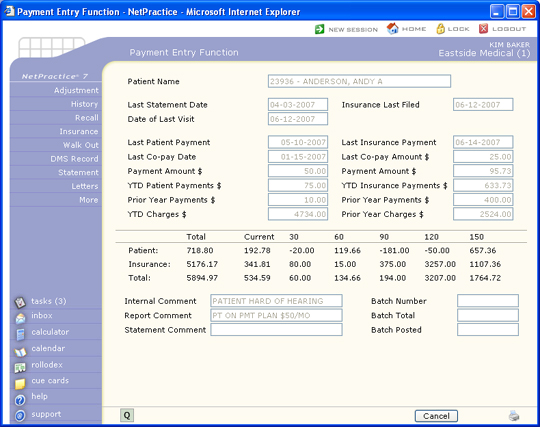
NOTE:Doctors are given credit only for payments that have been applied to charges or debit adjustments. If payments are left unallocated, those amounts will not be posted to the statistical files until such time the payment is allocated. Therefore, your Payment Analysis Reports will not always match total payments posted.
Your next step may depend on the information displayed here. For example, if you see a five cent balance in the 120 column, you may opt to write that balance off at this point.
You have several options to take at this point:
- Adjustments - even though the payment entry screen also allows for the entry of adjustments, those are strictly credit adjustments. If you need to make further adjustments on the account you can select Adjustment. Please refer to Adjustment Entry for complete details.
- History - this takes you to the patient review transaction history screen. You can choose this option if you want to review the history to see how the payment you just posted impacted the account. You may also want to validate the patient and insurance balances.
- Insurance - this allows you to print an insurance form on demand right from this screen. If you had done any files or refiles, you may want to print those forms immediately. If you are posting a large EOB that is generating secondary claim forms, it is better to print these secondary forms through the normal method of Printing Insurance. That way you can print them in alphabetical order which makes attaching them to a copy of the EOB easier.
- Walk Out - this allows you to print a Walk out statement to give to the patient as they are checking out. This would only be used if you were posting the charges and payments prior to the patient leaving your office. Please refer to Print a Walk Out Statement for details on the Walk out statement.
- DMS Record - this allows you to update any DMS record that might be applicable to this patient. For example, you may want to update the HIPAA screen if this patient gave you any new information. Please refer to Patient Change, DMS Records for complete information on the DMS screens available.
- Statement - You may generate a paper statement immediately if you desire. If you are doing electronic statements, selecting the Statement button here, will not accumulate your statements in the electronic file.
- More - this allows you to go right back into the same patient account you just posted a payment to. You may want to do some further allocations based on the information you reviewed on the summary screen. The More button takes you into the Payment Allocation Screen and not the Lead-In screen.
The Insurance, Walk Out, and Statement functions in the Action Column all allow you to print.
