![]()
Upon accessing the function, if you selected Sometimes or Always in the Batch Control Integration for Batch Payments, the first screen allows you to select a batch number. If you selected Always, the Batch Number is required. Next, the Batch summary screen will display. Click Proceed. If you do not use batches, the Unposted Payments Summary screen will display.

Next, the Batch summary screen will display. Click Proceed.
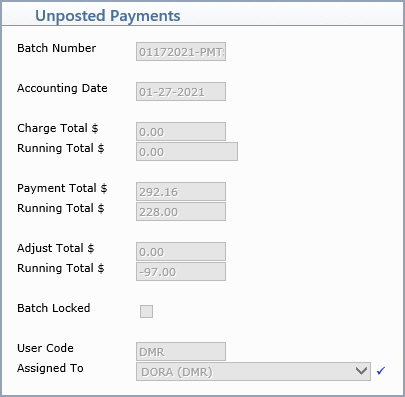
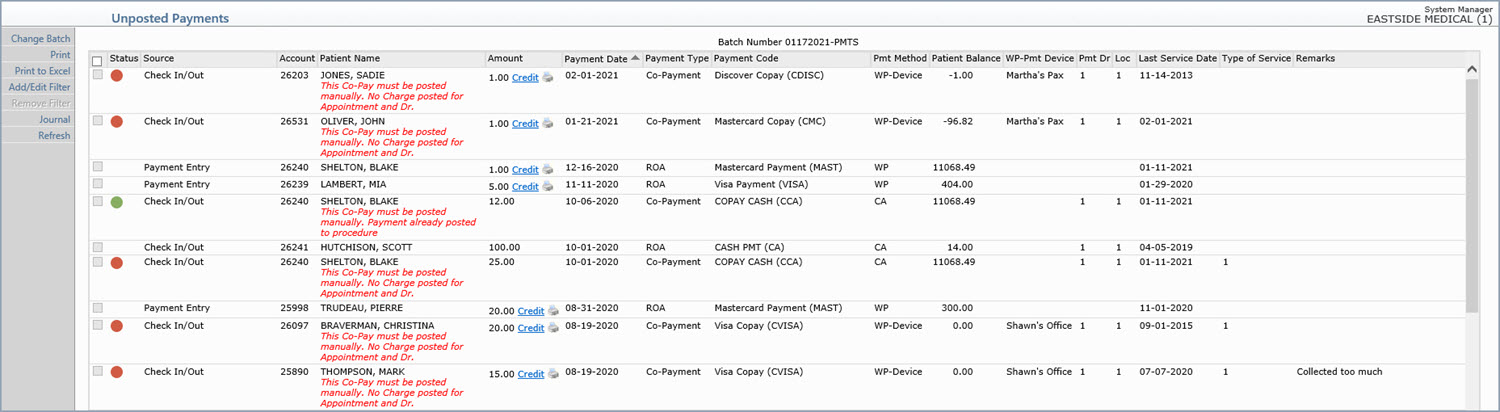
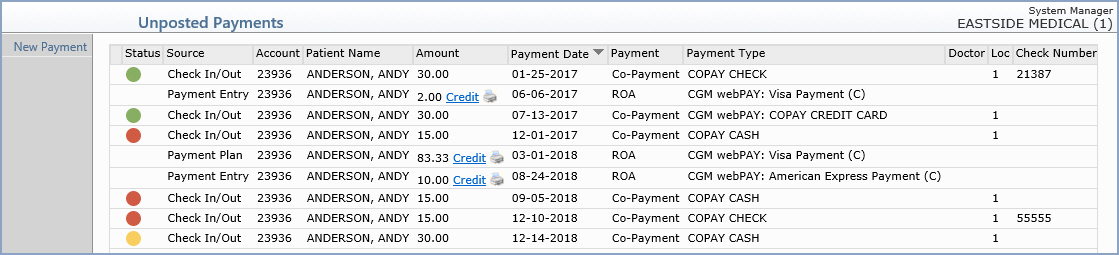
The Unposted Payments summary screen then displays. If you selected a Batch Number it will display at the top of the screen.
You can put the available columns on this screen in any order, specific to the user, by setting up the preferred order in the Column Selectable Fields menu. If you do not have access to the System Menu, you can click the gear icon in the lower right corner to change your Column Selectable Fields directly from within this function.
Columns one through six are required to display and their order is pre-set
but the remaining columns are available to be changed or removed. All
of the columns are 'sortable', meaning you can click on any column heading
to sort the data displayed by that column.
The available columns for this screen are:
| Column Heading | Description |
|---|---|
| Automatic Posting Check Boxes | If a Co-Payment has a green status icon, it is eligible to be automatically posted. You can select a check box for individual co-payments or select the check box at the top of the column to select all of the eligible co-payments. You can also select the check box at the top of the column to clear any previously selected check boxes. If the check box is unavailable, it is because there is an 'error message' in red italicized text under the patient's name and/or a red or yellow status icon in the Status column. |
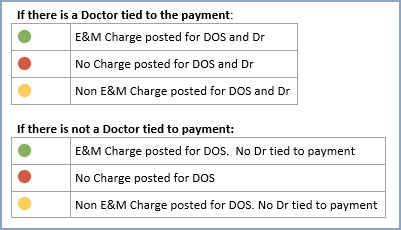
| Co-Payment Status | This column reflects icons for a Co-Payment's charge status,
to determine if an E&M procedure has been posted that matches
the Co-Payment date. A procedure code must be between 99201-99499
to be eligible to be automatically posted. When you point
to an icon one of the following messages will display:
|
| Source | Indicates where the payments were stored from; Payment Entry, Check In/Out, Payment Plan or CGM eMEDIX Payment Portal. |
| Account | The patient’s account number to which the payment applies. |
| Patient Name | The patient’s name (last name, first name) on the account. Any error messages will display below the patient's name in red text. |
| Amount | The payment amount. If the payment was collected using CGM PAY, a Credit link and Printer icon will be available to credit/void the payment or print the receipt. |
| Payment Date | The payment date entered when the payment was originally entered. |
| Payment Type | Co-payment or ROA (Received on Account). |
| Payment Code | The description and code of the Payment Code used - such as, Copay Cash, Copay Check, Check Pmt, CGM PAY: Copay Credit Card. Notes:
|
| Pmt Method | The method of payment which includes:
|
| Patient Balance | The amount owing for the patient's balance. |
| CP-Pmt Device | The payment device name for any CGM PAY payment collected on a device . |
| Pmt Doctor | The doctor assigned to the payment. |
| Loc | The location code where the service was rendered. |
| Last Service Date | The last date of service posted on the patient's account. |
| Type of Service | The type of service code for the appointment. |
| Remarks | Any remarks entered regarding the payment. |
| Check Number | The check number (if payment method was a check). |
Note: If you have been activated for the CGM eMEDIX Payment Portal for Electronic Statements - any payments received from the CGM eMEDIX Payment Portal will show the Source and Remarks as CGM eMEDIX Payment Portal.
Unposted Payments Error Messages
When a co-pay must be posted manually, the reason(s) will display in
red italicized text, to the right of the This
Co-Pay must be posted manually message. The reason(s) also displays
when you point to any of the Co-Payment Status icons, so you can see at
a glance what is wrong with the payment. If you must manually post a payment,
you can access Payment Entry by clicking anywhere in the row containing
the payment information.
Error Message |
How to Resolve the Error |
|---|---|
| This Co-Pay must be posted manually. | If this is a CGM PAY payment that has not been collected yet,
it cannot be auto-posted. Click the Credit
link in the Amount column
and collect the payment.
If there are multiple co-payments linked to the same appointment, they cannot be auto-posted. These payments must be posted manually. If a co-payment cannot be matched up to a procedure or does not meet any of the following parameters , the co-payment cannot be auto-posted and must be posted manually:
|
Auto-Post
multiple payments at one time
Select one or multiple check boxes in the first column to select the payments
that you want to post automatically. The Post button at the bottom
right corner of the screen becomes available. Click Post to automatically
post all selected payments to the accounts. If an unposted payment has
a doctor assigned to it and you auto-post the payment, the payment will
be applied to procedures that match the payment doctor.
Manually
Post individual payments one at a time
To review a payment in detail from the Unposted Payments Summary screen,
select the payment by clicking anywhere on the row containing the payment
information. The Payment Entry Function screen will display.
If you click Cancel, you will be returned to the Unposted Payments Summary screen and that payment will still be stored.
If you click Save, the Payment Allocation Screen will display.
For detailed information, see the Payment Entry Function.
The check box column is not included
The icons in the status column are converted to Red, Yellow, Green
The error messages that display under the Patient name are not included
| Prompt | Response | Req | Len |
|---|---|---|---|
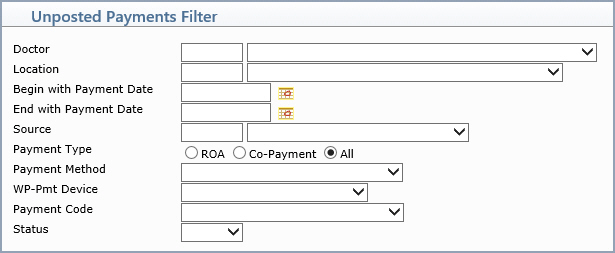
| Doctor | Type the code you want, select from the list to filter the summary screen for a specific Doctor, or leave the field blank to include all doctors. | 5 | |
| Location | Type the code you want, select from the list to filter the summary screen for a specific Location, or leave the field blank to include all locations. | 5 | |
| Begin with Payment Date | Type the date you want, click the calendar icon to select a date to filter the summary screen for a specific Payment Date, or leave the field blank to include all dates. | 10 | |
| End with Payment Date | Type the date you want, click the calendar icon to select a date to filter the summary screen for a specific Payment Date, or leave the field blank to include all dates. | 10 | |
Source |
Type the code you want, select from the list to filter the summary screen for a specific payment source, or leave the field blank to include all sources. | 5 | |
| Payment Type | Select either ROA or Co-Payment to filter the summary screen, or select All to include all ROA and Co-Payments. | 5 | |
| Payment Method | Select from the list to filter the
summary screen for a specific payment method, or leave the
field blank to include all payments. Values include:
|
||
| CP-Pmt Device | Select from the list to filter the summary screen for a specific payment device, or leave the field blank to include all devices. | ||
| Payment Code | Select from the list to filter the summary screen for a specific payment code, or leave the field blank to include all codes. | ||
| Status | Select from the list to filter the summary screen for a specific co-payment charge status, or leave the field blank to include all statuses. |
When you enter the Payment Entry Function either from the Transactions menu or from the Transactions > Payments Action Column function in Patient, Change Patient Data, if there are any existing unposted payments for the selected patient, a list of those payments display so you can select to post them from this screen. If the payments are posted from within these functions, they are removed from the Unposted Payments screen.
Copyright and Trademark Notice. Copyright © 2019 CompuGroup Medical, Inc. CGM®, CompuGroup Medical® and the CGM logo are registered trademarks and CGM webPRACTICE™ and CGM webTOOLS™ are trademarks of CompuGroup Medical AG in the United States and/or other countries. Any rights not expressly granted herein are reserved.