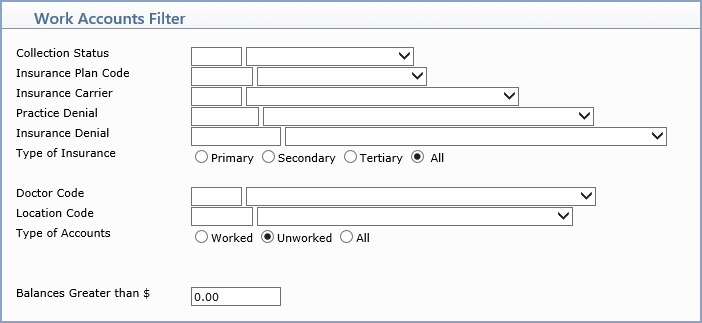
Work Accounts

With the Work Accounts function, you can review and process accounts that have entered Insurance Collections through the Populate Collection Roster function. Work Accounts provides the following functions/sections:
 
Upon accessing this function, the Work Accounts Filter screen displays containing blank data fields. You can filter the accounts that will be displayed on the Work Accounts summary screen.


Data Field Information
Prompt Response Req Len
Collection Status Select the code you want from the Collection Status list or leave the field blank to include all statuses.   3
Insurance Plan Code Select the code you want from the Insurance Plan Code list or leave the field blank to include all codes in the table.   5
Insurance Carrier Select the code you want from the Insurance Carrier list or leave the field blank to include all codes in the table.   3
Practice Denial Select the code you want from the Practice Denial list or leave the field blank to include all codes in the table.   3
Insurance Denial Select the code you want from the Insurance Denial list or leave the field blank to include all codes in the table.   1
Doctor Code Select the code you want from the Doctor Code list or leave the field blank to include all codes in the table.   3
Location Code Select the code you want from the Location Code list or leave the field blank to include all codes in the table.   5
Type of Accounts Select the option to indicate which accounts you want to work. The default is automatically set to 'Unworked'.   1
Balances Greater than $ Type the amount to indicate which accounts you want to work based on minimum balance.   10

Work Accounts Summary Screen
This screen lists each transaction that populated into the insurance collections module. ***Filter Applied*** displays at the top of the screen when the accounts are filtered, including details of the items you selected for the Filter.


You can place the available columns on this screen in any order, specific to the user, by setting up the preferred order in the Column Selectable Fields menu. All columns except the Acct and Name columns can be selected/deselected and re-ordered. All of the columns are 'sortable'.
 
This screen lists the patients' Account Number and Name and the Status that the claim is currently in. If it is in a Denial status it shows both the Practice Denial and the Insurance Denial codes (if entered). When you point to a Practice or Insurance Denial Code in a row, the description for the code displays. All of the basic information pertaining to the claim is listed. The Follow Up date is based on a pended claim or a letter generated to a carrier. If a letter was generated, the letter displays. The Action Date shows the date of the last action on the claim. (The first time you perform the Populate Collections Roster function, every account will show an action date of the populated date.) It also shows the balance due on that transaction.

Click Add/Edit Filter in the Action Column to access the Work Accounts Filter screen again if you want to change your original selections. To access the patient account detail, select the account by clicking anywhere in the row containing the claim information.


Work Accounts Detailed Screen
After selecting a patient account, the Work Accounts Detailed screen displays. This screen looks and functions like the History screen in Review Patient Information or in Change Patient Data, with the exception of being able to select claims for a specific insurance carrier or All Carriers in the insurance carrier list box to the right of the account demographic information. This screen contains the essential data required to 'work' the claim.


1. Select the check box next to the transaction that you want to work.
2. The Actions field becomes active and you can select the function you want to complete on the selected transaction(s).


Action Column Functions
Notes: Click Notes to add a Note DMS record to the account.
INotes: Click INotes to add an Insurance Note DMS record to the account.
Print: Click Print to print the transaction history on the account for a specified range of accounting dates.
Refresh: Click Refresh to refresh/update the screen.
 
Summary of the Actions and their affect on the Worked Status


After you have completed working the accounts, Print the Collection Roster again to review the accounts and the current status of the insurance collections process.