After completing the payment entry screen, the Payment Allocation screen displays.
If the date of service option was selected in the payment entry screen,
and Isolate was selected, the Payment Allocation Screen will only
display transactions for that date of service. If Starting From
was selected, the display will begin listing transactions from that date
of service. If you did not type a date of service, then all the open transactions
will be displayed starting with the most recent date first.
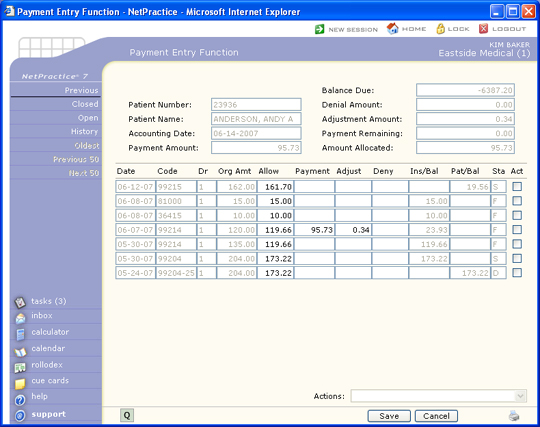
To start the allocation process, position the pointer on the line item
you want to pay. The payment amounts will automatically be highlighted
as you work your way through the allocation process, allowing you to quickly
type a new amount if needed without having to select and delete the defaulted
text.
If the insurance carrier code entered does not have a Fee Schedule link, or if the payment code entered reflects a personal payment, the Allow (Allowed Amount) column on this screen will reflect the full amount of the charge and will be inactive.
See the related functions for details on posting various types of payments:
The Action Column contains functions for Previous, Add/Edit Filter, Remove Filter, History, Oldest, Previous 50, and Next 50.
Previous
The Previous button will return you to the Payment Entry Screen. You will
be allowed to edit any of the information except the amount. If you entered
an incorrect amount, you must click on Cancel and start the payment
process over for this patient. The most common usage of this action is
to change the remarks field.
Add/Edit Filter
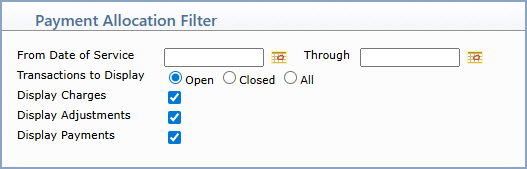
The Add/Edit Filter button opens the Payment Allocation Filter, which lets
you choose which transactions display while allocating the payment. You
can limit the transactions by a range of service dates, by whether they
are Open, Closed or All, and by transaction type (Charges, Adjustments
and Payments).
The second to the last column is a Status column displaying the last insurance activity type. The different activity types codes are:
The activity type shown for the line item, is the last activity that has taken place.
Copyright and Trademark Notice. Copyright © 2019 CompuGroup Medical, Inc. CGM®, CompuGroup Medical® and the CGM logo are registered trademarks and CGM webPRACTICE™ and CGM webTOOLS™ are trademarks of CompuGroup Medical AG in the United States and/or other countries. Any rights not expressly granted herein are reserved.