![]()
|
Mouse Actions - Referred to as the pointer. Always single-click options in CGM webPRACTICE - double-clicking or triple-clicking are only used within text boxes. |
|
Save and Cancel Option Buttons - Every data input window in CGM webPRACTICE provides a Save and Cancel option. Clicking Save submits the data you just input and proceeds on with the function, while clicking Cancel exits you from that window. If there are multiple data input windows in a function, a Proceed option is provided instead of or in addition to Proceed. To prevent locking-up or errors from occurring when you double-click or press ENTER multiple times, a message stating 'This page has already been submitted, please wait a moment.' will appear. |
|
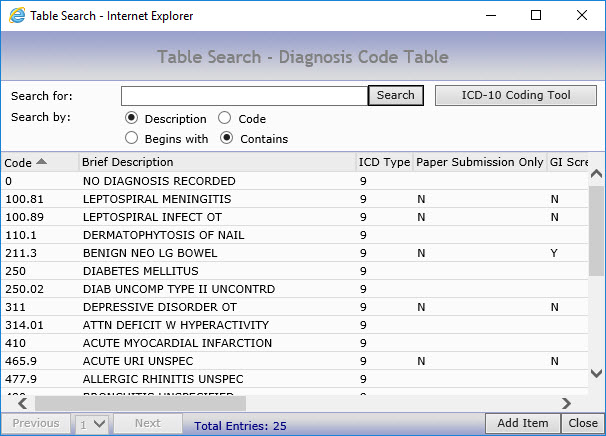
Magnifying Glass Icon - CGM webPRACTICE contains tables, which reduce the amount of data entry required by storing certain information under a single (user-defined) code. (For example, the Procedure Code Table, Diagnosis Code Table, Insurance Carrier Table and Referral Source Table.) The magnifying glass icon is shown next to Table fields whenever an entry is required to allow you to access the contents of that table without having to exit out to the Tables menu. The Table contents are automatically listed in code order. You can sort the list by clicking on the heading of the column that you want the list sorted by. Type text or a code in the Search for field and then select the appropriate option to search for that text by Description or Code and whether it Begins with or Contains the text or code you want to search for. The only requirement is that the field containing the information you are searching 'for' must be included in the Table Search window. For example, if you are searching for 'PO Box 5066' contained in the second address line field for an insurance carrier, the second address line field must be one of the fields shown in the Table Search window. The various Table fields are selected using the Search Integration menu. NOTE: The Total Entries field reflects the number of selections available to you within the Table Search window. You can control this number through the Smart List Control menu. |
|
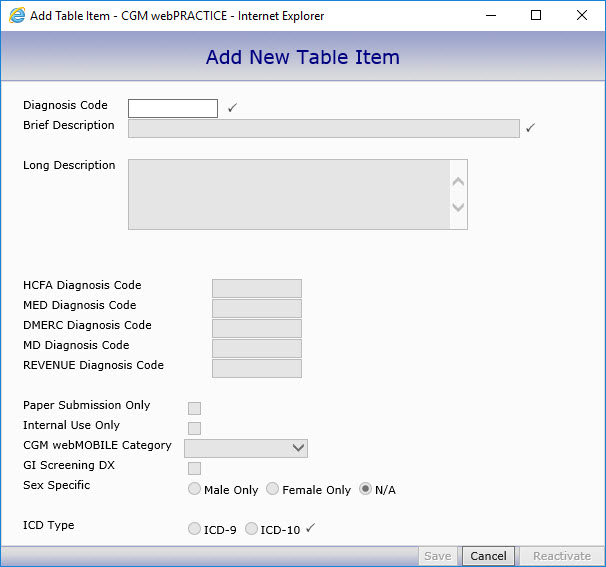
You can add a new code to the actual table, update existing table codes, or reactivate inactive codes directly from the Table Search window. To add or edit a code, click Add Item, type in the code and press TAB. Complete the remaining fields and click Save. If a code has been inactivated, the Reactivate button will be available and you can click it to reactivate the code. |
|
QuikLink Icon - This icon appears
in the lower-left corner of the CGM webPRACTICE window after you
select a patient account so you can access the following functions
for the selected patient without canceling out of the active screen:
Each QuikLink session uses the standard settings currently stored in the Security Control File to determine when to lock and auto log-off the session. Each QuikLink session is listed when you view the System Status function, but this does not mean that a separate license is used for each session. The System Status function displays the quantity of sessions that are 'open' and not the number of 'licenses being used'. NOTE: See User Licenses for additional information. |
|
Defaults Icon - With the Defaults icon in the lower-right corner of the screen, you can set Default Values, Fixed Values, and make specific fields required for your practice. After values have been stored for a particular data input screen, they can be modified using the Defaults, Fixed, and Required Fields menu. Note: The Defaults, Fixed and Required Fields menu must be assigned to the user code in Model User Menus. If the user does not have this menu function or if their security level is not as high as this menu function, they will not have the Defaults icon available within CGM webPRACTICE. |
|
Printer Icon - With the printer icon in the lower-right corner of the CGM webPRACTICE window, you can send the active page to a printer. |
|
Required Fields - Any field that is required, is indicated by a check mark to the right of the field. If CGM webPRACTICE requires the field, the check mark is gray. If your practice has selected a field as required, the check mark is blue. If you do not complete a required field before saving the information, a message displays informing you that it is a required response (by CGM webPRACTICE) or that the response is required by your practice, and you cannot proceed without completing the field. See the information on the Defaults Icon above. |
 |
Unavailable (Inactive) Fields - If a data field contains data that appears 'dimmed' or 'grayed-out', the field is unavailable for editing. For example, when you review a patient account, all the data fields are unavailable for editing and the text contained in each field appears dimmed. |
Copyright and Trademark Notice. Copyright © 2019 CompuGroup Medical, Inc. CGM®, CompuGroup Medical® and the CGM logo are registered trademarks and CGM webPRACTICE™ and CGM webTOOLS™ are trademarks of CompuGroup Medical AG in the United States and/or other countries. Any rights not expressly granted herein are reserved.


