![]()


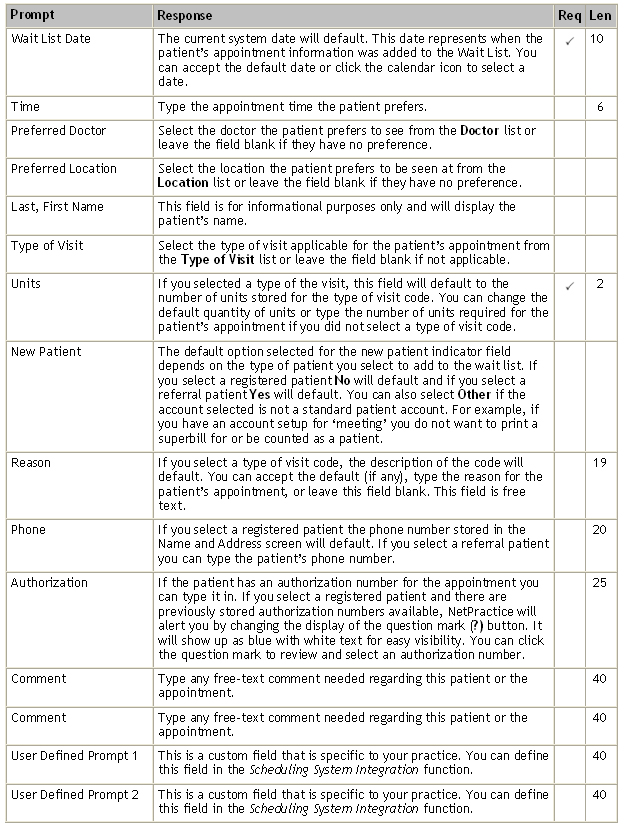
| Prompt | Response | Req | Len |
|---|---|---|---|
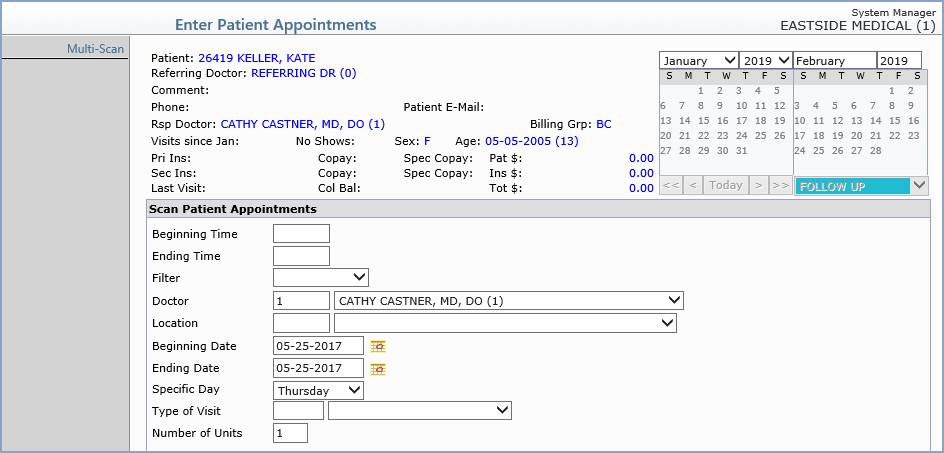
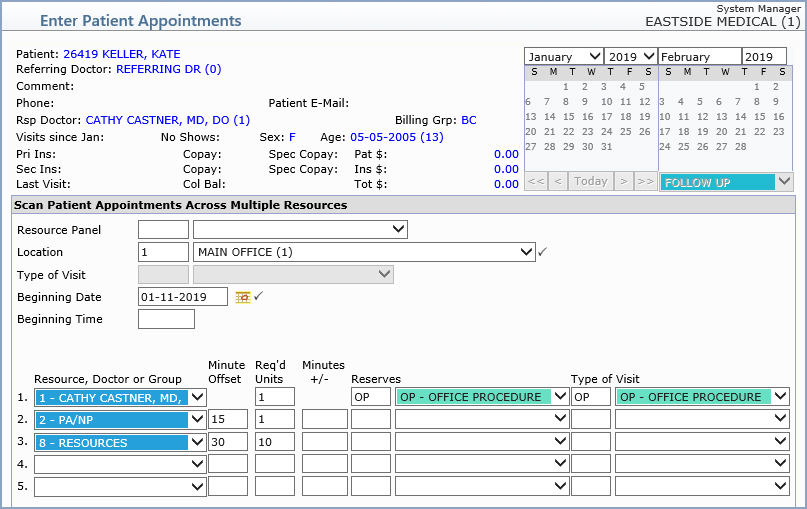
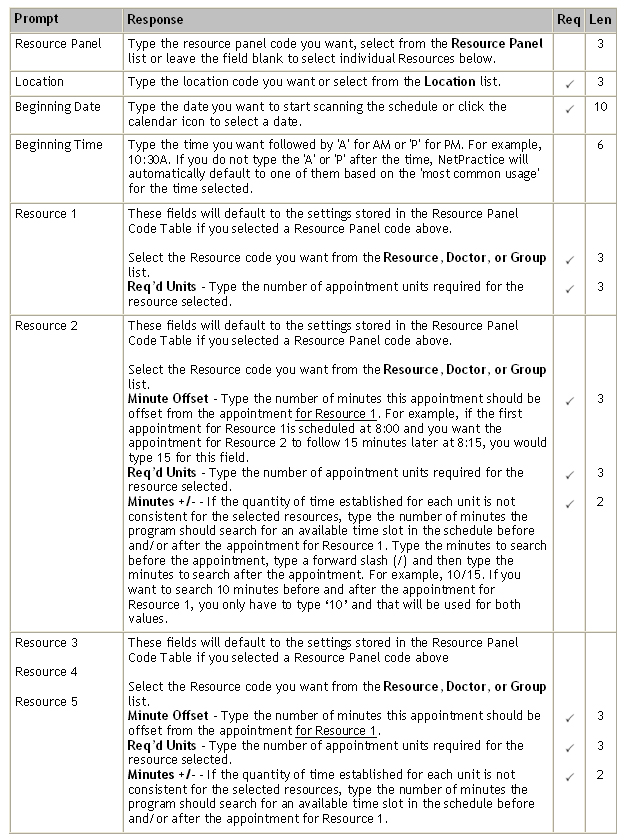
Beginning Time |
Type the time you want followed by 'A' for A.M. or 'P' for P.M. For example, 08:00A. If you do not type the 'A' or 'P' after the time, one of them will automatically default based on the 'most common usage' for the time selected. | 6 | |
| Ending Time | Type the time you want followed by 'A' for A.M. or 'P' for P.M. For example, 08:00A. If you do not type the 'A' or 'P' after the time, one of them will automatically default based on the 'most common usage' for the time selected. | 6 | |
Filter |
If you want to filter the scan results, select the filter you want from the list. | 6 | |
| Doctor | Type the doctor code you want, select
from the list or leave the field black to include all codes.
This field will provide an ‘auto-complete’ list. When you start typing the name or code you want, any matching values will appear in a list below the text box. If you type a code, you can press TAB and the code will populate in the text box. If you type a name or description of a code, you can use the down arrow or mouse to highlight the code and then press TAB to populate the text box. If you select a doctor code and that doctor has reached the specified maximum patient load for the morning, afternoon, or entire day, any appointment time slots during those times will be ignored during the scan. If you select a doctor code that does not have the Scan this Doctor field selected in the Maintain Doctor Integration Codes function, the scan function will ignore the doctor code. |
4 | |
| Location | Type the location code you want, select
from the list or leave the field black to include all codes.
This field will provide an ‘auto-complete’ list. When you start typing the name or code you want, any matching values will appear in a list below the text box. If you type a code, you can press TAB and the code will populate in the text box. If you type a name or description of a code, you can use the down arrow or mouse to highlight the code and then press TAB to populate the text box. |
3 | |
| Beginning Date | Type the date or click the calendar icon to select the date you want to start scanning the schedule. | 10 | |
| Ending Date | Type the date or click the calendar icon to select the date you want to stop scanning the schedule. | 10 | |
| Specific Day | If you need to scan for an appointment on a specific day, select the day you want from the list. | 9 | |
| Type of Visit | If you want to scan for a specific type
of visit that has been set up as a reserve appointment, or for
a type of visit scanning group set up as reserve appointments
for multiple type of visit codes, type the code you want or select
from the list. You can leave the field blank to include all codes.
Type of Visit Scanning Group codes will display at the bottom
of the list.
This field will provide an ‘auto-complete’ list. When you start typing the name or code you want, any matching values will appear in a list below the text box. If you type a code, you can press TAB and the code will populate in the text box. If you type a name or description of a code, you can use the down arrow or mouse to highlight the code and then press TAB to populate the text box. Note: The auto-complete functionality does not display Type of Visit Scanning Group Codes. |
3 |
|
| Number of Units | Type the number of units you want for the appointment. | 3 |


| Prompt | Response | Req | Len |
|---|---|---|---|
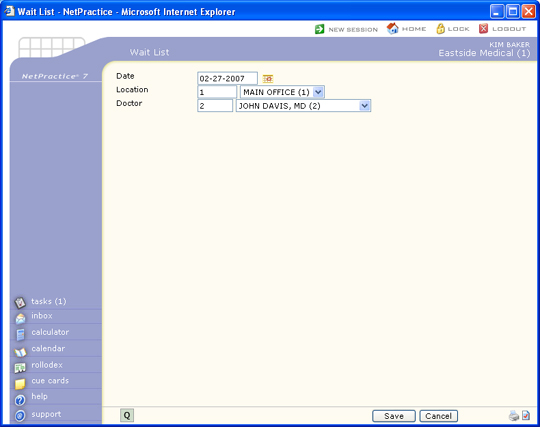
| Date | Type the date you want or click the calendar icon to select a date. | 10 | |
| Location | Type the location you want, select a code from the Location list, or leave the field blank to include all codes in the table. | 5 | |
| Doctor | Type the doctor you want, select a code from the Doctor list, or leave the field blank to include all codes in the table. | 4 |
| Prompt | Response | Req | Len |
|---|---|---|---|
| Sort by | Select the sorting option you want | 1 | |
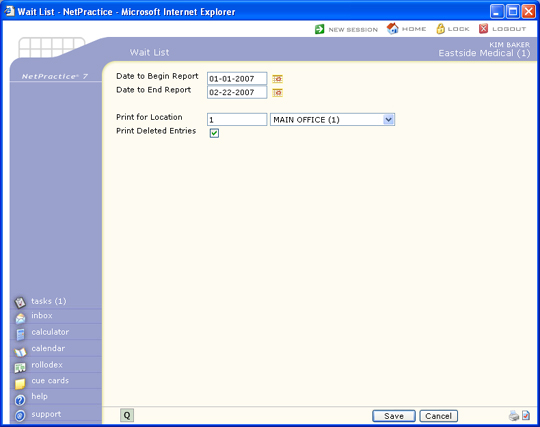
| Date to Begin Report | Type the date you want the report to start with or click the calendar icon to select a date. | 10 | |
| Date to End Report | Type the date you want the report to end with or click the calendar icon to select a date. | 10 | |
| Print for Location | Type the location you want, select a code from the Location list, or leave the field blank to include all codes. | 10 | |
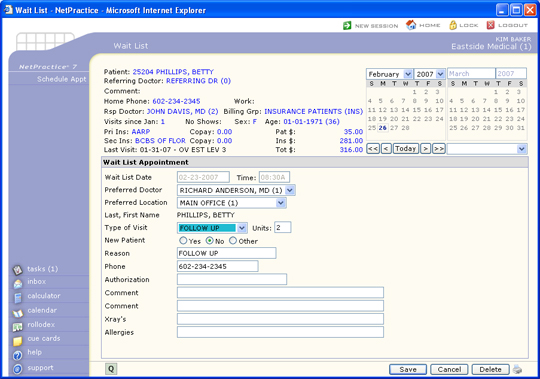
| Print Deleted Entries only | If you want to print the deleted wait list entries, select this check box. By selecting this option the report will only print the deleted entries and not the entries that are currently contained in the wait list. | 1 |
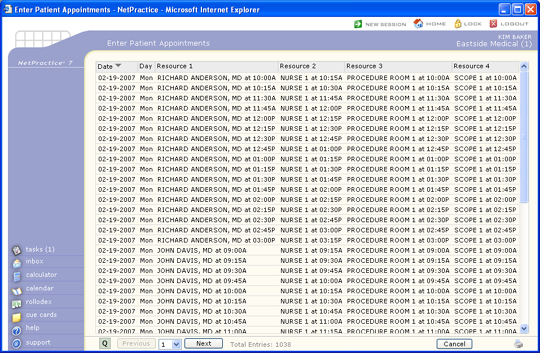
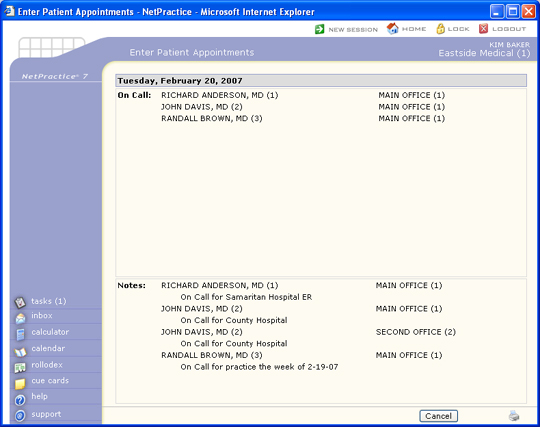
When you click Expand All/Collapse All, the view settings are stored by your User Code as expanded (or collapsed), so the next time you access the function, the view will be automatically expanded (or collapsed). This expanded/collapsed setting is stored separately for the Enter Patient Appointments, Inquiry and Wait List functions.
Copyright and Trademark Notice. Copyright © 2019 CompuGroup Medical, Inc. CGM®, CompuGroup Medical® and the CGM logo are registered trademarks and CGM webPRACTICE™ and CGM webTOOLS™ are trademarks of CompuGroup Medical AG in the United States and/or other countries. Any rights not expressly granted herein are reserved.
