Patient Collections Setup and Processing Steps
The Patient Collections function can be used in a completely hands-off
manner to conduct a collection letter writing campaign, or it can be used
as a hands-on tool to work accounts and maintain payment plans for patients.
In either case, Patient Collections easily accommodates the turn
over of accounts to third party collection agencies through automatic
transfer to the collection database and write-off of turned-over delinquent
balances.
Perform the following steps to set up Patient Collections:
Patient Collections Setup Steps
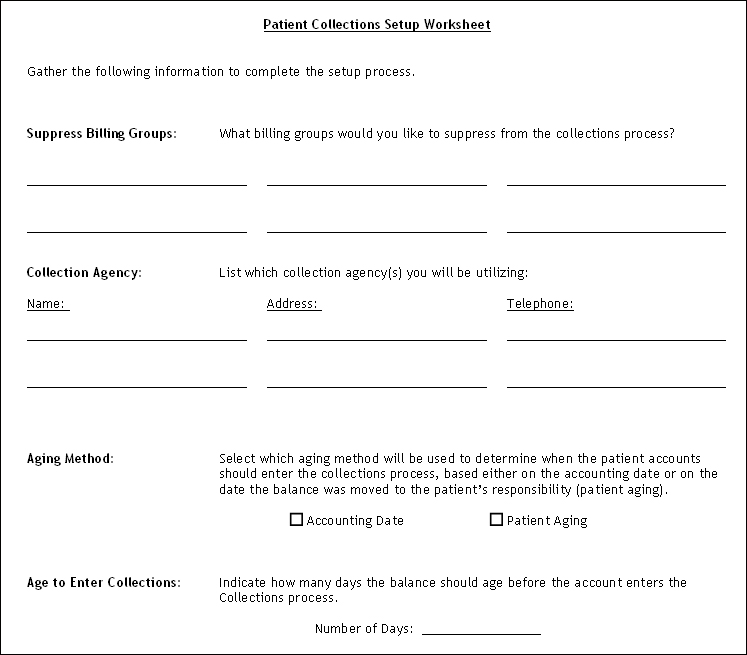
- Complete the Setup Worksheet
- The worksheet assists you in gathering the information necessary
to complete the setup process.
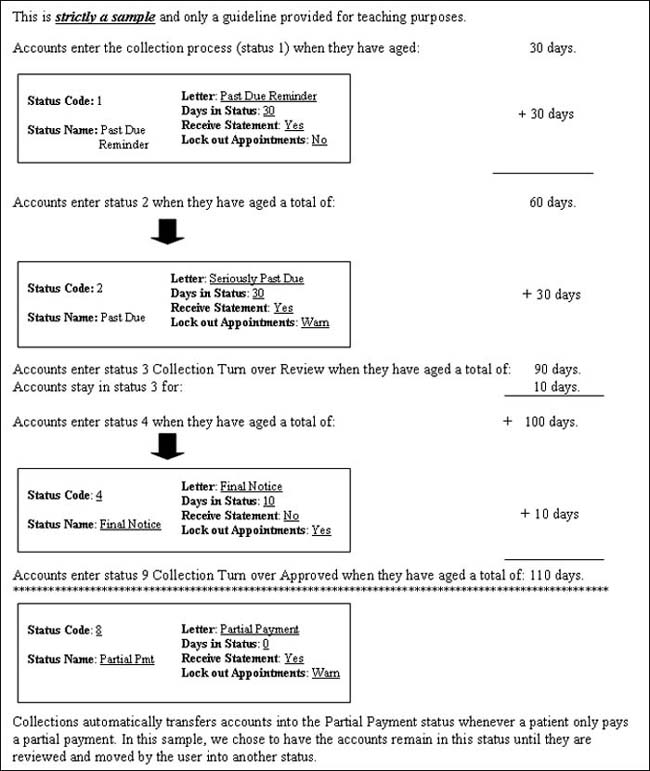
- Review the Sample
Setup - Status Codes and Options - With the sample, you can
familiarize yourself with a sample migration path for the collection
process. NOTE: This is just an example and you can modify the
status codes and migration path to suit your practice.
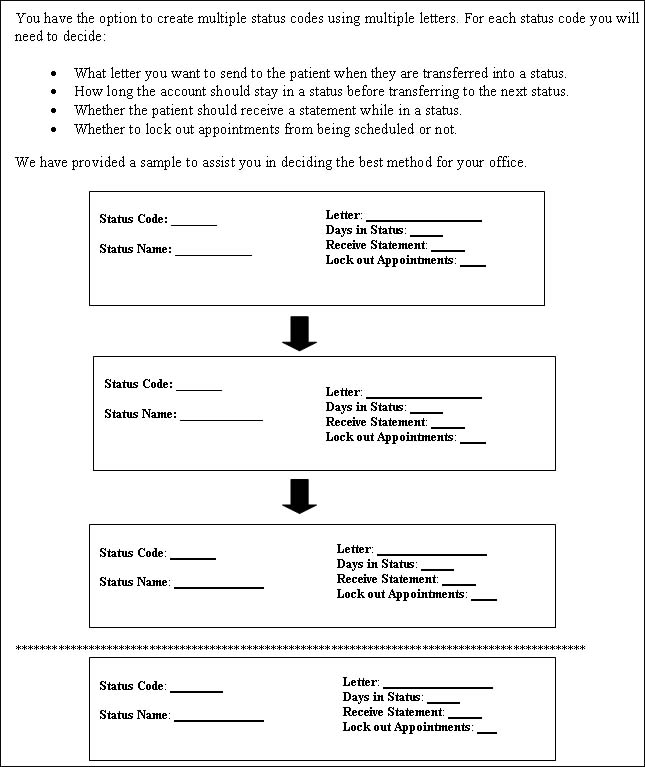
- Complete the Status
Codes and Options Worksheet - Define the migration path of
accounts through the collection process.
- Create or edit the Collection
Status Codes - The Collection Status Table is pre-loaded
with collection statuses 1-9. You must create the Non-Delinquent
Payment Plan and Non-Delinquent Payment Plan Failed statuses
if you choose to use them. You should review the Collection
Status Table Help section and the existing codes thoroughly, prior
to making any changes, but you can change the codes and the details
of the codes to suit your practice.
- Create the Collection
Agency Codes.
- Review/Edit the Collection
Letters - Sample collection letters are automatically loaded
in the DMS Letter Processor, and you can tailor them to the needs
of your practice.
Note: See CGM
ECOLLECTIONS if you are using electronic collection letters.
- Complete the Patient
Collections Integration.
- Select the Suppress Collections check box in the Billing
Group Table, if needed. This will prohibit the accounts assigned
to these billing groups from going through the Collections process.
- Follow the Standard
Steps for the Patient Collections Processing Cycle and follow
them on a regular basis, weekly at minimum. If you fail to perform
the steps, the patient accounts will not properly migrate through
the collections process.
NOTE: If there are accounts with patient balances
over 90 days, you should follow the Established
System Steps for Setting up the Patient Collections Processing Cycle.
After completing the setup, use the Standard
Steps for the Patient Collections Processing Cycle instructions every
consecutive time after that.
Setup Worksheet
Sample Setup - Status Codes and Options
Status
Codes and Options Worksheet
Established System Steps for Setting
up the Patient Collections Processing Cycle
If you are an established client that has accounts with patient balances
over 90 days old, some care must be taken before you perform the Populate
Collection Roster function for the first time. Accounts enter the
process under the collection status you selected in the Initial Collection
Status field in the Patient
Collections Integration, regardless of the actual age of the balance.
For example, if you have accounts that are 60, 90 and 120 days old, they
will all end up in Collection Status 1 the first time you perform the
Populate Collection Roster function, but you can manually put the
accounts in the correct status.
If, for example, you want to automatically
- Send a Final Notice (letter 4) to anyone with a balance over 120
days old
- Place all the accounts with balances over 90 days old into Collection
Turn Over Review (status code 3)
- Send a Seriously Past Due (letter 2) to every account with a balance
over 60 days old
- Place the remaining past due accounts into the Past Due Reminder
(status code 1),
then follow these steps:
- Create Insurance
File.
- In Patient
Collections Integration, set the Age to Enter Collections
to 120 days and the Initial Collection Status to 4
- Final Notice. Perform the Populate
Collection Roster function. Collections looks only at the accounts
with balances that are more than 120 days old and places them in Collection
Status 4.
- Go back to Patient Collections Integration and change the
Age to Enter Collections to 90 days and the Initial
Collection Status to 3 - Collection Turn Over Review. Perform
the Populate Collection Roster function. Collections looks
only at the accounts with balances that are more than 90 days old
and places them in Collection Status 3. The accounts with balances
that are more than 120 days old are already in the collection process
and are ignored by the Populate Collection Roster function.
- Go back to Patient Collections Integration and change the
Age to Enter Collections to 60 days and the Initial
Collection Status to 2 - Seriously Past Due. Perform the
Populate Collection Roster function. Collections looks only
at the accounts with balances that are more than 60 days old and places
them in Collection Status 2. The accounts with balances that are more
than 90 and 120 days old are already in the collection process and
are ignored by the Populate Collection Roster function.
- Go back to Patient Collections Integration and change the
Age to Enter Collections to 30 days and the Initial
Collection Status to 1 - Past Due Reminder. Perform the
Populate Collection Roster function. The remaining past due
accounts are placed in Collection Status 1.
After you complete the setup steps, complete the Initial
Processing Cycle for Established Systems. Then, use the Standard
Steps for the Patient Collections Processing Cycle every consecutive
time after that. The difference between the two sets of instructions is
that in the 'Initial Processing Cycle', you work the accounts prior
to printing letters. This provides you with the opportunity to set up
patients with payment plans that have been previously established and
to move any accounts to the Accounts Being Worked status that are
not ready to receive letters.
Initial Processing Cycle for Established Systems
- Print Roster Summary
- Work Accounts
- Move Letters
to Print File
- Print Collection
Letters
- Print the Dead
End Report
- Print Collection
Roster
