![]()
There are several Attachments available that will automatically perform extra functionality to save you keystrokes, data entry time, or provide additional required information for filing insurance claims. There are claim level attachments and service line item level attachments and some can be used for both claim and service line item levels.
You can add an Attachment by clicking the Attachment (paper clip) icon either at the claim level or next to the service line item.
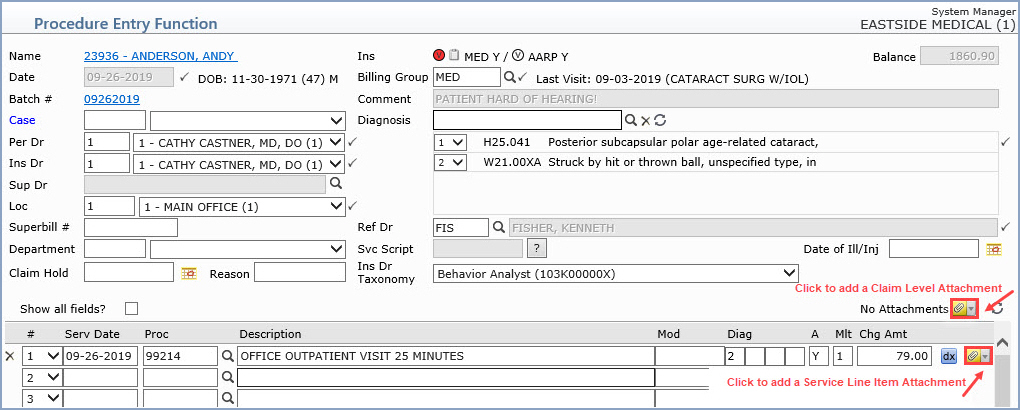
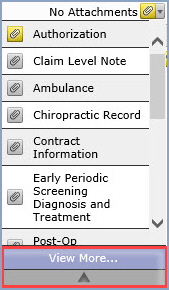
When you click the Attachment icon, a list of your practice’s most-frequently used attachments will display. This list is defined in the Procedure Entry Integration function. When an encounter does not have any attachments, the text “No Attachments” appears to the left of the attachment icon. To expand the list to see all of the available attachments, click View More at the bottom of the list. To close the list, click the UP ARROW at the bottom of the list. Click on the attachment in the list to select it.
The applicable attachment screen appears where you will enter the information specific to the attachment. For detailed information on the various attachments, see the list of Available Attachments below.
The attachment icons are color-coded so you can quickly identify if an Attachment is required, may be required, or if it is complete. When you point to any of the attachment icons, a ScreenTip will display the color of the icon along with a short description.
 Red attachment icon - At least one required attachment is incomplete.
For example, if you enter an inpatient location, the paper clip turns
red to indicate the Admit Date attachment is required.
Red attachment icon - At least one required attachment is incomplete.
For example, if you enter an inpatient location, the paper clip turns
red to indicate the Admit Date attachment is required.
 Yellow attachment icon - At least one attachment may be required.
For example, if there is one or more authorizations stored on the
patient’s account that are valid for that date of service, the paper clip
will be yellow. This is your cue to determine whether you do need to add
one (or more) authorizations.
Yellow attachment icon - At least one attachment may be required.
For example, if there is one or more authorizations stored on the
patient’s account that are valid for that date of service, the paper clip
will be yellow. This is your cue to determine whether you do need to add
one (or more) authorizations.
 Green attachment icon - Attachment exists and is complete. At least
one completed attachment has been added to the claim or that service line.
Green attachment icon - Attachment exists and is complete. At least
one completed attachment has been added to the claim or that service line.
 Gray attachment icon - No existing or required attachment.
The information stored on the patient account and entered in the Procedure Entry function is reviewed to determine if anything warrants or triggers an attachment. If warranted, the attachment icon changes color based on the “triggering” information. For example, the presence of an authorization on an account that matches the date of a service, triggers the attachment icon to turn yellow next to that service line. So, even before you have added any attachments, you may see that the claim level attachment icon or a service line item icon is yellow or red. For a list of the attachments and what triggers them, see Attachment Triggers.
To see which attachment is indicated, view the attachments list. The attachment icon next to the applicable attachment will be color-coded. Note: The system will not be able to determine all required or possibly required attachments; you will need to make the final determination regarding what is required and should be attached.
After entering the information and saving the attachment, the attachment is saved to the claim or the service line item level (or both). You may make changes to attachments, add new ones, or delete existing ones until the Procedure Entry screen is saved; after it has been saved, you will have to use the Edit an Encounter function to add, edit or delete an attachment. To delete an attachment, open the attachment window and click the delete button.
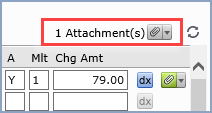
The count next to the claim level attachment icon changes to indicate the total number of completed attachments for the claim as a whole—that is, the sum of completed attachments at the claim level and at the individual service line items.
The attachments are listed in the order they were selected in the Procedure Entry Integration. For example, if National Drug Code (NDC), Line Item Note (NOTE), Special Program Indicator (SPI), and Ambulance (AMB) were selected for the claim level list (in that order), that will be the default order when you open the claim-level attachment list. The order of the attachments list can change though, depending on the status of the attachments for the claim or service line item as follows:
Red attachments have top priority and will display at the top of the list
Yellow attachments display after any required ones
Green attachments display next
So, for example, if a service line requires an attachment that is incomplete and it also has a completed attachment, the required attachment will display at the top of the list and the completed one will display next. If a service line has one completed attachment (and none have been identified as being required or possibly required), the completed one would display at the top of the list. The rest of the list will follow the order in the Procedure Entry Integration.
The one exception to this rule is the Hospital (HOSP) DMS record. If you add a hospital attachment in Procedure Entry, only the Admit Date and the Discharge Date fields will be read-only; you will be able to edit the rest of the fields.
Copyright and Trademark Notice. Copyright © 2019 CompuGroup Medical, Inc. CGM®, CompuGroup Medical® and the CGM logo are registered trademarks and CGM webPRACTICE™ and CGM webTOOLS™ are trademarks of CompuGroup Medical AG in the United States and/or other countries. Any rights not expressly granted herein are reserved.
