Main Scheduling Screen


Main Scheduling Screen
Upon accessing Enter Patient Appointments, the main scheduling screen displays the default schedule view for the individual user as selected in Maintain Users. For information about setting a default view for a user from within the schedule, see Make Default View. You can also set Filters for your schedule view.


The Main Scheduling screen is comprised of the following sections. (Note that your schedule will look different depending on the scheduling view, default or filter that you have selected.)

1 - Action Column
The Action Column contains easy access to a variety of functions that you might need when entering patient appointments and viewing your schedule. For detailed information on each function, see Action Column Functions.

2 - Patient Information Section
This section is blank until an account has been selected with the Select Patient Action Column function. This section includes:


You can quickly access the Change Patient Data function by clicking anywhere within this Patient Information section. The Change Patient Data summary screen displays so you can verify and update the address, insurance or any other information stored on the patient's account. After you have finished reviewing and/or updating the patient's account, click Cancel on the summary screen to return to the Main Scheduling screen.


3 - Calendar and Type of Visit Toolbar
The current month's calendar displays on the left and the next month's calendar on the right. Click any date on the calendar to display the schedule for that date. The selected date or dates on the calendar display in a blue font surrounded by a gray square. You can change the month or year by using the drop-down list box above the calendar. There are also navigation icons directly below the calendar that offer additional functionality for changing the schedule displayed.


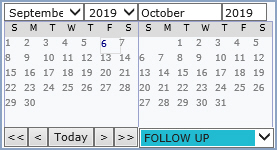
- Moves back one unit.

- Moves back two units.

- Displays the schedule for the current date.

- Moves forward one unit.

- Moves forward two units
The arrow icons automatically skip the dates that have no doctors scheduled, based on the current doctors/resources/filter currently selected. The unit value changes depending on the selected view. If one day is selected, the unit equals one day. If the 7-day view is selected, the unit equals one week and if the 30-day view is selected, the unit equals one month.

At the bottom of the calendar on the right is a drop-down list that displays all of the Types of Visit selected on appointments (in the Type of Visit field in the appointment detail) within the current schedule.

4 - Schedule Information and Schedule Views Tool bars
This section includes various information about the schedule for that day and several icons to access different views of the schedule. The doctor's name and doctor code display in bold font. The location name and location code also display. If you hover over an icon, a short description of that icon displays.


For information regarding the available scheduling views, see Scheduling Views.

The Units Sched displays the total number of units scheduled for the doctor for the day. The Unit Sched displays in red font to indicate when the Max Units Per Day for the Doctor has been exceeded.
 
Three additional icons are also provided on this tool bar:

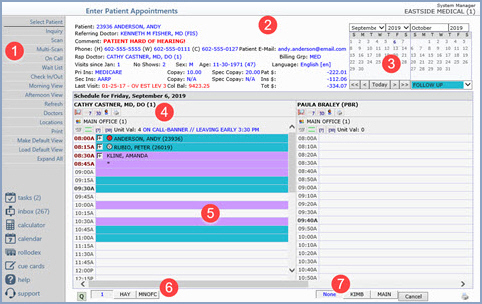
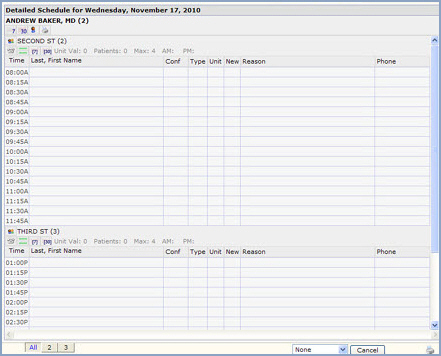
Print this schedule. This icon provides a shortcut to the Print Appointment Schedule function located in Schedule, Scheduling Printing Menu.

On Call Indicator. If the doctor is On Call, the telephone will be displayed in yellow. For information about setting the on call indicator, see the Edit Doctor Schedules function.

Maximum Appointment Indicator. This icon indicates whether the maximum number of appointments have been scheduled for this doctor. The maximum number of appointments allowed is set up using the Set Maximum Patient Loads function located in Schedule, Scheduling Table Maintenance, Doctor Code Integration Table, or the Edit Doctor Schedules function. After the maximum number of AM appointments has been reached the top bar will turn red; and after the maximum number of PM appointments has been reached, the bottom bar will turn red.


5 - Appointment Schedule
The Appointment Schedule section displays the name of the currently selected Location(s), Date(s), and Doctor(s) and all the time slots created within the schedule. Each time slot can contain: CGM webVERIFY Eligibility Status icon, the color for any Reserve code setup in the schedule, the names of any scheduled patients including the color for the Type of Visit code if one was selected, or an asterisk (*) which indicates a continuation of the previous appointment. If there are more time slots in the schedule than can be displayed on the screen, a scroll bar is provided.

CGM webVERIFY Eligibility Status icons: (CGM webVERIFY clients only)

Verification Failed - Red

Verification Passed - Green

Verification Outdated - Grey

Verification Partial - Yellow

Never Verified - Clear - denotes a policy that has never been verified. If you point to the icon, a ScreenTip will state either, 'Never Verified' or 'Never Verified. Carrier does not contain a CGM webVERIFY Identifier.' You can click the Status icon to check eligibility for the carrier

The status icon reflects the status of the specific result being viewed, not the current eligibility status for the policy.

 
You have the option to view the details of an appointment without accessing the appointment. You can expand and collapse the details of the appointment by clicking the PLUS SIGN (+) next to the patient's name to expand it or the MINUS SIGN (-) to collapse it. For additional information on selecting the appointment data you want to view, see Appointment Display Integration.

6 - Locations
The Location tabs indicate which Locations have schedules created for them for the date displayed, allowing you to quickly change schedules if needed. When a doctor is scheduled at more than one location, location tabs display at the bottom left of the schedule. Click the tabs to view the schedule for this doctor at one or All of the locations. The selected location tab displays in blue font.  When there are five or more locations to show on a schedule, the tabs change to a drop-down list.


If you select the All tab to view this doctor at all locations for this day, the schedules display vertically in time order, so depending on your window size and screen resolution, you may have to scroll down to see the second schedule. Note that this is true in any doctor schedule view any time the doctor is scheduled at multiple locations in one day.  


7 - Filters
The Filters tabs can be used if you have set up Schedule Filters. If there are four or more filters, the tabs change to a drop-down list.
 
Using Filters in the Schedule

All of your saved filters are viewable on the schedule in Enter Patient Appointments and Review Patient Appointments. The following rules apply when using filters in the schedule: