![]()

| Prompt | Response | Req | Len |
|---|---|---|---|
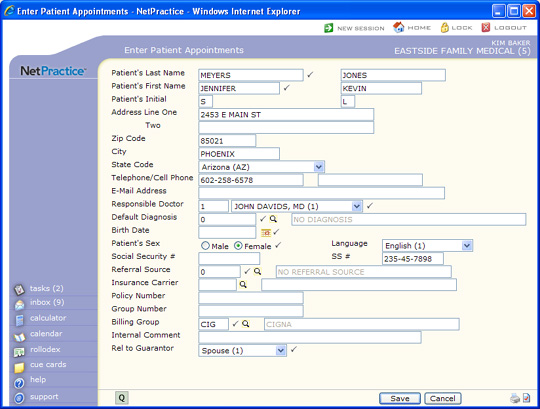
| Patient's Last Name | Displays the patient's last name you typed in Patient Look-up. You can edit this field if necessary. |  |
60 |
| Guarantor's Last Name | Guarantor's Last Name - This field is located to the right of the patient's Last Name field. Type the guarantor's last name. If you selected anything other than 'zero' for the Rel to Guarantor field, this field must be completed. | 60 | |
| Patient's Suffix | The patient's suffix may be up to 10 characters long. | 10 | |
| Guarantor's First Name | Guarantor's First Name - This field is located to the right of the patient's First Name field. Type the guarantor's first name. If you selected anything other than 'zero' for the Rel to Guarantor field, this field must be completed. | 10 | |
| Patient's First Name | Displays the patient's last name you typed in Patient Look-up. You can edit this field if necessary. | 35 | |
| Guarantor's First Name - This field is located to the right of the patient's First Name field. Type the guarantor's first name. If you selected anything other than 'zero' for the Rel to Guarantor field, this field must be completed. | 35 | ||
| Patient's Middle Name | Type the patient's middle name. | 10 | |
| Guarantor's Middle Initial - This field is located to the right of the patient's Middle Initial field. Type the guarantor's middle initial. If you selected anything other than 'zero' for the Rel to Guarantor field, this field must be completed. | 10 | ||
| Address Line One | Type the patient's address. | 35 | |
| Two | Type any additional address information. | 35 | |
| Zip Code | Type the five digit zip code or the zip-plus-four zip code. | 10 | |
| City | Type the city. | 15 | |
| State Code | In the State Code list, click the state you want. | 3 | |
| Telephone/Cell Phone | Type the patient's home telephone number in the first text box and their cell phone in the second text box. You can enter a phone number with or without the area code. If you do not enter an area code, CGM webPRACTICE will automatically use the default area code of the practice. You can also enter the phone number with or without dashes to separate the prefix and suffix of the telephone number. | 20 | |
| / | 20 | ||
| E-Mail Address | Type the patient's e-mail address. | 50 | |
| Responsible Doctor | In the Responsible Doctor text box, type the doctor you want or select from the Responsible Doctor list. | |
3 |
| Default Diagnosis | In the Default Diagnosis box, type the code you want or click the magnifying glass to search the table. | |
10 |
| Birth Date | In the Birth Date box, type the date you want or click the calendar icon to select a date. | |
10 |
| BD: | Type the guarantor's birth date in a MM-DD-CCYY format or click the calendar icon to select a date. | 10 | |
| Patient's Sex | For the Patient's Sex options, select the option you want. | |
1 |
| Language | Type the patient's nine-digit social security number with or without dashes. If the social security number has already been stored in another patient's account, CGM webPRACTICE will provide a warning message when you click Save. | 3 | |
| Social Security # | Type the patient's nine-digit social security number with or without dashes. If the social security number has already been stored in another patient's account, CGM webPRACTICE will provide a warning message when you click Save. | 11 | |
| SS # | Guarantor's SS Number - This field is located to the right of the patient's SS Number field. Type the guarantor's nine-digit social security number with or without dashes. If you selected anything other than 'zero' for the Rel to Guarantor field, this field must be completed. | 11 | |
| Referral Source | In the Referral Source box, type the code you want or click the magnifying glass to search the table. | |
6 |
| Insurance Carrier | In the Insurance Carrier box, type the patient's primary insurance code you want or click the magnifying glass to search the table. | 5 | |
| Policy Number | Type the patient's primary insurance
policy number.
If the Policy # Format field is completed in the Insurance Carrier table for this carrier, then the policy number entered here must match that format, otherwise an alert message displays. For more information, see Maintain Insurance Carriers. |
20 | |
| Group Number | Type the patient's primary insurance group number. | 50 | |
| Billing Group | In the Billing Group box, type the billing group code you want or click the magnifying glass to search the table. | |
3 |
| Internal Comment | Type any comments needed for this patient. This is a free-text field that will be displayed throughout CGM webPRACTICE whenever the patient's account is accessed using the Patient Look-up function. This comment does not print on any report. | 45 | |
| Rel to Guarantor | In the Rel to Guarantor list, click the relationship status of the patient to the guarantor. If you select anything other than 'zero' the Guarantor fields located to the right of the Patient fields must be completed. | |
1 |

|
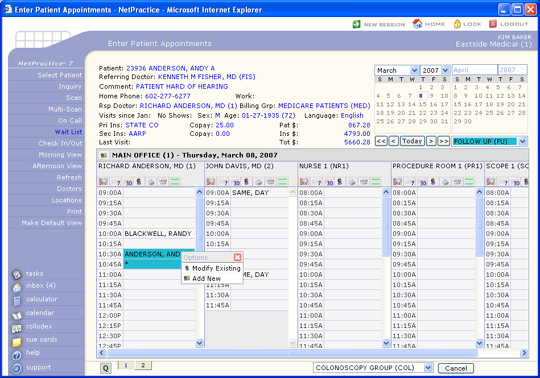
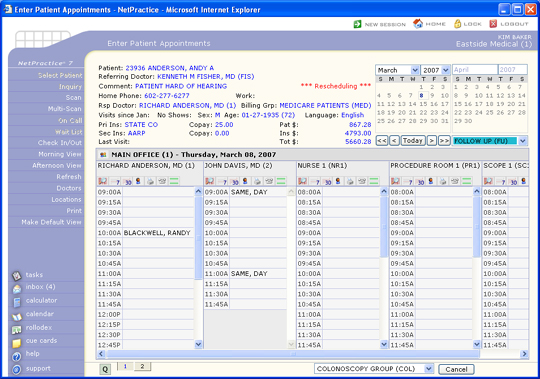
- The same appointment time is available for this day. |
|
- The same appointment time is not available for this day but other appointment times are available. |
|
- No appointment times are available for this day. |

Copyright and Trademark Notice. Copyright © 2019 CompuGroup Medical, Inc. CGM®, CompuGroup Medical® and the CGM logo are registered trademarks and CGM webPRACTICE™ and CGM webTOOLS™ are trademarks of CompuGroup Medical AG in the United States and/or other countries. Any rights not expressly granted herein are reserved.


