Enter Patient Appointments


The Enter Patient Appointments function provides the following functions necessary for viewing, creating, editing, and processing patient appointments:
The Scheduling for Family or Linking Billing Types section describes the differences in this function if your practice uses the Family or Linking Billing Types as set up in CGM webPRACTICE Integration Options.

Main Scheduling Screen
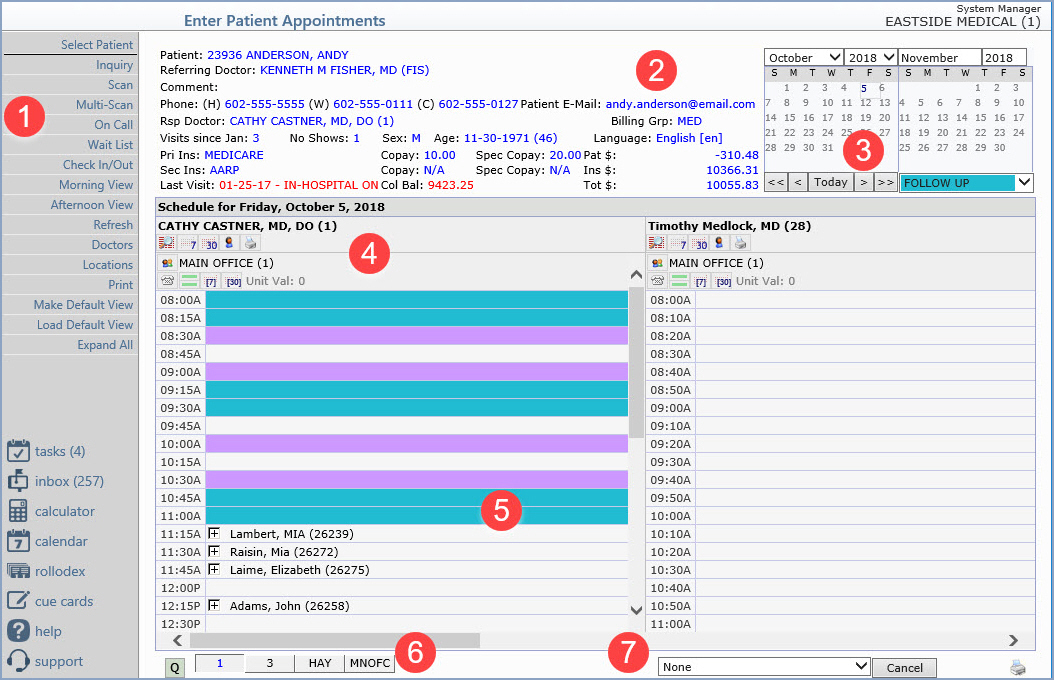
Upon accessing Enter Patient Appointments, the main scheduling screen displays the default schedule view for the individual user as selected in Maintain Users. For information about setting a default view for a user from within the schedule, see Make Default View. You can also set Filters for your schedule view.


The Main Scheduling screen is comprised of the following sections. (Note that your schedule will look different depending on the scheduling view, default or filter that you have selected.)

1 - Action Column
The Action Column contains easy access to a variety of functions that you might need when entering patient appointments and viewing your schedule. For detailed information on each function, see the individual links within this help section.

2 - Patient Information Section
This section is blank until an account has been selected with the Select Patient Action Column function. This section includes:
3 - Calendar and Type of Visit Toolbar
The current month's calendar displays on the left and the next month's calendar on the right. Click any date on the calendar to display the schedule for that date. The selected date or dates on the calendar display in a blue font surrounded by a gray square. You can change the month or year by using the drop-down list box above the calendar. There are also navigation icons directly below the calendar that offer additional functionality for changing the schedule displayed.

- Moves back one unit.

- Moves back two units.

- Displays the schedule for the current date.

- Moves forward one unit.

- Moves forward two units
The arrow icons automatically skip the dates that have no doctors scheduled, based on the current doctors/resources/filter currently selected. The unit value changes depending on the selected view. If one day is selected, the unit equals one day. If the 7-day view is selected, the unit equals one week and if the 30-day view is selected, the unit equals one month.

At the bottom of the calendar on the right is a drop-down list that displays all of the Types of Visit selected on appointments (in the Type of Visit field in the appointment detail) within the current schedule.

4 - Schedule Information and Schedule Views Toolbars
This section includes various information about the schedule for that day and several icons to access different views of the schedule. The doctor's name and doctor code display in bold font. The location name and location code also display. If you hover over an icon, a short description of that icon displays.


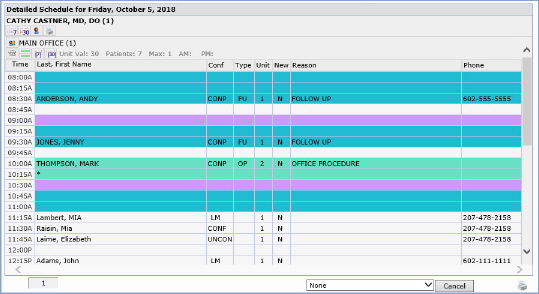
One Doctor/One Day - This view of the schedule shows all of the appointments, including the detailed appointment information, for the selected doctor, day and location.


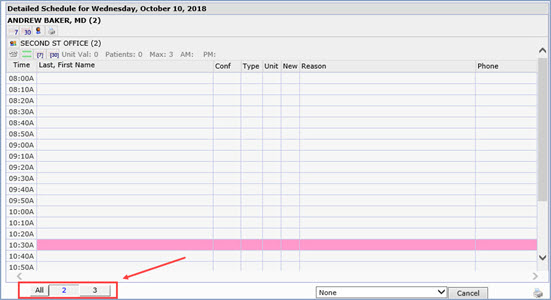
When a doctor is scheduled at more than one location, location tabs display at the bottom left of the schedule. Click the tabs to view the schedule for this doctor at one or All of the locations. The selected location tab displays in blue font. In this example, on Wednesday's, Dr. Baker is scheduled at Location 2 in the morning and at Location 3 in the afternoon. When there are five or more locations to show on a schedule, the tabs change to a drop-down list.

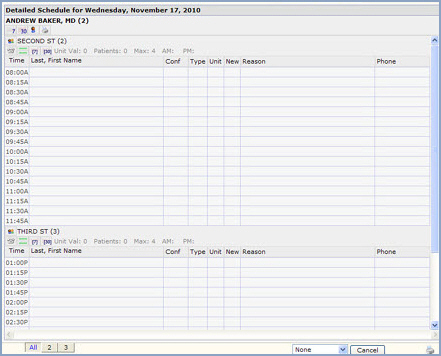
If you select the All tab to view this doctor at all locations for this day, the schedules display vertically in time order, so depending on your window size and screen resolution, you may have to scroll down to see the second schedule. Note that this is true in any doctor schedule view any time the doctor is scheduled at multiple locations in one day. To continue this example, Location 2 is at the top for the morning and you must use the scroll bar to scroll down to see Location 3 for the afternoon times.


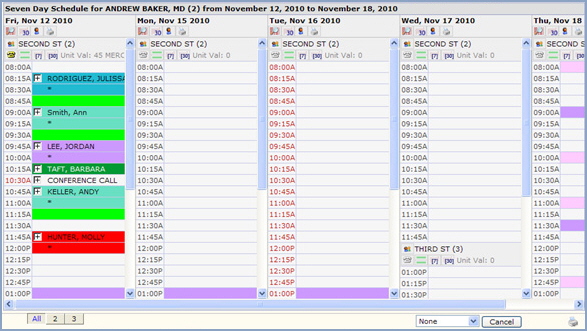
One Doctor/Week-at-a-Glance - This view of the schedule shows appointments for the next seven calendar days, for the selected doctor and location. To continue the example, note the multiple location tabs and the two locations on Wednesday's schedule.


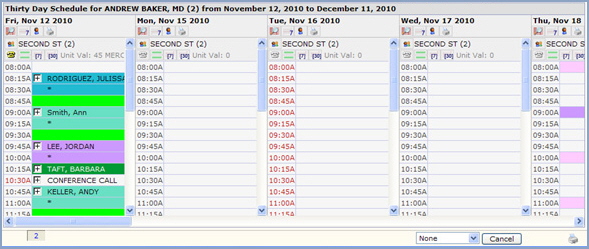
One Doctor/Month-at-a-Glance - This view of the schedule shows appointments for the next thirty days, for the selected doctor and location.


For information regarding the available scheduling views, see Scheduling Views.
Three additional icons are also provided on this toolbar:

Print this schedule. This icon provides a shortcut to the Print Appointment Schedule function located in Schedule, Scheduling Printing Menu.

On Call Indicator. If the doctor is On Call, the telephone will be displayed in yellow. For information about setting the on call indicator, see the Edit Doctor Schedules function.
   

Maximum Appointment Indicator. This icon indicates whether the maximum number of appointments have been scheduled for this doctor. The maximum number of appointments allowed is set up using the Set Maximum Patient Loads function located in Schedule, Scheduling Table Maintenance, Doctor Code Integration Table, or the Edit Doctor Schedules function. After the maximum number of AM appointments has been reached the top bar will turn red; and after the maximum number of PM appointments has been reached, the bottom bar will turn red.


5 - Appointment Schedule
The Appointment Schedule section displays the name of the currently selected Location(s), Date(s), and Doctor(s) and all the time slots created within the schedule. Each time slot can contain: the color for any Reserve code setup in the schedule, the names of any scheduled patients including the color for the Type of Visit code if one was selected, or an asterisk (*) which indicates a continuation of the previous appointment. If there are more time slots in the schedule than can be displayed on the screen, a scroll bar is provided.

6 - Locations
The Location tabs indicate which Locations have schedules created for them for the date displayed, allowing you to quickly change schedules if needed. If there are five or more locations on a schedule, the tabs change to a drop-down list.

7 - Filters
The Filters tabs can be used if you have set up Schedule Filters. If there are four or more filters, the tabs change to a drop-down list.
 
Using Filters in the Schedule

All of your saved filters are viewable on the schedule in Enter Patient Appointments and Review Patient Appointments. The following rules apply when using filters in the schedule:

Scheduling Views
There are five options available for displaying schedules. The views are represented by a different icon displayed immediately above each schedule. You can change views by clicking on the icon in the Scheduling Views Toolbar. The various views are:

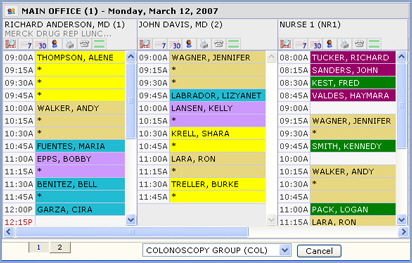
All Doctors/One Day - This is the most commonly used view. Each Doctor's schedule for the selected date and location will be shown in a separate column. If there are numerous schedules to be displayed, a scroll bar will be provided at the bottom of the screen to view the additional schedules. If you hover the pointer over the name of any scheduled patient, the Reason for the Visit will display if one was entered.


One Doctor all Locations - This view of the schedule will show all the appointments for every location for a specific doctor on a specific day. If you hover over the name of any scheduled patient, the Reason for the Visit will display if one was entered.


Action Column Functions

Select Patient
With the Select Patient function you can select the patient account you need to schedule an appointment.

New Patients
To add an appointment for a new patient, click Select Patient in the Action Column or click the time slot you want to schedule the appointment in. When the Enter Patient Appointments patient look-up screen displays, type the patient's last and first name. If you are sure they don't already exist in the database, click New in the Action Column.

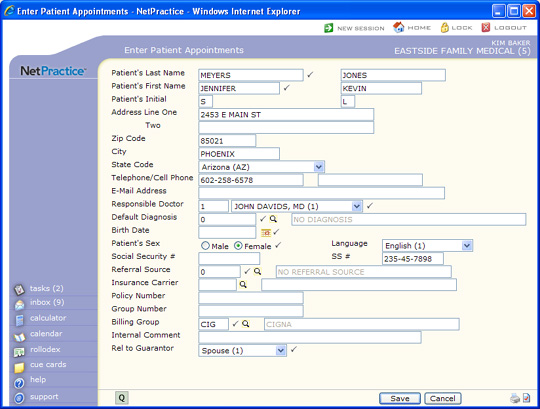
If your practice has selected to Quick-Register ('Quick-Reg') patients, the Enter Patient Appointments quick-register screen displays. (You can Quick-Reg patients if you have selected the Register option in the Scheduling System Integration.) You must complete the necessary fields prior to entering the patient's appointment so CGM webPRACTICE can check to see if the Social Security Number (SSN) you entered has already been registered for another patient and prevent duplicate patient accounts from getting registered. (If the SSN exists in the database, a message will display so you can choose whether see a list of the existing accounts with that SSN or you can choose to register the account anyway.) This function requires the minimum amount of patient information to quicky register a new patient. You can choose to Quick-Reg your patients through scheduling so you can take advantage of the full functionality available in the Patient Check In/Out function when processing patients through your office.

Data Field Information
Prompt Response Req Len
Patient's Last Name Displays the patient's last name you typed in Patient Look-up. You can edit this field if necessary. 60
Guarantor's Last Name Guarantor's Last Name - This field is located to the right of the patient's Last Name field. Type the guarantor's last name. If you selected anything other than 'zero' for the Rel to Guarantor field, this field must be completed.   60
Patient's Suffix The patient's suffix may be up to 10 characters long.   10
Guarantor's First Name Guarantor's First Name - This field is located to the right of the patient's First Name field. Type the guarantor's first name. If you selected anything other than 'zero' for the Rel to Guarantor field, this field must be completed.   10
Patient's First Name Displays the patient's last name you typed in Patient Look-up. You can edit this field if necessary.   35
  Guarantor's First Name - This field is located to the right of the patient's First Name field. Type the guarantor's first name. If you selected anything other than 'zero' for the Rel to Guarantor field, this field must be completed.   35
Patient's Middle Name Type the patient's middle name.   10
  Guarantor's Middle Initial - This field is located to the right of the patient's Middle Initial field. Type the guarantor's middle initial. If you selected anything other than 'zero' for the Rel to Guarantor field, this field must be completed.   10
Address Line One Type the patient's address.   35
Two Type any additional address information.   35
Zip Code Type the five digit zip code or the zip-plus-four zip code.   10
City Type the city.   15
State Code In the State Code list, click the state you want.   3
Telephone/Cell Phone Type the patient's home telephone number in the first text box and their cell phone in the second text box. You can enter a phone number with or without the area code. If you do not enter an area code, CGM webPRACTICE will automatically use the default area code of the practice. You can also enter the phone number with or without dashes to separate the prefix and suffix of the telephone number.   20
/     20
E-Mail Address Type the patient's e-mail address.   50
Responsible Doctor In the Responsible Doctor text box, type the doctor you want or select from the Responsible Doctor list. 3
Default Diagnosis In the Default Diagnosis box, type the code you want or click the magnifying glass to search the table. 10
Birth Date In the Birth Date box, type the date you want or click the calendar icon to select a date. 10
BD: Type the guarantor's birth date in a MM-DD-CCYY format or click the calendar icon to select a date.   10
Patient's Sex For the Patient's Sex options, select the option you want. 1
Language Type the patient's nine-digit social security number with or without dashes. If the social security number has already been stored in another patient's account, CGM webPRACTICE will provide a warning message when you click Save.   3
Social Security # Type the patient's nine-digit social security number with or without dashes. If the social security number has already been stored in another patient's account, CGM webPRACTICE will provide a warning message when you click Save.   11
SS # Guarantor's SS Number - This field is located to the right of the patient's SS Number field. Type the guarantor's nine-digit social security number with or without dashes. If you selected anything other than 'zero' for the Rel to Guarantor field, this field must be completed.   11
Referral Source In the Referral Source box, type the code you want or click the magnifying glass to search the table. 6
Insurance Carrier In the Insurance Carrier box, type the patient's primary insurance code you want or click the magnifying glass to search the table.   5
Policy Number Type the patient's primary insurance policy number.
 
If the Policy # Format field is completed in the Insurance Carrier table for this carrier, then the policy number entered here must match that format, otherwise an alert message displays. For more information, see Maintain Insurance Carriers.
  20
Group Number Type the patient's primary insurance group number.   50
Billing Group In the Billing Group box, type the billing group code you want or click the magnifying glass to search the table. 3
Internal Comment Type any comments needed for this patient. This is a free-text field that will be displayed throughout CGM webPRACTICE whenever the patient's account is accessed using the Patient Look-up function. This comment does not print on any report.   45
Rel to Guarantor In the Rel to Guarantor list, click the relationship status of the patient to the guarantor. If you select anything other than 'zero' the Guarantor fields located to the right of the Patient fields must be completed. 1

If the New Patient E-mail check box has been selected in the E-mail Integration function along with completing the other new patient e-mail fields, CGM webPRACTICE will automatically send the patient an e-mail after you have saved their account information. For additional information on sending new patient e-mails, see Patient Registration and E-mail Integration.

If your practice has selected to Pre-Register patients in the Scheduling System Integration, the Enter Patient Appointments main scheduling screen displays and you can proceed with selecting the time slot and entering the patient's appointment information. After you have saved the patient's appointment information, the Pre-Registration screen will display for you to complete the necessary patient demographic information. For detailed information on pre-registering patients, see Add a Patient Referral.

For detailed information on entering patient appointments, see the Entering an Appointment section.

Inquiry
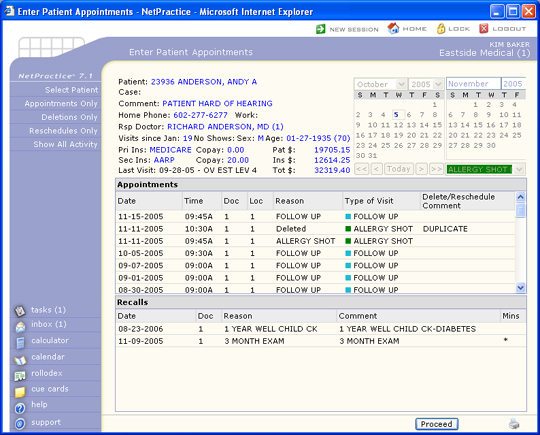
You can view appointment activity for a patient using the Inquiry function. It will provide a list of past, future, deleted, and rescheduled appointments and recalls stored on a patient's account by clicking Inquiry in the Action Column on the Main Scheduling Window. You will first need to select the patient using the Inquiry Patient Look-up function.

Inquiry Patient Look-up
When the Appointment Inquiry screen displays, it lists the most recent appointments first. NOTE: The Delete/Reschedule Comment column contains the comment entered when the appointment was rescheduled or deleted. If the appointment was deleted from Edit Doctor Schedules function, 'Deleted Through Doctor Edit' appears in this column.

You can access the Appointment Details for any appointment listed in the Appointment Inquiry screen. To select an appointment, click anywhere in the row containing the appointment information. For information on the data contained in the Appointment Details screen, see Details

If the patient has any recalls that are stored for the "current date plus 30 days prior" or any future recalls, they will be listed in the Recall section in the bottom portion of the Inquiry screen. You can select a recall and Delete it or Mark a Recall as Worked. The purpose of marking a recall as 'worked' indicates the patient has already made an appointment and the recall should be closed. When a recall is 'closed' it will no longer be included in the recall list to print a recall card or letter. To select a recall, click anywhere in the row containing the recall information.

Inquiry Action Column Functions:
Note: CGM webPRACTICE will display ***Patient is in Wait List*** in the Appointments area if the patient is currently on the Wait List.


Scan
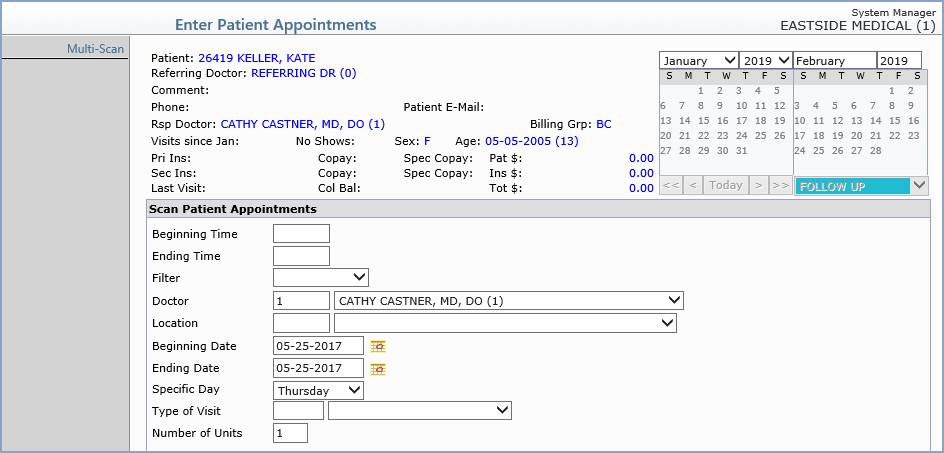
You can search for any available appointment time slots based on multiple criteria using the Scan function in the Action Column. The scan function will be inactive until you 'select' a patient account. You can also scan for appointments based on Schedule Filters and after you select a filter, you can additionally select a specific Doctor or Location stored in that filter.
 
Note: If you select a Filter that was created for a specific location, or if the Preserve Location check box was selected when the Filter was created, the Location field will be automatically populated and you will not be able to change it when scanning.


Data Field Information
Prompt Response Req Len

Beginning Time

Type the time you want followed by 'A' for A.M. or 'P' for P.M. For example, 08:00A. If you do not type the 'A' or 'P' after the time, one of them will automatically default based on the 'most common usage' for the time selected.   6
Ending Time Type the time you want followed by 'A' for A.M. or 'P' for P.M. For example, 08:00A. If you do not type the 'A' or 'P' after the time, one of them will automatically default based on the 'most common usage' for the time selected.   6

Filter

If you want to filter the scan results, select the filter you want from the list.   6
Doctor Type the doctor code you want, select from the list or leave the field black to include all codes.
 
This field will provide an ‘auto-complete’ list. When you start typing the name or code you want, any matching values will appear in a list below the text box. If you type a code, you can press TAB and the code will populate in the text box. If you type a name or description of a code, you can use the down arrow or mouse to highlight the code and then press TAB to populate the text box.
 
If you select a doctor code and that doctor has reached the specified maximum patient load for the morning, afternoon, or entire day, any appointment time slots during those times will be ignored during the scan.
 
If you select a doctor code that does not have the Scan this Doctor field selected in the Maintain Doctor Integration Codes function, the scan function will ignore the doctor code.
  4
Location Type the location code you want, select from the list or leave the field black to include all codes.
 
This field will provide an ‘auto-complete’ list. When you start typing the name or code you want, any matching values will appear in a list below the text box. If you type a code, you can press TAB and the code will populate in the text box. If you type a name or description of a code, you can use the down arrow or mouse to highlight the code and then press TAB to populate the text box.
  3
Beginning Date Type the date or click the calendar icon to select the date you want to start scanning the schedule.   10
Ending Date Type the date or click the calendar icon to select the date you want to stop scanning the schedule.   10
Specific Day If you need to scan for an appointment on a specific day, select the day you want from the list.   9
Type of Visit If you want to scan for a specific type of visit that has been set up as a reserve appointment, or for a type of visit scanning group set up as reserve appointments for multiple type of visit codes, type the code you want or select from the list. You can leave the field blank to include all codes. Type of Visit Scanning Group codes will display at the bottom of the list.
 
This field will provide an ‘auto-complete’ list. When you start typing the name or code you want, any matching values will appear in a list below the text box. If you type a code, you can press TAB and the code will populate in the text box. If you type a name or description of a code, you can use the down arrow or mouse to highlight the code and then press TAB to populate the text box.
 
Note: The auto-complete functionality does not display Type of Visit Scanning Group Codes.
 

3

Number of Units Type the number of units you want for the appointment.  

3


You can also access the Multi-Scan function in the Action Column if you need to switch functions and perform a scan for multiple resources. For information on scanning for multiple resources, see Multi-Scan.

A list of available appointments that meet the criteria will be displayed. The available reserve appointments will display in the Reserves column and the maximum number of units per appointment time and number of units already scheduled will display in the Units/Used column. Click anywhere in the row of an available appointment time with multiple reserves to proceed with scheduling the appointment. If you want to modify the criteria for the scan and perform a new scan, click Cancel to return to the scan screen.


After selecting the appointment time, the available reserve appointments will display. Click anywhere in the row of the reserve appointment to proceed with scheduling the appointment.


Multi-Scan
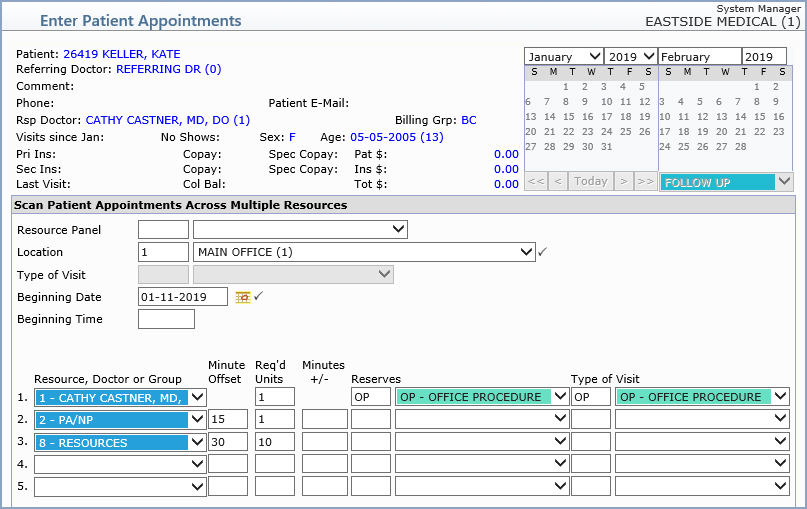
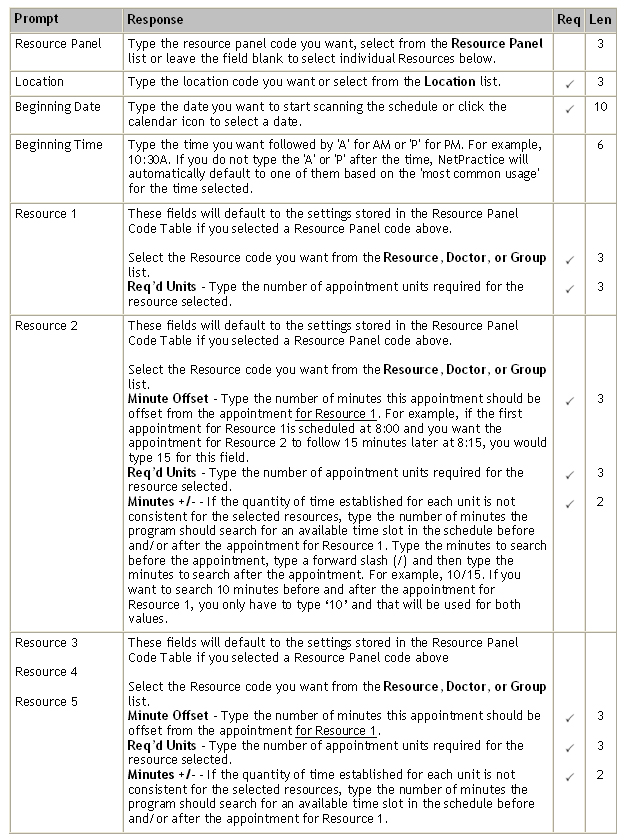
The Multi-Scan function is used in conjunction with Resource Panel Scheduling and allows you to scan for multiple resources at one time and then book the appointments for each resource simultaneously. The multi-scan function will be inactive until you 'select' a patient account.


Data Field Information

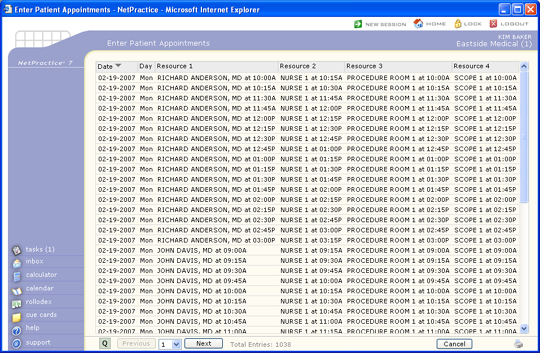
A list of available appointments that meet the criteria will be displayed. You can select an appointment and proceed with scheduling the resource panel. To select an appointment, click anywhere in the row containing the appointment information. If you want to modify the criteria for the multi-scan and perform a new multi-scan, click Cancel to return to the multi-scan screen.

On Call
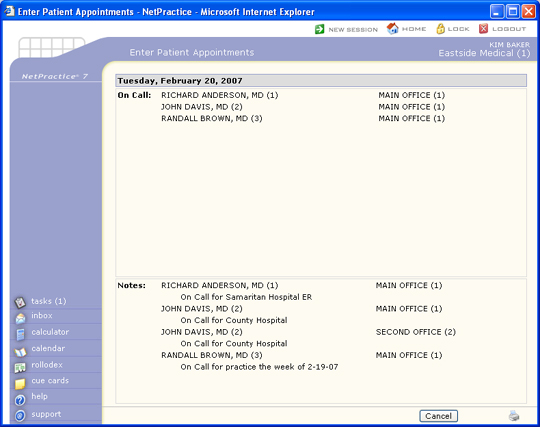
You can quickly view every doctor that is currently on call and any associated notes for the date displayed in the Main Scheduling Window, using the On Call function in the Action Column. For information on setting up the schedule to indicate when a doctor is on call or adding notes to a schedule, see Indicate On Call Status located in the Edit Doctor Schedules Help section.

Wait List
You can use the Wait List to keep track of patients that want to be notified if any cancellations occur so they can be seen sooner than their scheduled appointment time. The Wait List is also used to store the detailed patient appointment information whenever you Delete or Block time in the doctor's schedule. This prevents the loss of patient appointment information and saves you the labor-intensive task of having to re-enter all the information when rescheduling the appointments.

To assist you in processing the patients in the Wait List, CGM webPRACTICE will automatically inform you 'There are patients in the Wait List for this date' whenever you Delete or Reschedule an appointment and the Wait List contains patients for that same date.

Whenever you use the Select Patient function prior to scheduling a patient appointment and select a patient that is currently in the Wait List, the text for the Wait List function will change to a blue font color in the Action Column. This allows you to quickly access the Wait List and schedule the appointment using the information already stored in the Wait List.

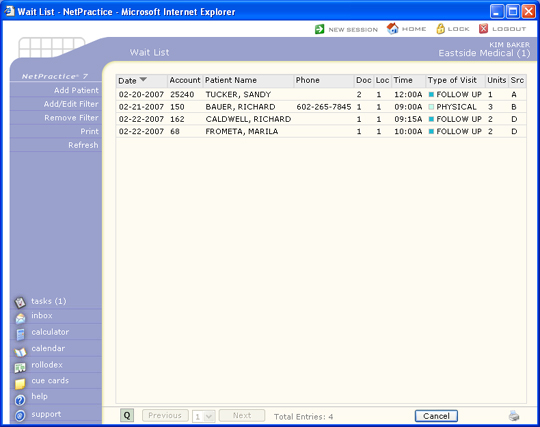
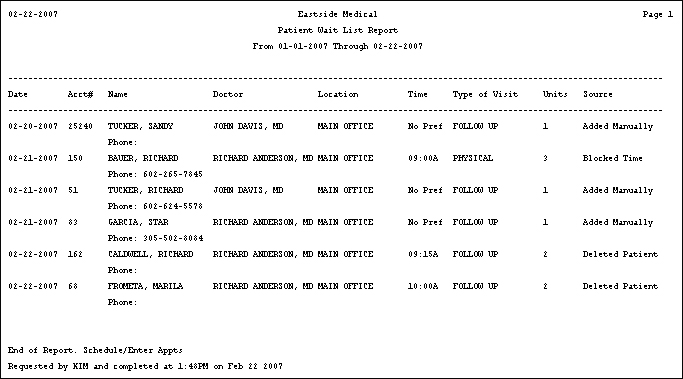
To access the Wait List, click Wait List in the Action Column on the Main Scheduling Window. Upon accessing this function, CGM webPRACTICE will display the Wait List Summary Screen listing all the patients currently stored in the Wait List using the current Filter settings. The information displayed includes; the date, patient account number, patient name, phone number (from the Patient Name and Address Information screen; if that is blank, then the phone number stored on the appointment), preferred doctor, preferred location, preferred time, type of visit, number of units, and the source of the appointment information.

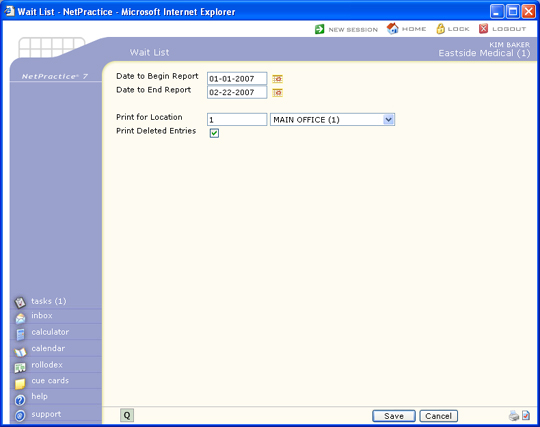
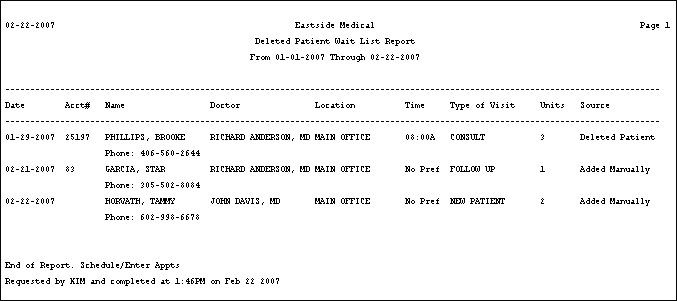
There are three different methods used to store patient appointment information in the Wait List. The source of the patient appointment information is indicated in the Source column (Src). Entries added to the Wait List by clicking the Add to Wait List Action Column function from within a specific appointment, will move off of the Wait List after the appointment date has passed for that specific appointment. All other entries added to the Wait List (not from within a specific appointment, but through the Move Patients to Wait List options when you edit a doctor's schedule, for example) will move off of the Wait List after the appointment has met the number of days stored in the Days for Wait List field in the Scheduling System Integration. After this time CGM webPRACTICE will automatically delete them from the Wait List and transfer the patient's appointment information to a file for deleted Wait List appointments. You can print a report of the deleted entries using the Print function in the Action Column. For information on printing the Wait List report, see the Print section below.

If a patient appointment is added to the Wait List that was originally scheduled using a Resource Panel, all the appointments for the various Resources will also be added to the Wait List.

If a patient appointment has been added to the Wait List and their account is inactivated, CGM webPRACTICE will automatically move that patient to the deleted Wait List file.

The following functions are available in the Action Column when the Wait List Summary Screen is displayed:
To access a Wait List entry to schedule an appointment, edit the appointment information, or delete the entry, you must first select a patient. To select a patient, click anywhere in the row containing the patient information.

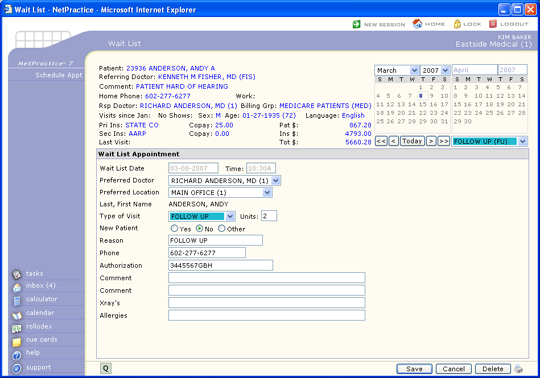
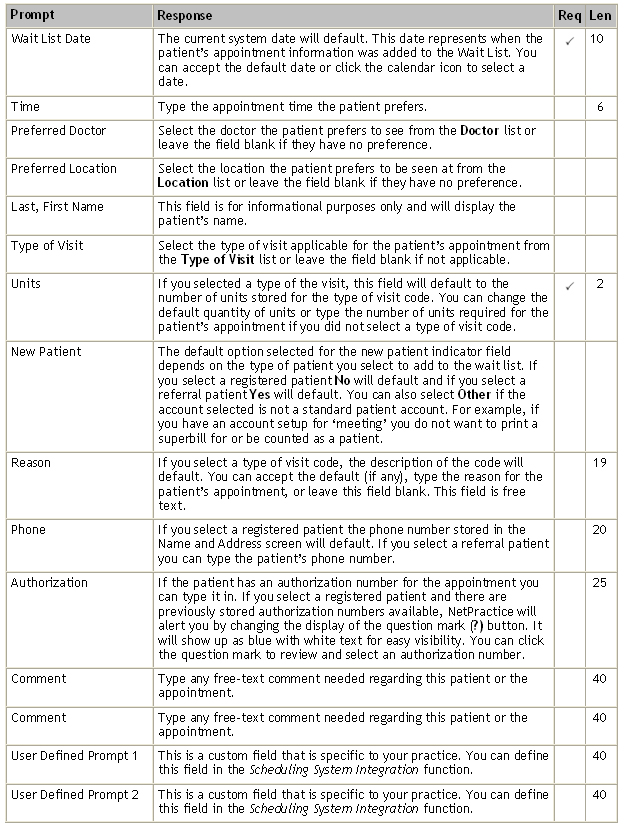
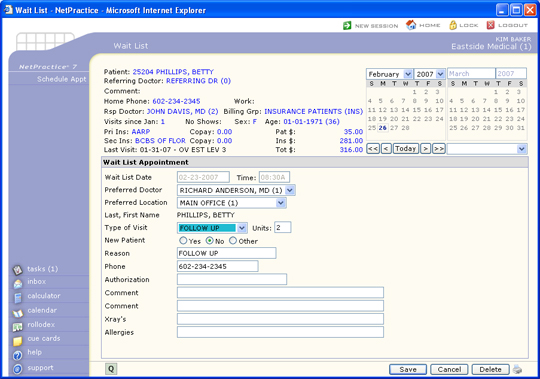
After selecting a patient, the Wait List Appointment Screen will display the detailed appointment information. For information on each of the fields, see the Add Patient section above.

You can perform the following functions after you select a patient from the Wait List Summary Screen:


Check In/Out
You can quickly access the Patient Check In/Out function by clicking Check In/Out in the Action Column. For information on the various functions available in Patient Check In/Out, see Patient Check In/Out.

Morning View
You can change the schedule view to display starting with the morning appointments by clicking Morning View in the Action Column instead of using the scroll bar to the right of the schedule to navigate back to the top of the schedule. You can still view the afternoon appointments but you will have to scroll down because the schedule view is going to list the morning appointments first.

After you select to display the Morning View, this view will continue to display as you work within the Enter Patient Appointments function.

Afternoon View
You can change the schedule view to display starting with the afternoon appointments by clicking Afternoon View in the Action Column instead of using the scroll bar to the right of the schedule to navigate down the schedule.

After you select to display the Afternoon View, this view will continue to display as you work within the Enter Patient Appointments function. The view will revert back to the default morning view automatically when you 'Cancel' out of the schedule and return to the menus.

Refresh
In larger offices, you may have several staff members using scheduling and the patients contained in the schedule will be changing constantly. You can click Refresh in the Action Column to redisplay the screen with the most current and updated information.

Doctors
If you want to view a schedule for a doctor that is not currently displayed in the Main Scheduling window you can select a different doctor by clicking Doctors in the Action Column. A complete listing of the doctor codes will display for you to select another doctor.

Locations
If you want to view a schedule for a location that is not currently displayed in the Main Scheduling window you can select a different location by clicking Locations in the Action Column. A complete listing of the location codes will display for you to select another location.

Print
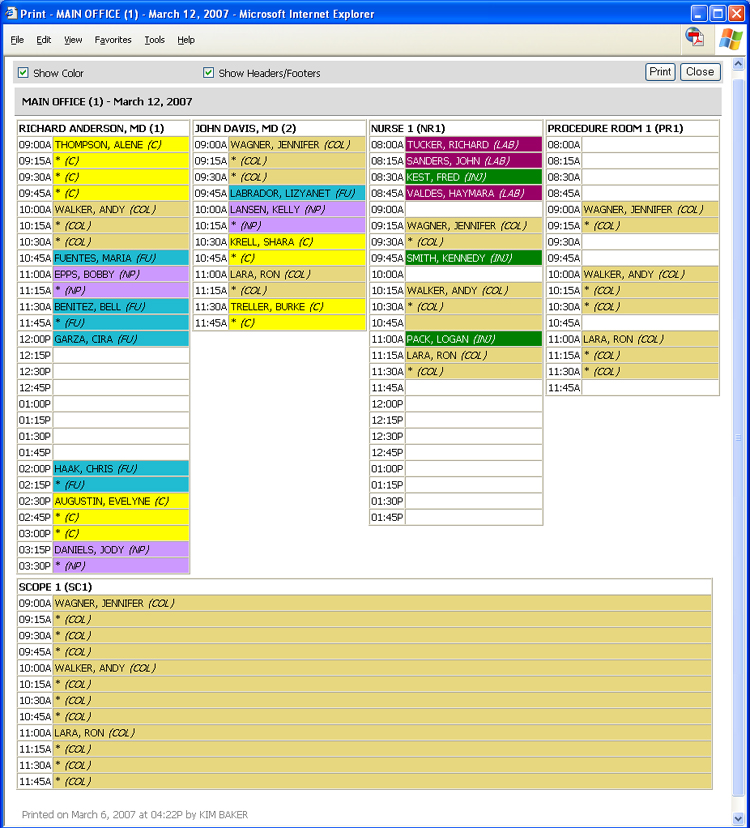
You can print the various Scheduling Views as they are displayed in CGM webPRACTICE using the Print function in the Action Column. The scheduling views for All Doctors/One Day and One Doctor/One Day will also print any Notes entered for the schedule.

Upon accessing this function you will first need to select if you want to Show Color and Show Headers/Footers in the top section of the screen and then click Print. The Type of Visit code for each appointment will print to the right of each patient's name and in any consecutive time slots for the appointment.

Note: This function is not available for the One Doctor/Month-at-a-Glance scheduling view. If you plan to print the Scheduling View in color, you must turn on background color printing in Internet Explorer (IE) first. To do this: from the IE menu bar, click Tools, select Internet Options, click on the Advanced tab, scroll down to the Printing section and select the Print background colors and images, click OK.

Make Default View
You can store an individual default view of the schedule for each CGM webPRACTICE User code in the 'Scheduling Default' fields in Maintain Users. Each time the you access the Enter Patient Appointments function, the default view selected in Maintain Users automatically displays. But if, for example, the front office staff located at the remote office wants to see only the doctors available for their location, they can change their current view of the schedule to display only the doctors that have schedules at the remote office and then click Make Default View to hold all of the settings. You can change and make new 'default' views as many times as you want and that view will hold until a different default view is made, even when you exit and re-enter the schedule. To display the last default view stored with the Make Default View function, click the Load Default View Action Column function.

Load Default View
Click Load Default View to display the schedule view that you last selected in the Make Default View function. Any time you change schedule views, you can click Load Default View to return to that view. NOTE: The default view loaded here is not the default view selected in Maintain Users; rather it's the view that you stored by clicking the Make Default View function.


Managing Patient Appointments
When you are processing patient appointments within a selected schedule, CGM webPRACTICE will automatically check the following criteria to make sure the schedules are maintained based on the information you entered when performing the Scheduling Setup Process.


Entering an Appointment
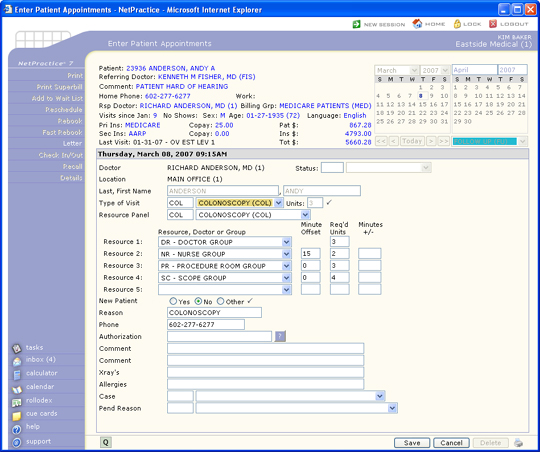
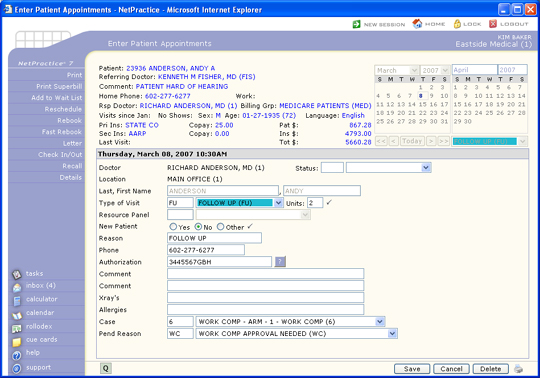
After you have selected a patient using the Select Patient function or clicking on a time slot and then selecting a patient, if no restrictions were encountered by CGM webPRACTICE the Patient Appointment Screen will be displayed. Complete the fields to enter the information required to schedule the appointment.

After you click Save, if the type of visit selected has a room attached to it in the Type of Visit Table CGM webPRACTICE will check if the room is available for the time slot selected. If another person is currently scheduling the room or if the room is not scheduled for either the database, location, date, or time slot selected, you will receive a message informing you of the status of the room. The room must have a schedule created for it before appointments can be added to the room.

If you click Cancel, you will receive the message, 'This appointment has not been saved. Are you sure you want to cancel?' If you click OK, the appointment will not be saved.

NOTE: For clients with interfaces between CGM webPRACTICE and other software: After these appointment details are sent from CGM webPRACTICE to the other software, depending on the interface, the information in the Case and Authorization fields may not come back across the interface into CGM webPRACTICE from the other software company.

Appointment Status
To review or change a patient's appointment status, click on the patient's name in the schedule in the Main Scheduling Window.

When the Appointment Screen is displayed, the status is displayed to the right of the Doctor's name. You may change a status by clicking on the drop down arrow, choosing another status and clicking Save.

For example: to confirm an appointment, click on the patient's name in the schedule in the Main Scheduling Window. Click the arrow on the Status field. Select Confirmed in the list of available status codes.

If your practice subscribes to CGM CONNECTION, the appointment confirmation status can be automatically updated based on the call results. To take advantage of this feature, complete the Confirmation fields in the CGM CONNECTION Integration function.

Authorization Lookup
The Authorization Lookup function gives you access to a patient's authorization record. From the authorization screen you can add, change, or delete authorization information. The patient selected must be a registered patient to gain access to this function. If you need to change authorization information entered for a pre-registered patient you need to go to Schedule, Patient Referral/Pre-registration.

To access patient authorizations, click on the patient's name in the schedule in the Main Scheduling Window. When the Appointment Screen is displayed, click the Question Mark icon next to the Authorization field. If there are available authorizations on the account the Question Mark icon will be blue; if not, it will be white.

If the patient account does not contain any stored authorizations, the Maintain Authorization screen will immediately display containing blank data fields for entering a new authorization record.

If there are any previously stored authorizations on the patient account, the Authorization Summary screen will list them, starting with the most recent. You can attach the authorization number to the appointment and return to the appointment details screen by selecting it. To select an authorization, click anywhere in the row containing the authorization information. If you select an expired authorization, a message will display to inform you.

The Visits used is based on number of visits (dates of service) posted in CGM webPRACTICE using this authorization number. The Pending visits indicates the number of appointments scheduled in the future linked to this authorization number. If the appointment is scheduled for a Resource, it will not be included in the total.

Resource Panel Scheduling
The Resource Panel Scheduling function eliminates the need to schedule multiple appointments individually. Prior to using this function, Resouce Panel Codes need to be created using the Maintain Resource Panel Codes located in Schedule, Scheduling Table Maintenance, Resource Panel Table.

Modify an Appointment
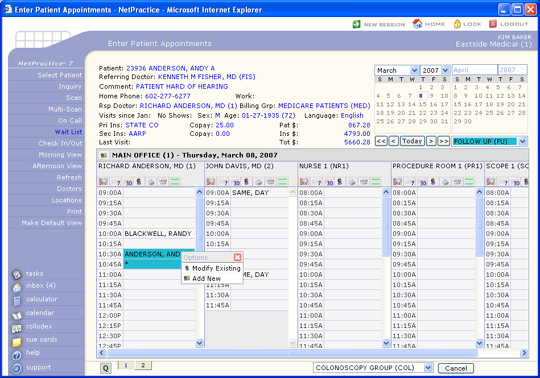
To change a patient appointment, select the patient in the Main Scheduling Window. Select Modify Existing when the pop-up box appears.

When the Appointment Screen is displayed, the appointment information may be edited by clicking in any field and typing over the existing information.

If there is a room scheduled along with this appointment, CGM webPRACTICE will update the room with the revised information. If the original type of visit did NOT have a room attached to it, and you change the type of visit to one that DOES have a room, CGM webPRACTICE will update the room with the appointment information. CGM webPRACTICE will also delete a room visit if you change the type of visit to one that does not have a room attached to it.

If this appointment is for a registered patient, you will not be allowed to change either the last name or the first name. The patient's name must be changed through the Patient, Change Patient Data function. A change to the name in Change Patient Data will automatically update the name in the schedule for all appointments this patient has.

NOTE: If you change the Type of Visit, the Units field and the Reason fields do not change; they stay the same as the original appointment. You must manually change the number of units and the reason, if necessary.

Delete an Appointment
To delete a patient appointment, click on the patient's name in the schedule in the Main Scheduling Window.

When the Appointment Screen is displayed, you may delete the appointment by clicking on Delete. CGM webPRACTICE will prompt you to enter a reason for the deletion. Once the reason is entered, click Save. The appointment is now deleted.

If this appointment also has a room appointment, CGM webPRACTICE will automatically delete the room appointment as well. If this patient was a new patient, and pre-registering new patients was chosen, the referral will also be deleted.

Print
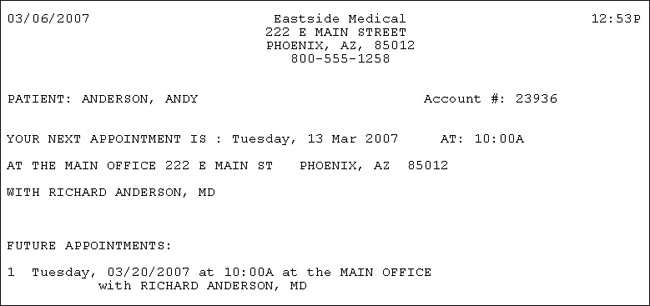
You can print a reminder for the patient's next scheduled appointment using the Print function in the Action Column. It prints all appointments if there are multiple appointments scheduled the same day. The reminder also prints a Future Appointments section listing any additional appointments the patient may have scheduled in the future.

Print Superbill
To print a patient's superbill, click on the patient's name in the schedule in the Main Scheduling Window.

When the Appointment Screen is displayed, click Print Superbill in the Action Column. Select the superbill document you want to print. If numbered superbills are used, this function will reprint the superbill. If this superbill is for a walk-in patient that didn't have a superbill printed and your office uses numbered superbills, CGM webPRACTICE will automatically assign the next available superbill number.

Add to Wait List
You can quickly add the currently selected patient appointment to the Wait List manually by clicking Add to Wait List in the Action Column. CGM webPRACTICE will immediately store the patient's appointment information in the Wait List.

If an appointment is added to the Wait List that was originally scheduled using a Resource Panel, all the appointments for the different Resources will also be added to the Wait List too.

Reschedule an Appointment
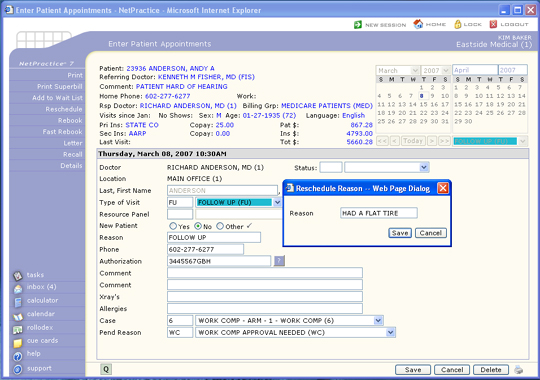
You can reschedule the currently selected patient appointment by clicking Reschedule in the Action Column. You will be required to enter the reason for the reschedule.

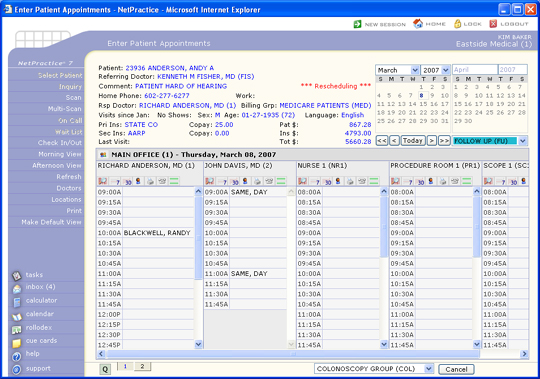
CGM webPRACTICE will store the appointment information in a temporary file and transfer you back to the Main Scheduling Window in 'Rescheduling' mode. The word 'Rescheduling' will appear in red in the Patient Information Section as a reminder that you are in the process of transferring appointment information to another date and/or time in the schedule. This message will remain on the screen until the appointment has been rescheduled.

You will need to navigate to the schedule date you want and then click on the appropriate time slot. When the appointment information screen displays, click Save to store the appointment in the schedule and complete the reschedule process. If you click Cancel in the appointment information screen, the message 'This appointment has not been saved. Are you sure you want to cancel?' will appear. If you click OK, you will be returned to the Main Scheduling Window to select a different date and/or time in the schedule. You will remain in rescheduling mode until you successfully save the appointment or click Cancel in the Main Scheduling Window to terminate the reschedule process and return the appointment information to its original time slot.

If you reschedule ane appointment that has a room attached to it, the room will automatically be rescheduled as well.

If a superbill has already been printed for this patient and the patient is re-scheduled for another day, CGM webPRACTICE will void the superbill number. If the patient is re-scheduled to another time slot on the same day, CGM webPRACTICE will keep the same superbill number.

If you are rescheduling a referral patient that has already been pre-registered, CGM webPRACTICE will update the referral file with the new appointment information.

Rebook an Appointment
There are two main differences between the reschedule and rebook functions. While the reschedule function removes the original appointment, the rebook function does not. The rebook function also allows you to repeatedly rebook the appointment (i.e. the patient needs to be scheduled once a month for the next three months). The rebook function will never retain a superbill number.

To rebook a patient appointment, click on the patient's name in the schedule in the Main Scheduling Window. When the Appointment Screen is displayed, click Rebook in the Action Column.

The Main Scheduling Window will now be displayed. Select the desired time slot for the new appointment by clicking in it.

The Appointment Screen for the rebook will be displayed. At this time you may modify the appointment details if desired and click Save to save the appointment.

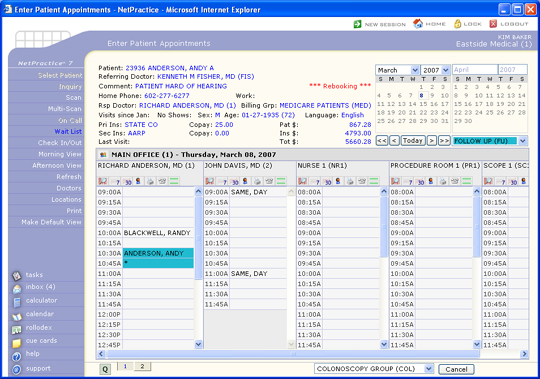
The word 'Rebooking' will appear in red in the Patient Information Section as a reminder that you are in the process of rebooking and will remain on the screen until you are finished rebooking this appointment.

Once you have saved the appointment, you may again click Rebook in the Action Column to continue rebooking this same appointment.

If the original appointment was not a registered patient, and you have since registered this patient, CGM webPRACTICE will give you the opportunity to select the patient number, prior to rebooking the appointment.

If the appointment being rebooked has a room attached to it, CGM webPRACTICE will automatically rebook the room as well.

Fast Rebook
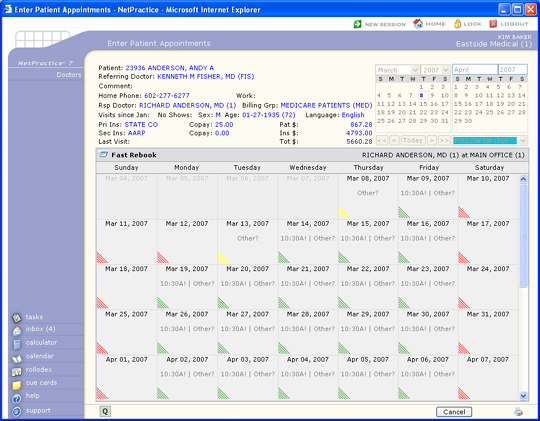
With the Fast Rebook function you can rebook a single patient appointment for multiple dates at one time. You cannot use this function to rebook a series of appointments that were originally scheduled using a resource panel. Fast Rebook differs from the rebook function in that you are not allowed to make any modifications to the appointment you are rebooking. Fast Rebook schedules an exact duplicate of the original appointment you select.

To fast rebook a patient appointment, select the appointment you want from the Main Scheduling Window by clicking on it. When the Appointment Screen is displayed, click Fast Rebook in the Action Column.

The Fast Rebook Calendar Screen will display. If the same appointment time is available for a day, the appointment time will display. If that time is not available, only Other ? will display. You can click either the appointment time to immediately rebook the appointment or click 'Other ?'. If you click Other for a day, a dialog box will display showing the other available time slots for that day. Click the time slot you want and the appointment will be saved.

You will be returned to the Fast Rebook Calendar Screen and you can continue to click future days/times to rebook again as needed.

Letter
You can quickly access the Print a Document function located on the Scheduling Printing Menu by clicking Letter in the Action Column. Using this function you can print directly within the schedule. You can print a letter for a patient even if the doctor code assigned to their appointment is set to Suppress Superbills in the Maintain Doctor Integration Codes function. This function is only available for registered patients. If your practice has 'Legacy' printers setup in Printer Maintenance, you will not be able to select them when printing a DMS Rich Text document. For additional information on printing letters for patients, see Print a Document.

Check In/Out
You can quickly access the Detailed Patient Check In/Out Screen for the selected patient by clicking Check In/Out in the Action Column. For information on the various functions available in Patient Check In/Out, see Detailed Patient Check In/Out Screen.

Recall
You can enter a recall for the selected patient by clicking Recall in the Action Column. For information on patient recalls, see Maintain Patient Recalls.

Details
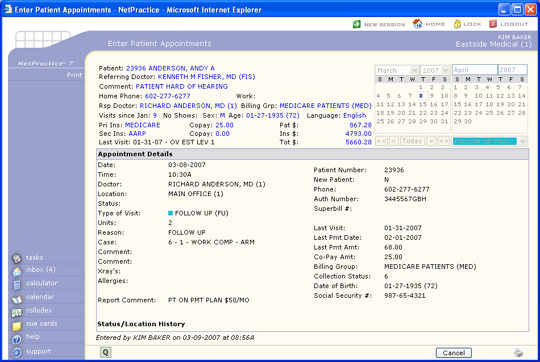
You can view additional detailed information for the selected patient appointment by clicking Details in the Action Column. You can see which User originally entered the appointment along with the date and time the appointment was entered.

You can print the Appointment Details Screen, by clicking Print in the Action Column. You can edit the appointment information using the Modify function in the Action Column as long as the appointment has not been deleted.

Scheduling for Family or Linking Billing Types

Scheduling Appointments for New Patients
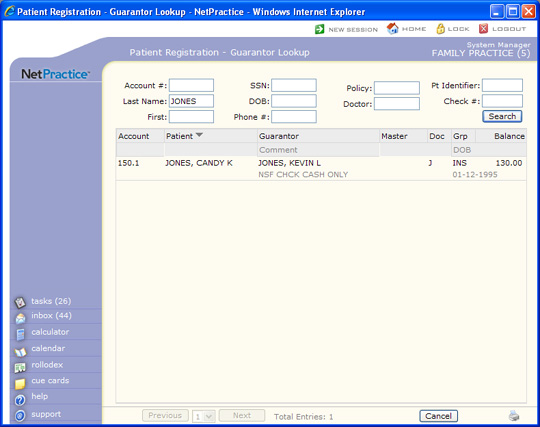
To add an appointment for a new patient, click Select Patient in the Action Column or click the time slot you want to schedule the appointment in. When the Enter Patient Appointments patient look-up screen displays, type the patient's last and first name. If you are sure they don't already exist in the database, click New in the Action Column. The Patient Registration - Guarantor Lookup screen displays. You can search for the existing 'Master Account' to attach the new patient to. To do this, click anywhere in the row containing the existing patient's information. If you do not want to attach the new patient to an existing account, click Cancel. For additional information on Family Billing, see Billing Type Conventions for Database Setup, Patient Registration for Family or Linking Billing Type and Change Patient Data.

If your practice has selected to Quick-Register ('Quick-Reg') patients, the Enter Patient Appointments quick-register screen displays. (You can Quick-Reg patients if you have selected the Register option in the Scheduling System Integration.) If you have chosen to add this account to an existing family, the Quick-Reg screen populates with the master account's/guarantor's information. The Rel to Guarantor is a required field so if you are adding a new patient to an existing master account, make sure you select the appropriate relationship so the account will be added correctly.

If the Pre-Register option is set in the Scheduling System Integration, you can schedule the appointment and complete the Patient Name and Address Information screen. You can then access the pre-registered account through Patient Registration. For additional information, see Patient Registration for Family or Linking Billing Type.